Showing posts with label macro photography. Show all posts

Saturday, 14 December 2024

OMG! - A Macro lens for my S5!

It's no secret that I've been struggling with photographic motivation over the last few years. My image production, and time spent out and about doing photography, has reduced insanely!

But if there is one genre that has pulled me slowly and inexorably back into the picture taking process, it's been fungi/macro photography.

Over the last two or three years, whenever I've posted on my blog (and no, dear reader, that hasn't been frequently), it's mostly been about macro/fungi photography. Therefore, not surprisingly, whenever I've gone out to take photos, it's to do fungi photography. I've even kept a Sony A99 around to shoot with because it has a specific 100mm macro lens. If I was going out fungi hunting I would leave my S5 at home, since I only had the 20-60mm 'kit' lens and standard 50mm f1.8.

That was, until very recently.

Sigma 105mm f/2.8 DG DN Macro Art

I had always hoped that I would one day get an L-mount macro lens for my S5, but given the price of them, I thought that 'one-day' would be a long way off! I had been keeping an eye on the Panasonic 100mm macro lenses on the second-hand market here in NZ, and a good copy is going for around $1300.00NZ (and about $1850.00NZ new). Yikes!! Too rich for my blood!

Fortunately for the L-Mount system, Panasonic (and Leica) aren't the only game in town. Sigma is also part of the L-Mount alliance, and bring another option to the table. And with their 'Art' range of lenses Sigma produce some of the best lenses in the world. As a third-party manufacturer, they also tend to be 'slightly' cheaper than the maker's own lenses. The Sigma 105mm f/2.8, brand new, is around $1100.00NZ - some $700.00NZ cheaper than the Panasonic. This is definitely a savings, but still a lot of money for a poor boy like me.

But recently, while looking through a New Zealand second-hand photography Facebook group, I came across the bargain I had been waiting for. A used Sigma 105mm f/2.8 Art Macro L Mount lens, at a very reasonable price. It was, in fact, for about the same price I thought that I could get for the Panasonic GH3 kit that I had sitting around unused. I'd purchased the kit at the start of the year when I thought I was going be doing a lot of real estate videography, but this never actually happened (don't get me started).  

Long story short, I sold my GH3 kit to a local photographer, contacted the seller of the Sigma on Facebook, and a few days later I was the very excited owner of a mint/like-new 105mm macro lens! It would be a month later before I would have the chance to get out and shoot with it, and pickings were slim this time of the year, but I did manage to find some fungi to shoot in my local area.

Coal Creek Fungi. Lumix S5 and Sigma f/2.8 DG DN Macro Art. f/18 @ 0.5 sec, ISO 400

The Sigma 105mm f/2.8 DG DN Macro Art is a beautiful lens -both in its construction and in the images it produces. It is packed with all the latest technology - as opposed to the Panasonic version which is very much a bare-bones offering. Both lenses have a focus limiter (fairly standard for macro lenses) and a MF/AF switch, but the Sigma also adds an AF lock button, an aperture ring, an aperture ring click switch and an aperture lock switch. The Sigma also has a dust and splash resistance structure, with water and oil repellant coatings.

Fade to Black. Lumix S5 with Sigma 105mm macro. f/11 @ 0.6sec, ISO 400.

Although it is a reasonably hefty lens at 715grams (over twice the weight of the Panasonic), it still balances well on the S5. The front half of the lens consists of a ribbed soft-grip to aid in manual focusing (important for a macro lens). The lower half is mostly smooth metal with aperture ring (yes, an actual aperture ring), and the aforementioned buttons. It's an elegant and practical design, making the lens a joy to use.

As well as being twice the weight of the Panasonic, it is also twice the height, especially with the provided lens hood attached. Despite this, the front element filter size is smaller than the Lumix offering (64mm for the Sigma and 67mm for the Panasonic). This, for me, is the only unfortunate thing with the Sigma. It would have been ideal if the filter thread was the same as the Panasonic so that I would only have to carry one set of filters. I do, however, already have a 64mm polariser - which is probably the only filter I'll need to use on a macro lens - so in the end its not a huge issue.

Stand out from the Crowd. Lumix S5 with Sigma 105mm. f/18 @ 1/6th sec, ISO 400.

As a first outing with the Sigma 105mm f/2.8 DG DN Macro Art lens, I'm very happy (ecstatic) with my purchase. From the moment I got the S5 and decided it would be my 'forever' camera, I've wanted to get a macro lens for it. I thought it would take me a lot longer than this to get one if I'm honest, so I am very grateful that the planets aligned and I was able to make it happen sooner.

I've still got a few technical 'tweaks' I want to make to the S5 when shooting macro images (I'm not sure I've set it up to make optimal use of the manual focusing aids the camera has to offer), but I've got a couple more months to get this sorted before fungi season really kicks in. 

At least my first outing with the lens was a great success! Bring on autumn and more fungi fun!

Monday, 10 April 2023

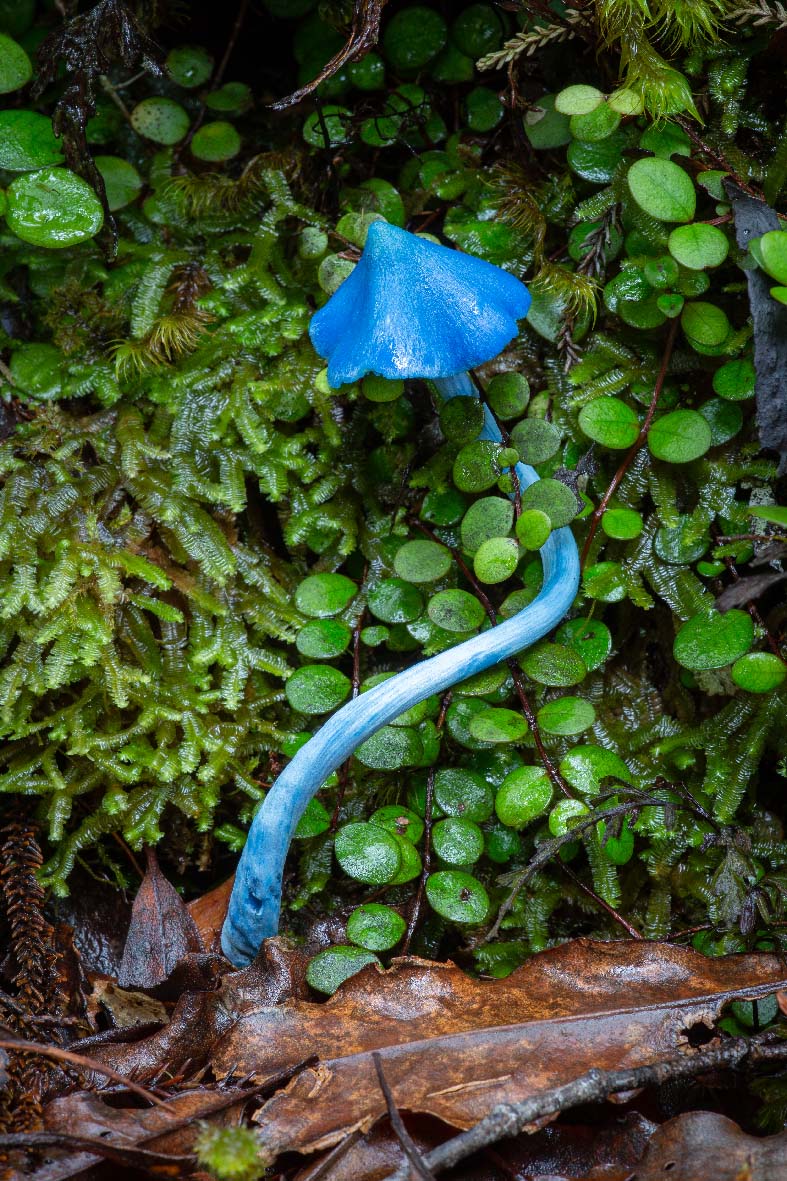
Photographing New Zealand's native Blue Mushroom

It is autumn here in New Zealand at the moment - and autumn for many photographers ushers in the start of something special - fungi season.

I'm a relative newcomer to fungi photography, having really only gotten interested at the tail end of last season. But I've got the bug - hard - and have been waiting patiently (or not so patiently as the case may be) for the new crop to start appearing. 

We have had a very hot, dry, summer on the West Coast of New Zealand - and it's taken a while for the rains to come. But come they have. And with it, comes the appearance of one of New Zealand's most iconic native mushrooms - the Blue Pinkgill.

Entoloma Hochstetteri - Blue Pinkgill. Sony a99 with Minolta 100mm macro. f/8 @ 1/3rd sec, ISO 100

Two weeks earlier (as I write this), my wife and I had taken a drive to Lake Kaniere. My wife has some friends coming from Australia to visit, and we were scouting locations to take them to. I suggested we go to Sunny Bight, to a small bushwalk there, and see if it was somewhere worth taking them to. It had been raining earlier in the week - although not a lot - so I really wasn't expecting much.

On the small walk at the Sunny Bight picnic area, we came across a little patch of Calocera viscoa, or Yellow Staghorn - a coral fungi that I had never seen before. I was very excited by this find and took a couple of quick snaps. But I didn't have my macro gear with me, so made a mental 'note-to-self' to return as soon as I could with my macro setup.

Calocera viscosa - Yellow Stagshorn. Sony a99 with 100mm macro. f/16 @ 2.5secs, ISO 100

Since the Sunny Bight picnic area walk is just a short 10 minute loop through native bush, we decided to explore further. Just past the picnic area is a dirt road that leads to the Lake Kaniere Walk - a 7hr return tramp that I had never taken a look at. We walked up the road, again surrounded by native bush, until we got to the carpark that is located at the start of the trail. Since neither of us were keen on a 7hr tramp, we turned around to head back to the picnic area. Just a few metres back along the road, a flash of brilliant blue caught me eye. And then another. And another! I stopped my wife and called her over, and together we discovered a a forest floor blooming with Entoloma hochstetteri - the native Blue Mushroom. 

I was so excited - never having seen one 'in the flesh' before. We spent the rest of the afternoon exploring, finding more and taking photos (mostly just snapshots), completely enthralled by this beautiful little fungi. It is the most beautiful, vibrant, almost iridescent blue. I was delighted to have discovered them, and couldn't wait to come back to photograph them properly.

Unfortunately, that wouldn't be until two weeks later!. Fortunately, they were still there - if not in even greater abundance than last time. Again I was so excited and set about making the most of my afternoon.

Twisted. Sony a99 with 100mm macro. f/16 @ 3.2secs, ISO100

With such a vast array of subjects, I was somewhat spoilt for choice. Believe me, I'm not complaining. But it did mean I could be a bit more picky about my subjects. Normally I come across one or two mushrooms and get to choose between the two. But the blue fungi were everywhere I looked! So much so that I needed to be careful where I walked (and I was - no mushrooms were harmed in the making of these photos).  I therefore started looking for either the unusual - or the most photogenic and prisitne examples that I could find. 

Mostly the blue mushrooms grow tall and straight. But the one exception I found was of the image above - appropriately titled 'Twisted'. As soon as I saw it I knew I had to take a photo of it - as unusual as it was amongst all the other upright specimens.

Out from Under. Sony a99 with 100mm macro. f/11 @ 1 sec. ISO 400

Entoloma hochstetteri is thought to engage in mycorrhizal relationships with Nothofagus and Podocarpus tree species. Mycorrhizas are beneficial fungi growing in association with plant roots, and exist by taking sugars from plants 'in exchange' for moisture and nutrients gathered from the soil by the fungal strands. The mycorrhizas greatly increase the absorptive area of a plant, acting as extensions to the root system. The native Kahikatea tree (a Podocarpus tree species) grows all around Lake Kaniere, providing a perfect breeding ground for the small blue mushroom species. Find a Nothofagus or Podocarpus tree species in New Zealand, and you are likely to find Entoloma hochstetteri at a certain time of the year.

Together alone. Sony a99 with 100mm macro. f/16 @ 15 secs, ISO 100

Photographing fungi is a bit like bird-watching - in that when you find and photograph a particular species you tend to tick it of your list. I wanted to find the New Zealand Blue, as occasionally it can be somewhat elusive. But not this year. This year there seems to have been an abundance at the start of the season - although that's the other thing about fungi. They seem to go as quickly as they come. Only to be replaced by another species as the season progresses.

I don't know what I'll find the next time I'm out on a fungi forage - but that's also a large part of the fun. But whatever the season brings, I'm thrilled that I've already got Entoloma hochstetteri in the bag!

Friday, 28 January 2022

Messing around with macro

I've been on holiday for most of the start of January 2022 (yay!), spending time in Christchurch, house (and dog) sitting for my sister-in-law and her family. Since we were staying for a while, we took a lot of stuff with us (the golf clubs and trundler came), so I decided not to take both the Olympus and Sony camera systems I'm currently using.

I would have opted for the Sony a99 and 50mm macro - since I'm trying to make macro my new thing - but I also knew that I was going to get the opportunity to shoot a family portrait while we were over in Christchurch (of said sister-in-law's family). So I opted for the Olympus E-M1 with 12-35mm f2.8 instead.

Oh Bee-have! Olympus E-M1 with Lumix 12-35mm. f/4 @ 1/320th, ISO 200

The Panasonic Lumix 12-35mm has no psuedo-macro features like those found on the Olympus 12-50mm EZ lens, and it's closest focusing distance is only 25cm. So not a fantastic macro performer. All the photos you see in this post, taken on the 12-35mm, are severe crops from the original shot, so that the subject (the 2cm bee) can fill-the-frame. This means that the original 12 megapixel file gets reduced to only around 1 megapixel with the final crop. Not ideal. But good enough when viewed on-line. 

Hard at Work. Olympus OM-D E-M1 with Lumix 12-35mm f/2.8. f/5 @ 1/640th, ISO 400

And I must say, that overall I'm very pleased with the final results (despite the small file size). I spent a very pleasant hour in a park in Rangiora, chasing bees around the flower gardens, and came away with some half-decent images. The E-M1 was quick to focus, using the central focusing point in single-autofocus mode, and simply firing away with reasonable shutter speeds, hoping to freeze the action (boy do bees move fast).

The original capture of the above crop is shown on the left, to give an indication of how much cropping has taken place. And yes, it is a lot. I'm not going to be printing any of these at  A3 (or probably even at A4) sizes anytime soon.

This is certainly one of the down-sides to using a smaller micro four thirds sensor with a 'standard' lens and trying to come up with decent 'macro' looking images. Really you're just hoping for an exceptionally sharp result that you can then blow up to exorbitant proportions and pass-off as a macro image.

Having said all that, as I commented earlier, I am reasonably happy with the results. The Panasonic Lumix 12-35mm f2.8 is a very sharp lens, so if you nail focus you can expect some very good results. And the benefit of using a smaller micro four thirds sensor when close-focusing is the greater depth of field you get with smaller apertures. f/4 on the E-M1 gives an equivalent dof of f/8 with full-frame, but allows for the extra light, and faster shutter speeds. So that's a win.

'As busy as a....' Olympus E-M1 with Lumix 12-35mm. f/5 @ 1/1000th, ISO 400

To get the bee as sharp as possible from such a big enlargement, I've opted for some selective sharpening techniques (just on the in-focus areas of the bee itself). It's a simple technique, but I find it very effective. And the best thing about it is that it is infinitely controllable, and selective.

Duplicate the original image in Photoshop (Ctrl+J), and then apply a High Pass Filter on the duplicate layer (Filter/Other/High Pass) with a radius of about 2. The image with turn grey, with a faint embossed outline. This is what you want. The magic happens in the next two steps.

In the blending mode for the grey layer, choose either Hard Light or Vivid Light. Then add a layer mask and fill the mask with black. This effectively hides the sharpening that you've applied with the blending mode. Choose a soft brush, make sure that the colour is white, and then paint over the areas where you want to reveal the sharpening. You can build this sharpening up gradually over different areas by lowering the opacity of the brush, and you can also lower the opacity of the layer if you feel that the final result is still too strong? And there you go - a nice sharp bee without adding any sharpness or artifacts to the background.

Time for a rest. Sony a99 with Minolta 50mm macro. f/5 @ 1/640th, ISO 400

My final image was taken just recently, once we got back from our trip to Christchurch and were on a local bush walk. This time I did decide to take the Sony a99 and dedicated 50mm macro instead. 

The difference in file size is day and night. Because I was able to use the dedicated macro lens, and get in fairly close to the dragonfly, there is almost no cropping required from the original file. I could print this A3 no problem.

Unfortunately, it's a bit of a grab shot, and I used autofocus, which locked on to the dragonfly's back and didn't quite nail critical focus on the head. In that regards, it's a failure as a macro image. Using the 50mm macro on the full-frame camera has meant that I had to get in very close to the insect - too close for it's comfort - and it flew away fairly quickly. A 100mm macro would afford a little more 'breathing' space, and that's certainly what I would opt for if I was to get a dedicated macro lens for my E-M1 (the 60mm Olympus macro is a 120mm full-frame equivalent field of view).

Still, it's an ok image - especially when viewed on-line - and it's still all a learning curve for me and macro. I'm getting the feeling that you have to shoot A LOT of images just to nail one or two keepers, especially when small flying insects are involved!?

All-in-all some OK early attempts, and lots of learning for the future. That's got to be worth my while wouldn't you say?


Tuesday, 11 January 2022

Possible gear for macro

In my last post I discussed my recently discovered enthusiasm for fungi (and therefore macro) photography. I also mentioned that I had briefly dabbled in this very genre last year - first with the Sony a99 and then with my Olympus OM-D E-M1.

Fungi photography with the Olympus OM-D E-M1

I still have both systems available to me, so now that I have decided to pursue this style of photography a bit more seriously in 2022, I have a few decisions to make around the type of gear I will need going forward.

First option is to stick with my micro four thirds system, and add to it, to cover macro photography. To do this 'seriously', I would be looking at purchasing the Olympus 60mm f2.8 macro lens.

By all accounts (I've never even held one), the M Zuiko 60mm macro lens is a stellar lens, offering waterproofing and 1:1 magnification. It certainly looks the part - is apparently tack sharp (I don't doubt it) - and would balance perfectly on my E-M1.

Olympus do offer a 30mm f3.5 macro lens as well, but it's not weather sealed, doesn't go to 1:1 magnification - and is a 60mm equivalent full-frame focal length, which isn't as conducive to shooting skittery insects (since you have to get physically closer with the lens). On the positive side, it's a bit cheaper than the 60mm ($450NZ for the 30mm and $600NZ for the 60mm) - but that seems to me to be the only real positive. I'd rather spend the extra for the 60mm (120mm full frame focal length equivalent) than 'settle' for the 30mm and wish I had the 60mm, especially if I am really serious about pursuing macro fungi photography.

The second option is to move to the Sony A-mount system, since I already have access to a 50mm macro for Sony A-mount (it's actually a Minolta AF lens), as well as a few other lenses. The Sony a99 I have at the moment is being borrowed from a friend, together with the 50mm macro, a fisheye, standard zoom and wide angle zoom - so I've got the lenses pretty well covered. I will have to give the a99 back at some stage, but I'm pretty sure I can keep the 50mm macro long-term, since I know the guy I borrowed it from also has a 100mm macro that he uses instead.

If I sold my E-M1 with all accessories and lenses, I could possibly get about $1k (maybe). With that sort of money I could pick up a used Sony SLT 65v or a55 and have a decent chunk of change left over for spare batteries and other accessories if required.

This option has some appeal, not withstanding the fact that the dedicated 50mm macro would get me up and running straight away with a macro lens. If I sold my Olympus gear, I would actually end up in the black, even after purchasing a Sony body. Whereas if I have to wait to be able to afford an Olympus 60mm lens - even secondhand (if one comes up for sale) - it will probably be 2024 before I can actually afford one! Damn...

There is, however, a third option. I already have the a-mount 50mm macro lens - why don't I just adapt it to fit the Olympus E-M1? A mount adapter like the one shown here, will cost me around $45NZ - and viola, a dedicated macro lens for my E-M1.

Yes, this means that the macro lens will be manual focus only - but that's par for the course with macro photography anyway. So no great loss there. And, when fitted to my micro four thirds camera, the Minolta 50mm macro lens becomes a 100mm macro lens focal length equivalent - again great news for a comfortable distance to subject when shooting. So option three is sounding like a win-win.

It also means that I can continue to use my E-M1, which has a whole host of advantages when using it for macro photography. There is greater depth of field when using the smaller sensor - which is helpful for keeping very small areas in sharp focus at lower apertures. It has crazy-good in-body image stabilisation - again very helpful when shooting insects handheld. The body is weather sealed (excellent when out in damp forest conditions), it's very light-weight and portable (never a bad thing), has focus peaking and manual focus magnification aids - and also has built-in focus bracketing and focus stacking - in camera! This camera was built for macro photography! Are you serious!!!! Option three baby! I love option three!

In all seriousness, sticking with the Olympus E-M1 and adapting the Minolta 50mm macro to it does seem like the perfect solution - at least until I can afford that 60mm M Zuiko. For $45NZ I'll be up and running with an excellent macro system, and I may even find that I don't need the 60mm Olympus lens at all?

It will also mean that I can use the Mecablitz flashgun I have for the Olympus in an off-camera wireless flash setup, or I could keep it even simpler and use the Godox LED cube (pictured opposite). Or both.

I've looked into purchasing the a-mount to micro 4/3 adapter from a local retailer, and they can have one for me by the end of February. In the meantime, I still have the Sony a99 and 50mm Minolta macro lens, and I'll  use that combination until the adapter for the E-M1 arrives. That will give me a month to see if I really am serious about this macro-fungi thing - and a month to fall in love with the Sony A-Mount system and change my mind about staying with Olympus! 😉  Me - change my mind? Never!

Sunday, 9 January 2022

Fungi photography in 2022

It's been about three months since I've posted anything on this blog. Did you miss me?

Yeah - thought not.

I have been posting content on this blog for sixteen years now, and I've known for some time that I'm really only doing it for myself. Yes, I get some views (yay), and some of you have even read and commented (thank you) - but my stats from Blogger have never been great. Or even good.

But hey - this isn't a 'pity me' posting. Far from it. I'm actually quite excited about photography again - hence the new post. I haven't been 'excited' about photography - in general - for a while now. Don't quite know why? Maybe it's burn-out? It's been my passion (sometimes all-consuming) for the past 36 years of my life. And that's quite a long time to sustain any passion/hobby/creative pursuit.

I was talking about this recently with a photographer friend of mine, and I can trace my loss of interest in photography back almost two years, to a major trip I went on to Golden Bay. It was a family holiday, but we went with other photographers, so it was always going to end up more of a photography trip. And it was. Ten days of almost non-stop sunrise until sunset photography. And I'm not going to lie - I had a blast! One of the best trips of my life.

Wharariki Beach, Golden Bay. Fuji XE2

But I also got back from that trip suffering from a bit of photography overload. And I think it's taken a couple of years to recover if I'm honest.

To be fair - COVID didn't help, and we've been through two lock-downs here in New Zealand since getting back from the Golden Bay trip. And then there was the issue that I was having with my E-M1 that meant it had to go in for repair. But as disruptive as those events may have been, I really think that photographic burn-out is the root cause for my relative disinterest over the last two years.

However, a recent trip to a local forest with my wife may have changed all that. At least I'm hoping it has...

Hygrocybe Firma - Canoe Cove Walk, Westland.
Olympus E-M1 with Panasonic 12-35mm. f/3.5 @ 1/100th, ISO 800

We have been having glorious weather so far this summer, so while I was on holiday over the Christmas/New Year period we decided to make the most of it and go on a few walks. It had been a while since we had visited the Lake Kaniere region in South Westland, so we decided to do a few short walks there - starting with the Canoe Cove Walk.

I took my EM-1 with me, more out of habit than the expectation of a good photo. And we were only 5 minutes into a 15 minute walk when my wife stopped me and remarked on the beautiful red mushrooms that she had spotted next to the path.

To be honest, I hadn't seen them at all, and would have continued on straight past them if she hadn't seen them and stopped me. And to be fair, they were tiny. Only about 5 to 10mm in diameter. But my wife had seen them. And once she stopped me and showed them to me, something sparked in me again and I knew I had to try and photograph them.

Hygrocybe Firma - Canoe Cove Walk, Westland.
Olympus E-M1 with Panasonic 12-35mm. f/3.5 @ 1/60th, ISO 800

Just so we're clear, I know these aren't great fungi images. By any stretch of the imagination. They are what they are - record shots. I know I can do much better. And that's the point. I'm fired-up, photographically speaking, to want to do much better.

For a start, they weren't taken with a macro lens - just the Panasonic 12-35mm f2.8 that I happened to have on the camera at the time. A stellar lens btw... just not the 'ideal' fungi photography lens.

Also, the composition isn't great, since I took them hand-held, didn't have a tripod with me, and wasn't about to start lying down in the middle of the forest track. This was a recreational walk that sparked a photographic interest - one I intend to pursue in greater detail in 2022.

Pluteus Velutinornatus - Canoe Cove Walk, Westland.
Olympus OM-D E-M1 with Panasonic 12-35mm lens. f/4.5 @ 1/500th, ISO 800

I took a few macro fungi images in 2021, and also enjoyed the experience. I even blogged about it here and here. Macro photography has always looked a lot of fun, but at the same time, also seemed like some strange and dark art? I have owned one or two dedicated macro lenses over the years, but I've never really made good use of them, or explored the genre with any real intention or purpose. And yet I've always enjoyed it, and liked the results - even with my meager understanding. So I think 2022 is the year to take this macro stuff a bit more seriously!

I'll write about what that means, and might look like gear-wise, in my next post. But for now I'm just jazzed that I'm finally getting excited about photography again!

New Zealand Native Tree Fern. E-M1 with 12-35mm. f/2.8 @ 1/200th, ISO 800

Of course if you go into the bush, fungi isn't the only thing you'll find. Thought I would finish this post with my favorite image from the walk - a tree fern frond. These are beautiful plants that grow in the New Zealand bush, and I always try to get a photo of the frond unfurling when I find them. This one turned out particularly well (if I do say so myself). So I guess fungi won't be the only thing I will point my camera at when I'm out in the bush this year 😀

Saturday, 15 May 2021

More fun with Fungi - Olympus OM-D E-M1

Last weekend I went out with a Sony a-99 and 50mm macro lens and took some fungi photos at a local forest (see last post). I had a lot of fun, and was very happy with the photos once I got the hang of the macro lens. But I also said I didn't enjoy the weight of the kit, and would like to try taking similar photos with my lighter Olympus OM-D E-M1. I was also keen to try out the 'macro' function on my 12-50mm f3.5/6.3 EZ lens.

This weekend I got the chance to go out again for a couple of hours on Saturday morning, so I headed to the same spot, expecting to be able to take the same photos. What a difference a week makes to fungi in the forest!

First setup with OM-D E-M1 & Lumix 45-150mm f4/5.6 lens
Overnight on the Friday we had some very wet and wild weather conditions, but I knew the area I wanted to shoot in was fairly sheltered from the elements. Even so, when I got there I found that practically all of the fungi I had seen the previous weekend were totally destroyed! Bummer.
Luckily, there were one or two in the area remaining, so I choose my first subject and set up the first composition.

Because the E-M1 is a lighter rig than the full-frame a-99, I was able to bring my smaller, lighter tripod and still have a very stable support for the camera. In fact, I brought two tripods along with me on the shoot. My Manfrotto travel tripod (seen in the first setup image) as well as my Manfrotto 'Pixi' tripod that I normally use for vlogging. It's a very small, yet stable table-top style tripod, with a solid ball head and slightly extendable legs, that I hoped I could use to set the camera up closer to the fungi. As it turned out, for my first image I decided to use my longer telephoto lens, the Panasonic Lumix 45-150 f4/5.6, and shoot from a distance using the long telephoto end of the range.

Yellow fungi. Olympus OM-D E-M1 with Lumix 45-150mm lens. 1/13th sec @ f/11, ISO 1600

I had tried to set up the 12-50mm EZ lens in macro mode, on the steep bank that the fungi was growing out of, but I just couldn't get the balance right with the camera attached to the small 'Pixi' tripod. So I opted to pull back instead and use the larger tripod on the track, with the longer lens. The image still has the effect I was after, with the fungi filling the frame and placed in context with its surroundings. 

Second setup with E-M1 & 12-50mm EZ 
For the second fungi, growing out of a drainage ditch on the side of the track, I knew I could get down low and use the macro function on the 12-50mm EZ lens. It also meant that I could use the 'Pixi' tripod, since it fit perfectly into the width of the ditch.

As you can see from the second setup image on the right, the articulating flip-up screen of the E-M1 came in very handy. With the camera on a small tripod, placed into a ditch, getting down to see through a normal viewfinder to take a photo would have meant lying down on the forest floor and getting very dirty. Not to mention extremely uncomfortable.

But with the screen articulation found on most modern cameras, shooting from these crazy low-angles is actually a breeze. When cameras first started appearing with flippy-out screens I honestly thought they were a fad. Now I wouldn't have a camera that didn't have one. Times, they are a changing...

Macro mode on the M Zuiko 12-50mm f3.5/6.3 EZ lens is available only at the 50mm end of the lens (which makes sense) and is accessed by holding down the 'macro' button on the lens and moving the lens barrel forwards to engage macro mode. This then allows a close-focusing distance of 20cms, with a maximum magnification of 4.2X. I'm not a big macro guy, so all the facts and figures start to sound all a bit Greek to me.

OM-D E-M1 on the Pixi-pod, in the drainage ditch
What I care about are results. And the results with the 12-50mm f3.5/6.3 in macro mode are (to me at least) fantastic. For the fungi images I wanted to capture, the M Zuiko lens in macro mode gave me just as good an image as the dedicated 50mm macro gave me using the Sony a-99. I do stress, again, that I'm not a macro shooter, so take all this with a grain of salt. 

But with the lens engaged in macro mode, and placed around 20 cms from the small fungi I was using as my subject, it was easily able to fill the frame and give me a sharp, close-up, fungi photo.

And speaking of sharpness, there were a few settings I changed on the camera from my normal shooting style to help facilitate a nice macro image.

Cute as a button. Olympus OM-D E-M1 with M Zuiko 12-50mm EZ. 1/200th @ f/8, ISO 1600

First, because the camera was on a tripod, I turned image stabilisation off. Not needed when on a tripod. However, since macro requires reasonably small apertures, which in turn gives somewhat slower shutter speeds, I also set the 2 second self-timer on the camera, to give it time to settle before taking the shot. Even though it balanced ok, the Pixi-pod isn't the sturdiest tripod (nor is it meant to be), so I gave it a helping hand with the 2 second timer.

I also switched the camera into manual focus, and turned 'peaking' on - just like I had when using the a-99 the week prior. This made it super easy to see the in-focus areas when manually focusing. It was also a very helpful visual aid to see how deep the depth of field was when changing the aperture. You can see at f8 above, that the in-focus area just covers the fungi. The moss it clings to is sharp just before it, and falls away quickly directly behind it. Stopping down to f/16 or f/22 would have increased the area of sharpness, but by using the peaking function I could choose the exact aperture necessary to just cover the fungi, giving me the result I was after. The fungi head 'pops' as the background blurs out.

Puffball. OM-D E-M1 and Lumix 45-150mm lens. 1/25th @ f/10. ISO 1600

I used the peaking technique on this top-down image of the fungi as well, to ensure that the ball itself was in sharp focus. f/10 did the trick, this time with the Panasonic Lumix 45-150mm lens, zoomed all the way out to 150mm.

I quickly got used to the macro 'manual focusing using peaking' technique. Setting up different shots was quick and easy, and the hour flew by. I did, however, make one rookie mistake - which the observant among you may have already picked up on. I shot everything at ISO 1600!

I only realised this as I was packing up to head home, and was re-setting my camera back to its normal (for me) settings. I kicked myself for making such a stupid mistake. But, then again, have a look at the images in this post, and tell me you would have picked that they were shot at ISO 1600 on micro four thirds if I hadn't 'fessed-up' and told you? Photographers who say that you can't go past ISO 400 with micro four thirds are talking through the proverbial hole in their heads. Yes, of course, I would have preferred to have shot these at ISO 200. But ISO 1600 is far from un-useable as some would have you believe. I certainly wouldn't hesitate to crank the ISO up to 1600 on the E-M1 if I needed to for the lighting conditions. 
 
Stand tall. OM-D E-M1 with Lumix 45-150mm lens. 1/6th sec @ f/16. ISO 1600

I've said at several stages in this post that I'm not a macro photographer. And I'm not. I appreciate that these aren't 'true' macro images, and that a 'real' macro photographer would have made a lot more of these subjects than I have.

But, having said that, for someone who just wants to have the occasional 'play' with some close-focusing, and who has no intention of owning a dedicated macro lens, then the M Zuiko 12-50mm f3.5/6.3 EZ with macro function is the bees knees 😃

Sunday, 9 May 2021

In Memoriam of the Sony A-mount

Alas, poor Sony A-mount, I knew you well (kind of). 

Sony has recently discontinued all of their A-mount products, quietly deleting them from their website. This includes their SLT line of cameras (a-99, a-77 etc), as well as all A-mount lenses. It's a shame, but also no great surprise, since their interest in the A-mount had waned considerably over recent years.

And let's face it, Sony aren't the only culprits. The world has 'gone mirrorless'. All SLR technology is going the way of the Dodo, and I wouldn't be surprised if Nikon, and then Canon, quickly follow Sony's lead and officially end production of all DSLR's. Nikon have the new 'Z' mount for their mirrorless system, and Canon are concentrating on boosting their RF lens lineup - so their can't be much (if any) R&D being put into their 'traditional' DSLR systems anymore? Canon have already stated that there will be no 5D MkV - putting an end to their incredibly popular 5-series full frame DLSR line. Surely that does not bode well for their other DSLR products either? 

I'm not lamenting the fact, other than for pure nostalgic reasons. I've been an advocate for mirrorless systems for a long time, and am thrilled that both Nikon and Canon have finally 'got in the game' seriously. It is the future, and always was the future. We can look forward with great excitement - whilst also shedding a small tear for the past.

Not that the past is going anywhere in a hurry. The used market will remain buoyant for another 20 years at least, with DLSR cameras and lenses that photographers will be more than happy to trade, collect and use. We may even see something similar with what happened to film cameras? There may be a ten year (or so) period where, because of the new technology,  DLSR's will be seen as largely worthless and available at ridiculously low prices. Followed by a resurgence in popularity (and price) as those who were raised on mirrorless 'discover' these old gems and start using them again. Maybe? Just a thought.

Surmising aside, when I heard that Sony had discontinued their A-mount products, I did come over all nostalgic-like. I have owned, and used, several Sony A-mount cameras over the years, and they were always very solid - and in some cases outstanding - performers. Case-in-point, the flagship full frame Sony a-99, which I just happen to have 'on loan' from a friend at the moment. An amazingly capable full frame DLSR - built like a tank and a joy to use.

And then, of course, there's the extra nostalgic tug of Sony's association with Minolta - a camera company that I truly loved. The A-mount was, of course, actually a re-branded Minolta M-mount, with all of Minolta's AF lenses being fully compatible with Sony DSLR's. With Sony's discontinuation of all things A-mount, all vestiges of the old Minolta camera company are now truly dead. And that really does sadden me.

Yet as I said earlier, I have moved on to mirrorless, currently with the Olympus OM-D EM1. But since I had the Sony a-99 kicking around, and with my thoughts freshly on the news of the A-mount demise, I decided to pay homage to the A-mount (and Minolta) and take the a-99 out for one final spin.

Coal Creek Falls. Sony a-99 with Minolta 17-35mm. 1/5th sec @ f8, ISO 64. Polarising filter

It was a very dull, overcast morning, so I decided to once again head out to my local waterfall. It's Autumn here in NZ as I write this, and the fungi are out in full force. Since I had a Minolta 17-35mm ultra-wide, and a Minolta 50mm macro as my two lenses, what better place to visit than the native bush.

Growth. Sony a-99 with Minolta 50mm macro. 1/5th sec @ f5.6, ISO 64

I'm not all that used to using a macro lens, so it took a while to figure out the process.. Eventually I realised that if I set the camera up on the tripod, and then manually focused, I could get better results than using the AF. Manually focus was a breeze, since the a-99 has a 'peaking' feature which automatically activates when you switch to manual focus. The 'in-focus' areas are indicated with a bright red outline so you can clearly and confidently set your focus. This feature isn't unique to the Sony's (it's also available on my Olympus EM1), but it's still nice to see it on the a-99.


Fungus stack. Sony a-99 with 50mm macro. 1 sec @ f22, ISO 800 

I said earlier that the fungus would be out in force this time of year, and I wasn't disappointed. They were everywhere, in all shapes and sizes, and I could have spent all day photographing them. It was a lot of fun, and not my normal subject matter. I enjoyed using the macro lens, and as already stated, the a-99 made this process very easy. 

Not only was peaking for sharpness helpful, but the fully articulating 3" screen was also greatly appreciated. It's one of the best designs I've ever used for screen articulation - being able to be positioned at almost any angle. It meant that I could place the camera and tripod very low to the ground, but raise and angle the LCD screen so that I could easily compose the shot without having to lie down on the wet forest floor. If I did a lot of forest fungi photography, I would seriously consider the Sony a-99 as my main camera for its articulated screen alone.

Button Fungi. Sony a-99 with Minolta 50mm macro. 1/2sec @ f16. ISO 800

While I appreciated many of the features available on the a-99, and did thoroughly enjoy my morning out with it, there was one thing I was very aware of that I didn't enjoy - the size (and weight). I know people harp on about this as the main factor many switch from a DLSR to Mirrorless - but I guess there's a reason for this. In the end, it's true. And it's not just the camera body, it's all the other associated products like lenses and tripods, that go together to add on the weight.

As a fully professional DLSR, you would expect the full frame a-99 to be built like a tank. And it is. The fully magnesium alloy body weighs in at around 733 grams, which is actually one of the lighter full-frame body weights. The Canon 5D MkIV, for example, weighs 890 grams, while the Nikon D850 is a whopping 915 grams. And this is without battery and lenses mounted. In comparison, my Olympus OM-D EM1 weighs 497 grams, including the battery. And the lenses offer even a greater weight saving.

Between two ferns. Sony a-99 with Minolta 50mm macro. 1/5th sec @ f/16. ISO 800

Since I was taking the a-99, and knew I would have to position it in some fairly precarious angles, I also decided I needed my largest (and most heaviest) tripod. After a morning of lugging the camera and tripod and lenses around the forest, I must admit I was wishing I had my Olympus gear instead. And I do plan to go back and take some more fungi images with my Olympus gear. Next time to try out the 'psuedo' macro on the 12-50mm f3.5/6.3 EZ lens.

Depth of field test. Sony a-99 with Minolta 50mm macro. Left: f/11. Right f/4

For most of the morning, since I was shooting with a macro lens, I set a fairly small aperture so I could get as much depth of field as possible. Around f/11 to f/16 was the norm, and sometimes even going up to f/22. This helped to keep most things in the image in sharp focus.

But there were also times when I played around with a narrower depth of field for a little more creative effect. The above example shows how aperture value can greatly effect the look and feel of an image when you are close-focusing with a macro lens.

Fly Agaric (amanita muscaria). Sony a-99 with Minolta 50mm macro. 1/13th sec @ f/5.6. ISO 400

Despite what I said earlier in regards to the weight of the a-99, plus lenses, plus tripod, I did enjoy my morning out shooting fungi in the forest with the camera. It has several features that make it ideal for this type of photography - not to mention the beautiful 24mp images that it produces. But then again, even that feels a little 'overkill' for me - though I realise that's almost blasphemous to say in this age of full-frame high-megapixel camera worship.

But for me, at least, it's true. I've said so on this blog over and over again. I don't need 20+ megapixels, and I strongly suspect you don't either. 12mp is probably more than enough for most use-cases, and yes, that includes large billboards.

So as I said right at the beginning of this post, I'm not lamenting the demise of Sony's A-mount. Although I realise that maybe some will. But probably not many. Most have probably already moved on to Sony E-mount, or Nikon Z, or Canon RF, or (perish the thought) micro four thirds.

And for those who do still want to stay with A-mount, maybe it's actually good news? Maybe the prices on the secondhand market will come down as people sell off their 'outdated' gear - just as they did in the days of film switching to digital?

Whatever happens, I'm glad we have the Sony/Minolta A-mount equipment that we can use for many, many years to come. No, there won't be any new releases. But that a-99, or a-77, or a-300 and associated lenses that you have will still work for the foreseeable future, and may even be serviceable by the right camera technician. So enjoy them while you can. And thanks, Sony, for the great products that bear the A-mount name. It was/is a great system.  

Tuesday, 12 March 2019

Olympus MCON-P02 Macro Converter - Initial impression

Macro photography is something I've only ever dabbled in briefly. This is despite owning more than a few macro lenses in my time. But macro lenses also tend to be viewed as quite 'specialist' optics, and therefore not a lens that you look to get early on when putting a kit together - unless, of course, you happen to be a dedicated macro specialist. Which I am not. I do, however, like to dabble...

Olympus MCON-P02
Olympus make two dedicated macro lenses for their micro four thirds cameras - a 30mm f3.5 and a 60mm f2.8. I 'may' end up getting one of them one day (the 60mm is especially tempting), but in the meantime, I need to consider other options.

Enter the Olympus MCON-P02 - a screw-on converter that increases the image magnification of certain M.Zuiko lenses. Most are primes (like the 45mm f1.8 or the 25mm f1.8 which are both lenses I may look at in the future), but it also works with one zoom lens - the 14-42mm f3.5/5.6 kit lens that came with my Pen E-P3.

I saw an MCON-P02 for sale recently on Trademe, and the seller had lowered the price for a quick sale. Good enough for me, I thought, and I snapped it up - mint, in box. It arrived a few days later, as advertised, although the box was a little worse for wear.

Olympus suggest that the MCON-P02 be used at the telephoto (42mm) end of the zoom range, giving you a close focusing distance of 22cm from the subject to the sensor - and a 0.38x magnification factor. They're all just numbers to me. What does that actually look like in practice?

Dandelion head. Olympus Pen E-P3 with 14-42mm f3.5/5.6 at 42mm. 1/800th @f8, ISO 400
The above image of a dandelion head is as close as I could get with using just the normal 42mm end of the zoom range. Olympus claim the closest focusing distance of the lens is 25cm, and although I didn't get out the ruler and measure it, this seems about right.

Dandelion Head Macro. Olympus EP-3 with M.Zuiko 14-42mm f3.5/5.6 with MCON-P02 Converter. 
The above shot is taken with the MCON-P02 attached. This time, minimum focusing distance has increased to 22cm. And although 3cm doesn't sound like a lot, in macro photography it can make quite a big difference. Both the images above are uncropped - as shot - straight out of camera. You are definitely receiving a magnification boost by adding the macro converter, although as previously stated, it's nowhere near dedicated macro lens 1:1 magnification.

Dandelion Head Macro 2. Olympus Pen E-P3 with 14-42mm f3.5/5.6 lens with MCON-P02 Converter.
At around NZ$145.00 new (as of March 2019), there are probably cheaper ways to increase the magnification of your lenses. Close-up filters for example. But since I didn't pay anywhere near $145.00 for my copy, I've probably come out on top. Would I buy one for full retail - no, I wouldn't. Will I use it a lot - no, I probably won't. But it's still a fraction of the cost of a dedicated macro lens. And it's probably worth every cent I paid for it in terms of the fun/experimentation factor it will bring to my photography. I'm already visualizing the fungi shots I'm going to try out with this combination in the next few months.

As I mentioned earlier, with macro photography every centimeter - heck, every millimeter - counts when you are shooting up close and personal. If the MCON-P02 can get me a few shots that I wouldn't otherwise have been able to get, then it's worth every measly penny I paid for it.