Showing posts with label Lumix S5. Show all posts

Friday, 2 May 2025

Shooting with the 65:24 custom ratio - XPan images on the Lumix S5

I can't afford a Hasselblad XPan  - who can nowadays? Here in New Zealand they can go for as much as $7000.00! But hey - that's with a lens buster! If, that is, you can find one. Rare as hen's teeth they are. People just don't want to part with them. And that's because they are:

  1. A Hasselblad
  2. An XPan - a camera that managed to be something not many other cameras are - truly unique.
I'm fairly sure I'll never own one, and for a long time I wasn't sure I wanted to (but oh, I do!). Because the XPan's image ratio is what sets this camera apart from most others (certainly in the 35mm film space). Its 65:24 'panorama' view could almost be seen as a gimmick. Or just plain weird. And that's what I thought when they were first introduced in the 1990's - the love-child of Hasselblad Sweden and Fujifilm Japan. The camera you didn't know you needed, until you saw one.

How many photos do you want to shoot at an extreme 65:24 aspect ratio? Isn't a bit of a novelty isn't it? A bit like a fisheye lens point of view. Get's old real fast. Am I right?

Nelson Waterfront. Lumix S5 in 65:24 aspect ratio with S 20-60mm . f/8 @ 125th, ISO 100

Nope. Turns out I'm wrong! Dead wrong. It looks like those clever Swedish/Japanese engineers knew what the hell they were doing when they designed the XPan. Shooting in the 65:24 aspect ratio is not only a whole heap of fun, but amazingly helpful when composing an image. And fortunately for me - even though I don't have an XPan, I do have a Panasonic Lumix S5, which just so happens to shoot in the 65:24 aspect ratio (amongst others).

In a recent trip to Nelson, my wife and I took a stroll along the waterfront in the early evening, hoping to get some half-decent photos of the boats and wharf. It was a lovely evening, with some very nice light. BUT, there wasn't much in the way of cloud action in the sky, or foreground action either. I shot for a while in the usual 3:2 aspect ratio, and wasn't digging the results. But then I thought to myself - 'self, what would it look like if I got rid of the foreground and bland sky, and shot XPan style'.

Boatshed Cafe, Nelson. Lumix S5 in 65:24 ratio with S 20-60mm . f/8 @ 1/50th, ISO 100

Boom! Instantly better photos! Well at least I think so. The Panoramic-style format has not only allowed me to get rid of the bland sky and foreground, but it also suits the horizontal composition of the building jutting out into the water. It 'accentuates' to horizontality (is that a word) of the subject - and I love it. And far from being the 'only' composition I could use it with, the opposite seemed to be true. Everywhere I looked there were images crying out to be 'XPanned'!

Fishing off the Wharf, Nelson. Lumix S5 in 65:24 ratio with S 20-60mm. f/8 @ 100th, ISO 100

Now I know what you're thinking. These aren't really 'XPan' images. They're just full frame 3:2 images 'cropped' in camera to produce the look of the 65:24 ratio. And of course, you'd be 100% keerect. But when you look through the viewfinder of the S5 in 65:24 ratio, that's what you see. And you can compose accordingly. A bit like when you switch the camera to shoot mono and you get to 'see' in mono through the viewfinder. It elevates the user experience in a way that 'pre-visualising' can't.

And just like shooting in monochrome, as long as you are also capturing a RAW image, then you are still retaining a colour 3:2 full-frame image. Actually - that's just given me an idea.... How about using the 65:24 aspect ratio and setting the camera to monochrome, for that truly old-school film shooting feel. I hadn't thought of that! (Note to self...)

Boat at Dusk, Nelson Harbour. Lumix S5 in 65:24 ratio with S 20-60mm lens. f/8 @1/25th, ISO 100

Sure, it means that you are 'throwing away' about half the megapixels in the image - but with a full frame camera and 24MPs they still end up being a decent size and have plenty of detail to work with in post.

And speaking of 'post' - I've made a huge change recently to my post-processing. I've dumped my Adobe Photography subscription and moved to something else for all my RAW processing and photo editing. What did I go with? I'll let you know in the next blogpost.... 😉

Serenity. Panasonic Lumix S5 in 65:24 ratio with S 20-60mm. f/8 @ 1/60th, ISO 800

I loved photographing Nelson Waterfront in the 'Hasselblad XPan' 65:24 aspect ratio. I had an absolute blast. And it proved to me that the 65:24 aspect ratio isn't just a gimmick. It's a bona fide choice for really strong compositions - with the right subject.

Is it enough to make me want a Hasselblad XPan? Yeah - it kinda is. It's certainly shown me that it wouldn't just sit on the shelf gathering dust. Will I ever use one 'for real'? Nah. Probably not. It's a bit like the Leica conundrum. Yes, I'm sure they are nice. But for that price, I'd rather have a couple more lenses for my Panasonic and change left over! Dreams, however, are free.....

Sunday, 16 March 2025

Exploring the Panasonic Lumix S5 Photo Styles

In my previous post I talked about getting back into film photography. And on that note, the film I ordered from AliExpress, that was due to arrive in about two months from that slow boat to China, actually only took a couple of weeks. Excellent! If I like the look of the 400 ISO Lucky film, I may have to order some more....

But why, in this day and age, would anyone want to shoot film (I hear you say)? And that's a very good question - thanks for asking. Well, one of the main reasons to shoot film relates to what I just said about the Lucky film from China. It has to do with the 'look' of the film. Its rendition of colour (or monotones). Its grain structure. The way it handles contrast - mid tones, highlights etc. 

It's the reason film photographers have favourite film stocks. Some like the 'look' of Portra, while some prefer Velvia. Which of course, also speaks to the Fuji vs Kodak debate. Fuji tends more towards greens and blues, while Kodak tends more towards reds and warm colour tones.

Film shooters will argue that they get to change their camera's 'sensor' every time they change their film stock. Kodak for portraits, Fuji for landscapes, and TMax for moody black and whites. Whereas a digital sensor is just an electronic device capturing 1s and 0s in a predictable and repeatable manner - right?

Cobden Lagoon. Lumix S5 with S20-60mm. L Classic Neo Photo Style + Low Grain.

Well, actually, digital camera manufacturers have gone to great lengths to reproduce colours from digital sensors in very specific ways. It's why two manufacturers can use the same digital sensor, and yet the images that they produce will be very different in the way they render colour. Very much like film shooters preferring a particular film stock, you will now hear digital photographers talk about preferring a particular 'colour science' from one brand over the other.

Every digital camera you buy offers 'Picture Profiles' (some call them 'styles') with titles like Landscape, Portrait or Natural (to name just a few). These give you different 'looks' to your photos - if you shoot Jpegs. If, however, you only shoot RAW, then these picture profiles are basically redundant (although they will be what you see through the viewfinder and on the LCD screen when you review the image).

Perhaps the manufacturer who has taken these picture styles to the extreme is Fujifilm. With a rich history of 'film' (duh), they offer styles called Velvia, Acros and Eterna (among others) that get baked-in to the jpeg and simulate their film stocks. An entire community has been created around photographers coming up with new 'recipes' that simulate film stocks for Fujifilm cameras. But they aren't the only players in the game...

Photo Styles from the Panasonic Lumix S5.

Above is an overview of the 15 Photo Styles (plus one with grain added) available in the Lumix S5. It may be difficult to pick up some of the subtle (and not so subtle) nuances in each style, but they are certainly different from each other. Many of the styles are 'as advertised', in that Natural is quite 'natural' looking, Vivid is more 'vivid, and Monochrome is - you guessed it - 'monochrome'. Others, like 'Landscape' or 'Portrait' are also fairly self-explanatory.

But then there are also options like L Classic Neo, L Monochrome D and Cinelike V2 which are a bit more out of the ordinary. L Monochrome (Lumix Monochrome - or Leica?) has been added to Photo Styles with the S series of cameras, together with Monochrome D and monochrome S. D is a more punchy b&w - more suitable for architecture and landscapes, while S seems tailored towards portraiture? That's how I would use them.

L Classic Neo is Panasonic's attempt at simulating colour negative film. The colours are intended to have a more nostalgic and gentle colour film look. And to be fair, it does a pretty decent job of it (see the first photo in this blogpost).

Another example of Photo Styles.

The final row of Photo Styles are more geared towards video shooting, although you can produce still images using these profiles. The final, V-Log is a very flat profile, ideal for colour grading of video, and not really useful if you are purely a stills shooter. I did, however, quite like the colour rendition using the Like 709 style on the landscape image above, so there's no rule that says you can't use these video-centric style for your photography. But again, remember these are for Jpegs only, so the resulting style will be 'baked-in' to the final image.

Greymouth Wharf from Cobden Lagoon. L Monochrome D + Grain High.

Almost all of the above examples are of Picture Styles using the default settings. Each individual Photo Style can also be 'tweaked' to create your own style (or 'recipe' to steal the concept from Fujifilm). The S5 allows you to programme a further 4 custom styles of your own making for quick recall. 

Adjustments such as contrast, highlight, shadow, tone, hue and sharpness can be set by adding or subtracting values and will vary depending on the picture style (you can't set hue and saturation in the monochrome styles for example). For Monochrome (and Classic Neo), you can also add grain structure in 3 settings (low, standard or high), as well as adding yellow, orange, red or green filter effects. The options are almost endless! With a bit of trial and error, I'm sure you could dial in something resembling your favourite film stock.

Grain can be set at either Low, Standard or High for that extra film look.

And if this wasn't enough, the latest Lumix S cameras (not my S5 unfortunately) can also accept LUTs - colour profiles that are usually used at the post-processing stage by videographers to simulate different colour gradings or film stocks. Fujifilm eat your heart out!

Photo Styles (or film recipes - call them what you will) were something that I played around with a lot when I was shooting Fujifilm cameras. It seemed like a natural thing to do when you were starting out with styles called Provia. But there's really no reason why you couldn't do the same thing with Lumix cameras like the S5 using their Photo Styles as a base. 

If you enjoy shooting jpegs, and trying to get a particular 'look' to your images SOOC (straight out of camera), then have a play with Photo Styles. I'm going to have a play with some of my own, and I'll share what I've come up with. Can I get Kodak TMax 400 and Fuji Velvia out of a Panasonic Lumix S5? Why not....

Saturday, 14 December 2024

OMG! - A Macro lens for my S5!

It's no secret that I've been struggling with photographic motivation over the last few years. My image production, and time spent out and about doing photography, has reduced insanely!

But if there is one genre that has pulled me slowly and inexorably back into the picture taking process, it's been fungi/macro photography.

Over the last two or three years, whenever I've posted on my blog (and no, dear reader, that hasn't been frequently), it's mostly been about macro/fungi photography. Therefore, not surprisingly, whenever I've gone out to take photos, it's to do fungi photography. I've even kept a Sony A99 around to shoot with because it has a specific 100mm macro lens. If I was going out fungi hunting I would leave my S5 at home, since I only had the 20-60mm 'kit' lens and standard 50mm f1.8.

That was, until very recently.

Sigma 105mm f/2.8 DG DN Macro Art

I had always hoped that I would one day get an L-mount macro lens for my S5, but given the price of them, I thought that 'one-day' would be a long way off! I had been keeping an eye on the Panasonic 100mm macro lenses on the second-hand market here in NZ, and a good copy is going for around $1300.00NZ (and about $1850.00NZ new). Yikes!! Too rich for my blood!

Fortunately for the L-Mount system, Panasonic (and Leica) aren't the only game in town. Sigma is also part of the L-Mount alliance, and bring another option to the table. And with their 'Art' range of lenses Sigma produce some of the best lenses in the world. As a third-party manufacturer, they also tend to be 'slightly' cheaper than the maker's own lenses. The Sigma 105mm f/2.8, brand new, is around $1100.00NZ - some $700.00NZ cheaper than the Panasonic. This is definitely a savings, but still a lot of money for a poor boy like me.

But recently, while looking through a New Zealand second-hand photography Facebook group, I came across the bargain I had been waiting for. A used Sigma 105mm f/2.8 Art Macro L Mount lens, at a very reasonable price. It was, in fact, for about the same price I thought that I could get for the Panasonic GH3 kit that I had sitting around unused. I'd purchased the kit at the start of the year when I thought I was going be doing a lot of real estate videography, but this never actually happened (don't get me started).  

Long story short, I sold my GH3 kit to a local photographer, contacted the seller of the Sigma on Facebook, and a few days later I was the very excited owner of a mint/like-new 105mm macro lens! It would be a month later before I would have the chance to get out and shoot with it, and pickings were slim this time of the year, but I did manage to find some fungi to shoot in my local area.

Coal Creek Fungi. Lumix S5 and Sigma f/2.8 DG DN Macro Art. f/18 @ 0.5 sec, ISO 400

The Sigma 105mm f/2.8 DG DN Macro Art is a beautiful lens -both in its construction and in the images it produces. It is packed with all the latest technology - as opposed to the Panasonic version which is very much a bare-bones offering. Both lenses have a focus limiter (fairly standard for macro lenses) and a MF/AF switch, but the Sigma also adds an AF lock button, an aperture ring, an aperture ring click switch and an aperture lock switch. The Sigma also has a dust and splash resistance structure, with water and oil repellant coatings.

Fade to Black. Lumix S5 with Sigma 105mm macro. f/11 @ 0.6sec, ISO 400.

Although it is a reasonably hefty lens at 715grams (over twice the weight of the Panasonic), it still balances well on the S5. The front half of the lens consists of a ribbed soft-grip to aid in manual focusing (important for a macro lens). The lower half is mostly smooth metal with aperture ring (yes, an actual aperture ring), and the aforementioned buttons. It's an elegant and practical design, making the lens a joy to use.

As well as being twice the weight of the Panasonic, it is also twice the height, especially with the provided lens hood attached. Despite this, the front element filter size is smaller than the Lumix offering (64mm for the Sigma and 67mm for the Panasonic). This, for me, is the only unfortunate thing with the Sigma. It would have been ideal if the filter thread was the same as the Panasonic so that I would only have to carry one set of filters. I do, however, already have a 64mm polariser - which is probably the only filter I'll need to use on a macro lens - so in the end its not a huge issue.

Stand out from the Crowd. Lumix S5 with Sigma 105mm. f/18 @ 1/6th sec, ISO 400.

As a first outing with the Sigma 105mm f/2.8 DG DN Macro Art lens, I'm very happy (ecstatic) with my purchase. From the moment I got the S5 and decided it would be my 'forever' camera, I've wanted to get a macro lens for it. I thought it would take me a lot longer than this to get one if I'm honest, so I am very grateful that the planets aligned and I was able to make it happen sooner.

I've still got a few technical 'tweaks' I want to make to the S5 when shooting macro images (I'm not sure I've set it up to make optimal use of the manual focusing aids the camera has to offer), but I've got a couple more months to get this sorted before fungi season really kicks in. 

At least my first outing with the lens was a great success! Bring on autumn and more fungi fun!

Saturday, 12 October 2024

Playing with aspect ratios on the S5.

For most of my photography 'career' I've been a fairly traditional shooter. By that I mean I don't tend to make much use of the technology that is built into todays cameras. There aren't all that many settings that I change or play around with on a regular basis. Growing up a film shooter, I tend to just focus on aperture, shutter speed and composition. I don't even really move my ISO around that much (mostly using the lowest native ISO setting the camera has).

Rapahoe Pier Structure. Lumix S5 with S20-60mm. f/8 @ 1/100th, ISO 100

Now having just said all that, I'm also not a luddite! I use image stabilisation as a matter of course, and will change the ISO if and when I need to. When I owned Fuji I spent endless hours playing around with film simulations. And of course, I shoot in RAW so I can get the best out of my images during post-processing. But usually, that's about it.

I've said on numerous occasions that I'm not a video guy, and would be more than happy if camera releases came in two flavors - with, or without video. My S5, although now 'old' by digital camera standards, has video features that I will never use. It is, in fact, by all accounts, still an amazing camera for video shooters - being predominantly designed with video shooters in mind (according to the hip on-line hybrid content creators). I don't care. Didn't buy it for its video capabilities - obviously. Because it is also - for all its video centric capabilities - a damn fine 'camera' for photography. Who'd have guessed?

Magick is Real. Lumix S5 with 20-60mm. f/8 @ 1/50th, ISO 100

In terms of photography-centric features, the S5 has a few that interest me slightly - and that I will 'play around with' from time to time. One of those is the high-res mode, which takes the 24MP sensor and turns it into a 60+MP monster! This does have some limitations - the camera must be on a tripod, and the scene you are photographing must largely be static (landscapes and not portraits). 

Do I really need 60+MP images to deal with? I suspect the answer is no. In fact I know that the answer is no. But hey, fun to 'play' with - right?

And maybe going out with your camera to 'play' with settings you don't normally shoot with, can be a door back into shooting with your camera a bit more? A bit of a spark to kick-start the creative juices again?

That's how it was for me the other evening when I found myself at a local beach and I decide to play around with aspect ratios.

Rapahoe Xpan. Lumix S5 with 20-60mm. f/8 @ 1/60th, ISO 100. 65:24 aspect ratio

I was watching a review of the S5 on youtube the other night (as you do), and the reviewer mentioned that the camera could shoot in the 65:24 'Xpan' ratio. I kind of knew this already, but hadn't given it much thought. But as I stood in front of a dilapidated pier structure at Rapahoe Beach, stretching out across the sand, I suddenly remembered about the panoramic aspect ratio of the Xpan. This, I thought to myself, would make a perfect subject for it. And I was right.

I really like the above image, and the subject works perfectly in this aspect ratio. Once I switched the camera's aspect ratio over to 65:24 and could 'see' in this format, it was a hell of a lot of fun trying to compose using the wide field of view.

Not that I don't think the subject doesn't work in the S5's native 3:2 aspect ratio - see the first image in this post. But it's undeniably 'fun' and then undeniably challenging, to compose for a totally different field of view.

Something fishy. Lumix S5 with 20-60mm. f/5.6 @ 1/50th, ISO 100. 1:1. Mono conversion

Once I had started exploring the possibilities of other aspect ratios, I started looking for compositions that would fit a particular framing. As an ex-medium format film shooter, I have a love-hate relationship with the 1:1 square format. When I was using medium format almost exclusively, I often struggled with composing in the square format. But every now and again I'll come across a subject and I'll 'see' it as a square image.

I saw the above image of the washed-up fish on the beach not only as a square 1:1 composition, but also as a monochrome photo. I have also added a little film grain when I processed the final image in Camera RAW, to give that familiar film-look. Might not be everyone's cup-of-tea, but I like it.

Standing Tall. Lumix S5 with 20-60mm. f/8 @ 1/80th, ISO 100. 1:1 aspect ratio

Of course the square format also works well for colour. The above image reminds me of the colour rendition of Kodak Ektar 100 medium format film. Has that 'look' with the overall green and blue hues. It's actually very faithful to the scene, and I love the colours coming from the S5's sensor. Even the RAW files look pretty good and don't need a lot of punch added in post.

All in a Row. Lumix S5 with 20-60mm. f/9 @ 1/40th, ISO 100

I had a lot of fun shooting in various different aspect ratios during the evening, and it did inspire me to keep shooting and find some interesting compositions. But, because I shoot in RAW mode, the aspect ratio I chose to use in-camera isn't set in stone like it would be if I was shooting jpeg. All of the images imported into Lightroom as a normal 3:2 ratio that makes use of the whole image sensor. The aspect ratio is a crop attached in the metedata. So it can be changed or removed at any stage.

So what's the point in shooting with different aspect ratios if you can just crop later on in post? Good question, and I've asked this myself. And I guess there's two parts to the answer. First, as mentioned above, if you are shooting in jpeg mode, then the aspect ratio (crop) is locked in to your final image. So any final jpeg images straight from camera will be as you saw it through the viewfinder.

Second, it's that 'play' aspect - and also the pre-visualisation - that happens when you are composing with the actual crop through the viewfinder. It's a bit like shooting monochrome on a digital camera. If you shoot RAW, then the monochrome setting is just attached metadata - the colour information is still retained in the original file. But the great thing is that you 'see' in monochrome through the viewfinder. I can't stress enough what a massive help this is when learning to shoot black and white images. Suddenly it's not 'theory' anymore, but actual visual feedback.

Have you shot in different aspect ratios in your camera? Do you even know where to go to change them? If you haven't, then go ahead and have a play. It's a lot of fun. It can also be a very helpful compositional aid. And if you shoot in RAW mode, then no harm - no foul. You can always undo what your clever camera has done.

Sunday, 24 March 2024

Panasonic GH3 for photography (in 2024).

In my last post I discussed my recent purchase of the Lumix GH3 for shooting video. This will be its main purpose - in conjunction with my Lumix S5 - to supply video and photos for a Real Estate firm. But it will also act as a back-up of sorts, if anything should happen (please no, touch wood) to the S5 while on a shoot. So the IQ (image quality) needs to be 'good enough' to take over photo duty if required (again, please no....!).

Of course whenever you get any new gear, you need to test it out - right?! Nobody in their right mind would take a newly acquired piece of equipment and try it out for the first time on a shoot - least of all an actual paid gig! No - I thought not.

With this in mind, I loaded up my Lowepro backpack with my Lumix S5 and S 20-60mm f/3.5-5.6 attached, and the Lumix GH3 with the G 12-60mm f/3.5-5.6 Power OIS, and headed out the door this past weekend (as I write this).

It had been a while since I had been to Dorothy Falls at Kaniere, so that was my destination. I got up at stupid-o'clock on Saturday morning so I could get to the falls around dawn. Turned out this was a little too early, so I wandered down to Lake Kaniere to see if I could capture a few sunrise photos.

As you can see from the image on the right, reducing the exposure to retain highlight detail in the sky (very important with digital sensors) has meant that the landscape itself is underexposed. Looking at this image back home on the computer, I didn't hold out much hope of getting any detail or definition in the trees around the lake, especially since this is from a micro four thirds sensor. 

Lake Kaniere Dawn.  Lumix GH3 with Lumix G 12-60mm Power OIS. f/8 @ 1/50th, ISO 200

Having owned, and used, 16MP Olympus micro four thirds cameras for many years, I shouldn't have been so pessimistic. I've written myself, on several occasions in this very blog, that the ability to extract information from the micro four thirds sensor is actually quite staggering. Micro four thirds sensors are capable of capturing excellent dynamic range - the GH3 itself is capable of around 12.5 stops of dynamic range. 

In comparison, the S5's 24MP sensor is rated by DXO of 14.5 stops. Two stops is certainly significant, but this is a considerably newer - full frame - sensor. 12.5 stops on the GH3 is very, very respectable, and allows it to create images like the one above. What's more, the detail pulled out of the shadows is very clean and noise-free at the cameras native ISO of 200. A very good result indeed.

Dorothy Falls. Lumix GH3 with G 12-60mm. f/8 @ 1/3rd sec, ISO 200 + Polariser

I would have liked to have spent a bit more time exploring Lake Kaniere, but I was being swarmed and eaten alive by the (in)famous west coast sand fly. They like the taste of me unfortunately, and as soon as I set up my tripod I was surrounded by the little biting monsters! I took this as my que to head back to Dorothy Falls where, given the slightly cooler temperatures of the surrounding bush, the sand flies were thankfully (mostly) absent.

This allowed me to take my time, and take two shots of the same subject - one with the GH3 and one with the S5 - for 'comparisons' sake.


I've already discussed the dynamic range capabilities of both cameras, and this can be seen in the 100% crops above. The S5 retains detail in even the brightest areas of the waterfall, whereas the GH3 doesn't quite manage it. On both exposures I was very careful not to 'clip' the highlights, but the GH3 sensor just isn't capable of  retaining the extreme highlight detail. The full frame image is also very slightly 'crisper' than the micro four thirds one - again not surprising given the size and age advantage of the newer S5 full-frame sensor.

And yet, there's not a massive difference between the two - certainly not as much as some would have you believe there should be. I would take the S5's full-frame sensor over the GH3's micro four thirds - of course I would. But if you told me I had to use the 16MP GH3 from now on, it certainly wouldn't hold me back from making amazing images. And as a back-up to my S5, it'll do just fine.

Dorothy Falls Cascade. Lumix S5 with S 20-60mm. f/8 @ 1/2sec, ISO 200

Having just said that, I will admit to preferring to using the S5 over the GH3. For a start, the viewfinder on the GH3 leaves a lot to be desired. It's a little blurry around the edges for us glass-wearers, which makes composition a little tricky. Fortunately, when shooting video, I'll only be using the LCD screen which is perfectly fine to compose from. This was also the case for most of the morning while the GH3 was on a tripod. But take it off the tripod, use the viewfinder to compose and the picture taking experience is diminished somewhat.

I also prefer the weight, heft, and overall handling of the S5. The GH3 isn't bad in this respect, but the S5 is better (IMHO). The GH3 with battery grip weighs about the same as the S5 body. Add a lens to both of them and the weight is similar enough to not be a factor. But the S5 certainly feels better in my hand. That being said, the GH3 is probably the most comfortable micro four thirds camera I've ever used. Far better than the angular and retro inspired Olympus offerings like the OMD EM-5 and EM-1.

Cloud Cover. Panasonic Lumix GH3 with G 12-60mm f3.5-5.6 OIS. f/7.1 @ 1/800th, ISO 200

As someone who has had a lot of experience shooting micro four thirds - especially with Olympus - the Olympus vs Panasonic question is an interesting one. I can see why Olympus embraced their heritage with the retro OM look to their cameras, as much as I can see how it made sense for Panasonic to pursue a more traditional DSLR style to their cameras.

Personally, even though I like the look of the Olympus cameras, I do prefer the Panasonic's DSLR style ergonomics and handling. BUT.... I think that Olympus make the better cameras in terms of functions, engineering and technology. Especially when it comes to the Panasonic's Achilles heal - auto focus. Not that Panasonic's contrast-based autofocus is unusable. For stills photography it's actually very good. But video - well that's another story. Needless to say, I think I'll be using a lot of manual focusing with the GH3. And that's absolutely fine.

Dorothy Falls, Kaniere. Lumix GH3 with G 12-60mm. f/8 @ 1/2sec, ISO 200. + Polariser

Is the 16MP Panasonic GH3 micro four thirds camera a twelve year old obsolete dinosaur that should be dismissed in 2024? No - of course not! In fact, it would be an amazing camera to give to someone who wants to learn photography and grow in their hobby. With great ergonomics, a very capable image sensor, and very good IQ - not to mention excellent video features (if you are happy to focus manually) - the GH3 was Panasonic's flagship camera when it was released in 2012. It was an amazing camera then, and it's a fantastic camera now. Not state-of-the-art, granted. But you're not paying state-of-the-art prices. And yet what you get for your money is above and beyond what you should expect at this price point. Cheap as chips, but oh-so capable. I reckon the GH3 will make a perfect video camera, and an ideal back-up for my S5.

Saturday, 10 February 2024

Sunny sky photography - in defence of the 'record' shot.

'You can't always get what you want.'

Sir Mick and his Rolling Stones were right. We can't always get what we want. And this is certainly true in photography. As a landscape photographer, I'd love to have amazing golden light every time I went out to photograph. But that ain't ever going to happen. In fact, it rarely ever happens!

Most times, the golden light doesn't eventuate, even if you're at the right place, at the right time. Quite often, however, we're in the right place - but it's definitely not the right time. Mid afternoon in summer, for example. Do we just put our cameras away because the light isn't right?

Well, yes, that can be an option. Especially if it's a location you can return to easily. But what if it's not? What if it's your once-in-a-lifetime opportunity? Maybe you're traveling and will likely never return? Do you put your camera away because the lighting isn't right? No, of course you don't. You take some photographs anyway. And get what many refer to (somewhat disparagingly) as 'record' shots.

Truman Track, Punakaiki. Lumix S5 with S 20-60mm lens. f8 @ 1/1000th sec, ISO 200

I took the above image of the Truman Track Beach at 1.30pm on a sunny, blue sky day. The time of day when many other tourists and visitors were out-and-about experiencing nature and taking photos. If I were a tourist on that day, just passing through for my one and only time in Punakaiki, would I be happy with this photo of the Truman Track? Of course I would!

For a start, I'm very happy with the composition. I waited for just the right time when the white sea foam had made it halfway up the beach to take the photo. And I nailed it. So composition-wise there's nothing wrong with this image. And yes, I even like the tiny bits of flax sticking up from the right hand corner at the bottom of the photo. I think they help to 'ground' the photo and keep your eye from wandering. A little bit like a 'natural' vignette 😄

I also like the colours in this image. they are vibrant and 'pop'. And yes, that includes the blue sky. What is so wrong with blue skies? I've watched many a photographer online (some who I even respect) talk about how much they hate blue sky days. And many refuse to photograph them.

Does the simple fact that the above photo has a blue sky, and was taken in the middle of the day, immediately reduce it to merely a 'record' shot? No, damn it! I think not....

Truman Track, Punakaiki. Lumix S5 with S 20-60mm lens. f8 @ 1/800th, ISO 200

Here's another - same day, same time, same subject (just down on the beach this time). And I really like this shot. Because of the cloud formation - and the blue sky. Would it be a better photo if I had been there at sunset and captured a pink sky with golden light. Maybe. But then wouldn't that just make it a 'record' shot with nice light? Isn't any photo just that - a record of a particular time and place? Irrespective of the light you captured it in?

Surely what we want in our photos is to capture the feelings we felt when we were there? To somehow recreate the essence of the experience we had, in a single frame (let's not get into video - seriously, let's not). And the above images, taken in the harsh summer afternoon light, do just that for me. They take me straight back to that time and place, and I'm right there again - hearing the pounding of the waves, smelling the ocean and feeling the hot sun beating down on my neck. Mere 'record' shots? Whatever...

Truman Beach Waterfall. Lumix S5 with S 20-60mm. f.8 @ 1/250th, ISO 200

Shooting in the mid-day sun does have its challenges though, given that you are dealing with the harshest light of the day. With the sun large, bright, and almost directly overhead, shadows can be very deep and highlights very blown-out. It's often for this very reason that photographers will tell you to avoid shooting at this time of the day. And it's generally good advice. Although with the digital camera sensors we have nowadays, the extreme ranges of light and shadow (referred to as dynamic range) can often be recovered in post-processing.

Modern cameras like my Panasonic Lumix S5 can capture a staggering dynamic range in a single image - about 11 stops! Compare that to the 5 stop range you used to get with slide film, and you can see why slide film shooters avoided mid-day light like the plague! Whereas with the technology we have available now, there's almost nothing you can't recover in post if you have a well-exposed RAW file to work with. And that's not even taking other processing tricks like digital blending or HDR imaging into account.

With a digital sensor capturing harsh light, it's important to keep as much highlight detail as possible in your original RAW file (and yes, shoot RAW to get the best file to work with). Often this means under-exposing by a stop or more and letting the black shadows go black. You will be amazed at how much detail can be recovered from a densely black shadow, without sacrificing too much in the way of detail or noise. 

Deep, black shadows make sense to us as humans, as our eyes constantly adjust to the bright light and naturally let the shadows go black. So this is what looks  more 'realistic' to us in a final image. If in doubt, just let those shadows go black.

Punakaiki Rock Forms. Lumix S5 with S 20-60mm. f.8 @ 1/200th, ISO 200

Let's finish with a true 'record' shot. A close-up of the strange rock formations found at Punakaiki. Surely this is a true record shot. Or is it? Of all four images in this post, is this the one with the 'best' (softest, contoured, gradual) lighting? Is it purely lighting that elevates a photograph above a simple 'record' shot? Or are photographers simply using the term to de-value shots they've taken that they don't like? I've heard it time and again from the mouths of photographers - 'Yeah, it's ok. Just a record shot.'

Don't misunderstand me, I'm not saying that light doesn't matter. I started out this post by stating that I would love to have golden light every time I shoot. Although upon reflection, I'm not sure that's entirely true. Because I think it's important (and rewarding) to be able to shoot in all kinds of lighting conditions and still come away with images you can be happy with - or even proud of. Blue sky days included.

So please, don't be one of those photographers who only shoots under 'ideal' (whatever that means) lighting conditions. Even in the middle of the day, at the height of summer, there are many amazing photos to be had...


Saturday, 27 January 2024

Facing photography burn-out. Will 2024 be better?

It's late January, and this is my first post of 2024. Hardly something to brag about. I only wrote 7 posts in 2023 - which makes it my second-worst year (my worst was 2014 when I only wrote 4). That should tell you something about my photography mindset for most of 2023 (and a good deal of 2022 if I'm honest).

It's ironic really. Since 2023 was also the year that I finally, FINALLY, got a brand new camera. The Panasonic Lumix S5. I've wanted a new camera for well over ten years, and spent most of that time with second-hand gear, trying to figure out what I actually wanted in a camera system. And in 2023 I got it. A small (relatively speaking), full-frame 24 MP camera with excellent ergonomics, outstanding optics, and a tonne of features - some of which I may actually use. If, that is, I can be bothered using my camera at all!?

Late Bloomer. Panasonic Lumix S5 with S 20-60mm 3.5/5.6. F8 @ 1/60th, ISO 3200

For someone like me, for whom photography has been more like an addiction than a passion, that last sentence above is quite alarming. My wife has, in fact, asked me if I may actually be depressed? For somebody who has lived and breathed photography for the last 30 years of their life, to be so uninterested in any of it, is certainly rather strange. 

But I'm not - depressed that is. At least I don't think I am? I think what has happened is something akin to burn-out. Saturation point was finally reached a couple of years ago, and I think it's required time-off to work through it. Something similar may have happened, or may end up happening, to you?

Clearly Defined. Lumix S5 with S 20-60mm. F5.6 @ 1/60th, ISO 200

If this does happen to you (photography burn-out or whatever you want to call it), then my advice is to just let it. Don't panic. Don't rage against it. Don't try to 'push' through' regardless. Just let it take its course. However long it takes. Give yourself the time you need work through it. Do something else. Find another hobby. Put your camera away. And eventually, when the time is right, your passion for photography will start to come back. Probably....

Sunny Bight Track, Kaniere. Lumix S5 with S 20-60mm. F6.3 @ 1/80th, ISO 800

I'm no expert, but speaking as someone who has gone (is going?) through this myself - I can only give my personal experience. Initially I did fight it. I tried everything I could to 'ignite' the passion again. Nothing really worked. Not even a trip away down South to Dunedin - although I did enjoy the trip and got a few good images.

In the end, I put my camera away and focused on other hobbies. After all, what's the worst that could happen? Would it be so bad if I never enjoyed photography again? Gulp.....

But then, as it so often does, fate stepped in and began to turn things around. 

We are thinking of selling our house and moving to a more central location in the town where we live. And so we have been talking to real estate agents, have gone to a few open homes, and have had some agents look at our house.

One of those agents remarked on all the photographs up in our house, and so my wife told him I was a photographer. He got very excited at hearing this, because he was looking for a photographer to do some Real Estate work for him. I think you can see where this is going....

Sunny Bight, Kaniere. Lumix S5 with S 20-60mm. F8 @ 1/200th, ISO 100

So Real Estate work has rekindled my passion for photography! Who'd have thunked it!? Certainly not me! But it has. And now I'm watching YouTube photography videos again, taking my camera out and getting familiar with it once more - and even thinking about investing in an ultra wide angle lens!

And the great thing about this resurgence of interest is that it hasn't been forced. I didn't find photography again - photography found me!

It's early days, for sure. And yet the above images were all shot today, because I wanted to go out and take photos! It was the wrong time of the day, with the wrong kind of light, in an area I've been dozens of times before. But it didn't matter. I just went out with my camera to enjoy the experience. And enjoy it I did.

So if you are in a photography funk - or any other kind of funk for that matter - my advice would be - just let it be. Don't push the issue. Drop it. And in time, God willing, your passion will return. Sometimes in the most surprising and unlikely of ways....

Thursday, 19 October 2023

Is there life after Adobe?

John Lennon once sang that 'the best things in life are free' (yes, I know it's an old Motown song, but I grew up with the Beatles version). He then, however, went on to say that he'd rather have money. And I'm sure that this is a sentiment shared by most in the west today.

Don't get me wrong, I need money just as much as the next person. But with the price of living sky-rocketing, I also need to be careful how I spend it. Which is a long(ish) way of saying that I've decided to end a couple of my software subscriptions.

One of these just happens to be Adobe's photography subscription which gives you Lightroom and Photoshop. It's actually pretty good value to be fair. But it's still a monthly subscription, and I still can't afford it. 

So of course, that means that I start looking around for alternatives. FREE alternatives. Yeah - right! But hang on a minute. There actually are some very good, open-source, free alternatives to Lightroom and Photoshop. And it turns out they are actually very - very good. 

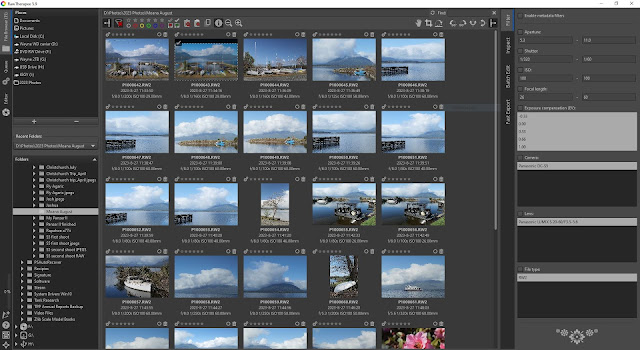
Raw Therapee 5.9 Catalogue interface.

The first one I downloaded was Raw Therapee - an Adobe Lightroom alternative with a very similar look and feel to Lightroom. The one (major) advantage that Raw Therapee has over Lightroom is that it doesn't require you to set up a catalogue. Instead it simply accesses the images from your hard drive and uses the file structure you already have.

You can key-word, tag, compare and stack images, just like in Lightroom, and the thumbnails can display a good amount of shooting information (or none). Speed is very good, since there's not a catalogue to slow things down, and if you've used Lightroom, you should feel right at home with Raw Therapee.

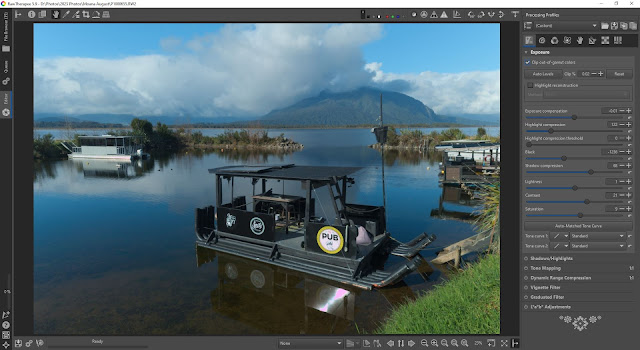
Raw Therapee 5.9 Editor interface.

Double-clicking a thumbnail in the File Browser loads the Raw file into Raw Therapee's Image Editor. And BTW, it reads the Raw files from my Lumix S5 with absolutely no issues.

Again, anyone with even a limited knowledge of Lightroom will feel at home in Raw Therapee. All the slider controls are on the right side of the screen, and are all arranged in a mostly obvious order. Which is a good thing. Because there are a LOT of controls. Which is also a good thing. Although it may mean a bit of a learning curve - especially for newbie photographers. But stick at it if you are considering trying a free Raw processing programme, because Raw Therapee is incredibly powerful and you will be richly rewarded with first-class results. Amazing for FREE software!

A quick tip for anyone who is new to Raw image processing and is thinking about giving Raw Therapee a go - use the 'Auto levels' button in the Exposure tab. There's no shame in it, and it will get you in the right ball-park immediately (very much like the same button in Lightroom will).

Buoyed by my overall positive impressions of Raw Therapee, I decided to download another free, open-source image conversion software that I'd heard a lot about - Darktable.

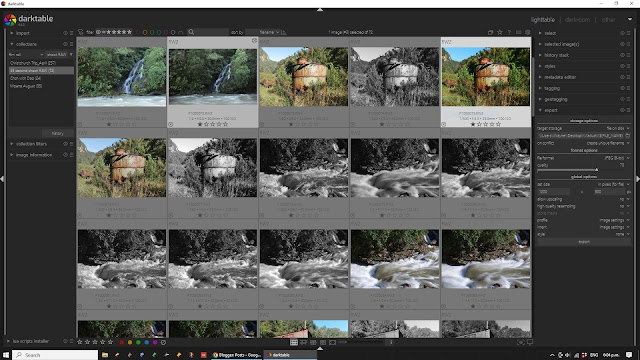
Darktable 4.4.2 Image Browser (Lighttable)

If Raw Therapee reminded me of Lightroom from a few versions ago (and it did), Darktable upped the ante even more - reminding me of a somewhat more up-to-date Lightroom. Again, navigation is easy and logical, with a plethora of options when it comes to key-wording and image tagging.

Moving into the editing (Darkroom) section is as straight forward as double-clicking on a thumbnail - and again, as with Raw Therapee, speed is decent because it works off of your already created computer file system. Whenever you make changes to the Raw file, it simply adds a sidecar .xmp file to note the changes. So just like Lightroom, it is 100% non-destructive (as is Raw Therapee).

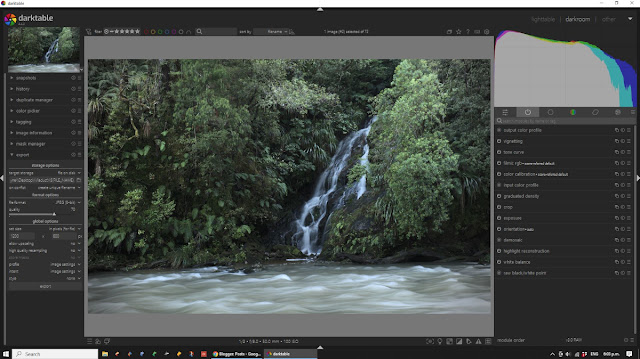
Darktable 4.4.2 'Darkroom' module. Look familiar at all?

Of the two (Darktable vs Raw Therapee), Darktable seems the more feature-packed - but also comes with a slightly steeper learning curve? I've watched a few Darktable tutorials on the interwebs, and the features and explanations can get pretty complex. But I also find Darktable to be the programme I gravitate towards - maybe because I am a fairly experienced Adobe user, and Darktable is the more modern Lightroom-like of the two. 

Having said that, both programme are absolutely amazing. And well worth the money.

Yes, that's a joke. Because remember folks, both of these programmes are absolutely FREE! Gratis. Nada. Zilch. Mind officially blown!

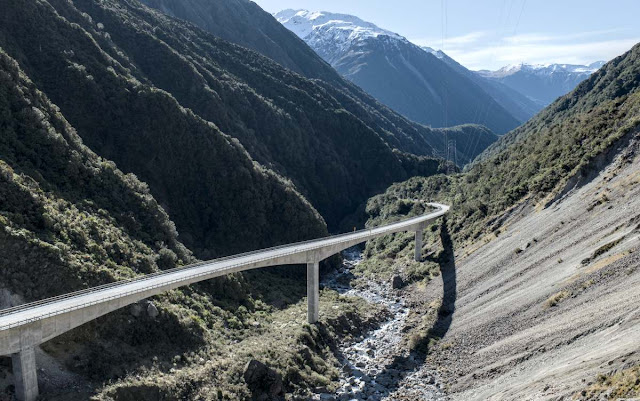
Arthur's Pass Viaduct, Developed in Darktable. Lumix S5 with 20-60mm. f/10 @ 1/100th, ISO 100

I've been an Adobe Lightroom user since version one. And was an Apple Aperture user before that. I love the Adobe Lightroom interface - but I don't love the monthly bill. With the price of living ever-increasing, it's hard to justify yet another monthly subscription charge. Something has to give. And as someone who doesn't make a living from his photography, a monthly subscription to Lightroom (especially when I haven't been shooting all that much over the last year), was an obvious choice to let-go.

I may be struggling financially, but I'm also not crazy! I do need a Raw conversion programme of some description. But to be honest, I hadn't really taken the open-source (free) programmes very seriously. I mean they are Free after all, so how good could they be - right?

Fortunately for me (and you), it turns out they can be good. Very, very good. Maybe even (dare I say it) as good as (if not in some areas maybe even better than) Adobe Lightroom.

Is there a bit of wishful thinking and self-delusion involved in all of this because I want them to be as good as Lightroom? Maybe. But I don't really think so. Having downloaded and 'played' around with both open-source programmes, I have been super impressed.

I still have a lot to learn, and am riding the learning curve at the moment. But even that gives me hope. Because neither Raw Therapee or Darktable are 'simplistic' versions of Lightroom, dumbed-down for the masses. Oh contraire. They are both fully-fledged Raw conversion programmes that are serious contenders for the best software out there - money aside. 

So do yourself a favour. Download both and give them a go. You might just find that the Beatles were right. The best things in life might really be free!?

Sunday, 15 October 2023

Back from the Wilderness.

Kia ora (hello) everyone. 

Shock - horror, I'm back with a new post! It's been 6 months (almost exactly) since I've written on the blog, and I'd like to say I've been too busy with photography to post. But that would be a lie.

I've been busy alright. But not with photography.

Family life has been very busy, and somewhat stressful, but it looks like I may be climbing out of some darkness and into the light. I won't go into great detail, but I will say that part of the reason (a very large part) for my lack of posting and photography has been my work situation. I started a new job at the beginning of this year, but it hasn't gone so well. That's the bad news.

The good news is that I have found a new job, and a change of career! And this is, in a very large way, the reason for this post (on photography - yes, I AM getting there 😄)

Hagley Park, Christchurch. Panasonic Lumix S5 with 20-60mm f3.5/5.6. f8 @ 1/30th, ISO 400

I finish my old job this week (as I write this), and start the new one two weeks later. So that gives me a two week break in-between jobs. My wife and I have decided to take the opportunity to go away on holiday - which means lots of photography! Yay!!!!

This is a big deal for us, since we don't tend to go on many dedicated holidays. It has, in fact, been about 25 years since we went away on holiday together - just us alone - and that was our honeymoon! But even then, we stayed with friends in Australia, so it wasn't really 'on our own'. So yes, it's been a while.

I'm also suffering from a bit of 'local landscape lethargy' if I'm honest - which even the purchase of a brand new camera couldn't overcome. I've written about this in the past here and here. What I really need to give my photography juices a boost, is a good holiday! A change of scene. A different view that will inspire me to use the camera. And that's exactly what this trip will offer. And I can't wait!

Spidey Boy! Panasonic Lumix S5 with Lumix S 20-60mm. f/5.6 @ 1/4000th, ISO 400

We are going to take a trip down the eastern side of the South Island, through Ashburton, to end up at Mosgiel. From there we will explore the city of Dunedin and maybe travel one day to Invercargill. We plan to go to The Moeraki Boulders, Larnach Castle and the Dunedin Chinese Gardens, as well as The Church of the Good Shepherd at Lake Tekapo and check out the steampunk themed town of Oamaru. These are areas of New Zealand that my wife and I have never really explored. To say I'm excited is an understatement!

So yes, there is photography - lots of photography - coming to this blog in the very near future.

No guesses on what gear I'll be taking. Unlike other times when I may have had a few systems or configurations to choose from, I now have just the one - awesome - system. And I will probably stick to just the one camera/lens combination. The S5 with the Lumix S 20-60mm f/3.5-5.6 will be a fantastic travel kit that I'm sure I will use 99% of the holiday. But I will take the 50mm f1.8, just in case....

Finally new content going forwards. And a chance to really get to know my Panasonic Lumix S5.  Happy days.

Saturday, 25 March 2023

Setting up the Lumix S5 for stills photography

I've had a couple of forays out with my new Panasonic Lumix S5 and have gradually been setting it up for my shooting style.

The S5 has 3 custom dials (although you can set up to 13 shooting styles since C3 has slots for 10 different variations), and I have programmed all 3. I don't usually use Custom modes (in fact I don't think I ever have), but since this was a brand-new camera, and the option was there, I thought 'why not'?

Waterways. Lumix S5 with 20-60mm. F/8 @ 1/2sec, ISO 100

There are certain settings I change on all cameras as soon as I get them. First things first - the autofocus confirmation 'beep' gets turned off! Then the file format is set to RAW (I seldom bother with RAW+Jpeg), and the control dial is set to 'A' (aperture priority). I'm shooting a lot in M (manual) now too, but for casual shooting I stick with 'A'.

Then it's a matter of tweaking the rest of the buttons and dials to work how I like them to. And fortunately, with most of todays cameras, there isn't a dial or a button that can't be reprogrammed! I do, however, try to keep it as simple as possible and I don't go changing all the buttons functions.

The Lumix S5 is a great camera to reprogramme, since it allows you to name each custom setting with something that makes sense to you (and not just CS1, CS2 etc). I have called CS1 'General Photography' and CS2 'Landscape Tripod'. Pretty self-explanatory, don't you think!? The CS3 setting (with 10 extra slots for different variations) I've kept for 'fun' at the moment, and have programmed some black and white settings. In this post I'll just concentrate on the CS1 and CS2 settings - the two I will use most often.

Old Mine Site. Lumix S5 with 20-60mm. F/11 @ 1/15thsec, ISO 100

For both CS1 and CS2, I have them set up in Aperture Priority, to start with an aperture of f/8 and an ISO of 100. Because I'm working in A mode, the front dial is set to choose the aperture, the back dial is set to change the exposure compensation, and the real control wheel is set to change ISO. When (and if) I switch to M mode (manual), the exposure compensation rear wheel changes to controlling shutter speed. So with the two top control wheels, and the rear control dial, I have the exposure triangle instantly accessible.

Also, and very importantly, I have 'Constant Preview' set to ON! This is set to OFF by default (don't ask me why), and means that if you're changing the exposure you won't see the effect in real-time in the viewfinder! If you want to see what is happening when you change exposure values, make sure 'Constant Preview' is set to ON.

You will also need to enable the histogram to appear in the viewfinder as well - which is also OFF by default!? The great thing about the histogram in the S5 is that you can place it wherever you choose within the frame (I have it bottom right). Very cool.

The level gauge in the viewfinder is on by default. I find it somewhat annoying so turn it off. This is easy to do by simply hitting the 'back arrow' button on the camera body - which will toggle between the level gauge being on or off when in live view.

For the CS1 'General Photography' setting, I have picture mode on 'Normal'. This gives me a fairly good indication of how the RAW file is going to look. For my CS2 'Landscape Tripod' setting, I have the picture mode set to Landscape. This gives me punchier colours and helps me visualise what my final, processed image might look like.

In CS1 I have single autofocus area (centre) and single shot mode activated. For CS2 I have the self-timer automatically set for 2 seconds, and I have the Image Stabilisation turned OFF (it's turned ON for my CS1 general photography setting). In CS2 Landscape Tripod mode, I also have the 'touch to focus' screen activated (it's turned OFF in CS1).

The Blue Men. Lumix S5 with 20-60mm. F/8 @ 1/80th, ISO 6400

I hope that's not too confusing? Basically in Landscape Tripod mode I have IS OFF (because the camera is on a tripod), 2 second self timer, and touch to focus activated.

As mentioned earlier, you can 'tweak' the camera to your heart's content. But the more you fiddle and change, the more you need to remember what you changed it too! So I try to keep the fiddling to a minimum - just changing the parameters that make sense for what I'm trying to achieve with my images.

Of course none of this relates to video - this is purely a stills-centric setup. As much as the S5 is a film-making beast, I will never use the video. Video is there because we demand it (apparently). I'd be more than happy if it wasn't included, but there you are. That's progress I guess.

There are other settings I could mention, but really they come down to personal preference. You can, for instance, change the direction of the dials as they relate to moving the settings, tell the camera what to do for both card slots, set up auto ISO, control AF magnification, change photo gridlines, focus peaking colours - the list goes on, and is practically endless. 

Which is why I have only changed a few parameters so far, and I live with them for a while. Then, when I'm out in the field actually taking photos and I think - "I wish I could change/add this...", that's when I know I need to dig back into the menu and add this functionality to my custom settings.

So the custom mode settings are used somewhat fluidly, and can be changed or added to over time. But I think I'm fairly set now with my C1 'General Shooting' and C2 'Landscape Tripod' custom modes.

If you haven't set up the custom modes on your camera before then give them a try. They speed-up the shooting process considerably. Just make sure you can remember what you re-programmed all those buttons and dials to do!