Showing posts with label Olympus OM-D E-M5 Mk2. Show all posts

Tuesday, 21 February 2017

Sunset on an OM-D EM-5 MkII

In my last post I pondered the oft quoted 'best camera is the one you have with you' line of reasoning in relation to using my Samsung Galaxy S3 to take sunset photos. My argument (and I'm sticking to it), is that unfortunately the 'best' camera is often the one you don't have with you, and you have to settle for second (or third) best.

Blaketown Tiphead Sunset. Olympus OM-D E-M5 MkII with Zuiko 12-50mm EZ. F6.3 @ 1/320th. ISO 400
Why do we spend large amounts of money on camera bodies and lenses? Why do we (some of us at least) agonize over different systems, kit configurations and accessories? Even if we aren't hung up on image quality to the extent of 'pixel peeping', why is it that many of our photography decisions have to do with technical considerations like noise, sensor size or chromatic aberration?

From Cobden to Blaketown. OM-D E-M5 MkII with 12-50mm EZ. F6.3 @1/200th. ISO 400
Maybe it's because in this digital age, these are the things that are more easily quantifiable? Let's not talk about composition, or subject matter, or story telling - these are far too subjective and ephemeral topics. Much easier to compare low-light images, sensor formats or lens characteristics. With all the agonizing over IQ or individual sensor pixel density (is that a real thing?), it's a wonder we have any time for actual picture making at all!?

Cobden Breakwater Sunset. OM-D E-M5 MkII with 12-50mm EZ. F6.3 @1/400th. ISO 400.
Or maybe, just maybe, these things really are important? And by that I mean individually important. Subjectively important. Important to me. Let me explain what I mean...

Photography is a visual medium. We are visual artists. We like to be visually creative. And so, just like a painter who chooses their paints carefully, we  - as artists - like to choose our tools carefully too. I've heard people say that some photographers spend too much time worrying about the gear and that painters never get together and talk about the brushes they use. Really? I guess these people have never spent much time with painters? All the artists I know have their favorite brands of paint/brushes/paper/canvas that they swear by (and that they have sometimes taken years of trial and error to perfect). So much so that they will almost refuse to use anything else. Does it mean that they can't paint with something else? No, of course not. But does it also mean that they should just paint with anything because surely anything will do?

Grey River Sunset. Olympus OM-D EM-5 MkII with Zuiko 12-50mm. F6.3 @ 1/20th sec. ISO 400
As a photographer, I have my own set of criteria for how I want my 'tools' to perform. I know the level of noise that I am comfortable with at certain ISO's. I have a sensor size and megapixel number that I am happy with, and certain tolerances within which I want my lenses to perform. I've come to these quality decisions from years of trial and error with different systems and configurations, to the point where I now have a set of expectations of how I want my images to turn out with the tools I've chosen. When I use tools that I know will produce an image inferior to my set of (subjective) criteria, then I feel a slight disappointment at the final result. Even if only from a qualitative standpoint.

Freedom Campers, Cobden. OM-D E-M5 MkII with 12-50 EZ. F6.3 @ 1 sec.(hand held) ISO 800
Let me be very clear  - my criteria for acceptable IQ is NOT your criteria. You must find you own. The trouble comes with photographers who try to force their own set of criteria onto others, as if it was some kind of law. "You must have a full frame sensor or you're not a real photographer. You must have at least 40 megapixels or you're not a real photographer. Your images must all be noise free at ISO 640,000  or your camera's no good" - blah, blah, blah....

Kingsgate Hotel at Sunset. OM-D EM-5 MkII. F6.3 @ 1/6th sec. ISO 800
I'd like to end by saying that my image criteria isn't set in stone. It's a fluid, evolving and changing thing - and technology plays a large part in this. A few years ago I couldn't have conceived of hand-holding a sharp image at 1 second. But thanks to the OM-D EM-5 MkII , I can. I was also a full-frame snob for a very long time (yes, one of those). But not anymore. I am also finding that the older I get, the less things like noise and megapixels seem to matter.

And yet they do matter. And I know that they matter when I use my smartphone as a camera and am somewhat unhappy with the results. In a way that I am not unhappy with the results I get from my OM-D EM-5 MkII.

Saturday, 24 December 2016

Merry Christmas from NZ Digital

'Tis the season to be jolly :-)

Yes folks, it's Christmas tomorrow (as I write this) in New Zealand - the first country to wake up to Christmas Day. So I thought I'd better post something 'Christmassy'.

Greymouth Christmas Tree Festival, 2016. Olympus OM-D E-M5 MkII with 12-50mm EZ. F5.2 @ 1/8th sec, ISO 800
Every year the local theater hosts a Christmas tree festival, where businesses and other groups can decorate a tree and the public comes to see the results and vote for their favourite. It's always a lovely place to visit on the week leading up to Christmas - it has a peace and serenity that is often needed at this time of the year. And it also happens to be a lot of fun to photograph.

Reindeer Light. OM-D EM5 MkII.
The last time I shot the event was several years ago, when I had the Pen Ep-1. The camera was fairly new at the time, and I remember I had a lot of fun shooting with the art modes. The grainy black and white was my favourite (and still is). The bright lights, dark backgrounds and multi-coloured trees invite you to experiment with ISO, shutter speeds and creative techniques, which I certainly intended to do this time as well. But to begin with I started out by capturing a 'traditional' view of the scenes around me, for a while at least, to get into the 'groove' and help the creative juices flow.

I didn't take a tripod, preferring to shoot everything hand-held, even though the light is very low. This is where the IBIS (in-body image stabilisation) of the Olympus system really comes into its own. By cranking the ISO up to 800-1600, I find I can still achieve sharp shots with shutter speeds hovering around the 1/6th second mark using the Olympus 12-50mm EZ f3.5/6.3 lens.

Christmas Bokeh. Olympus OM-D E-M5 MkII with 12-50mm EZ. F5.6 @ 1/8th sec, ISO 800
This year, my 'creative inspiration' came initially from a mistake (which is often the case). I was trying to focus on the trees in the dark, and not surprisingly, the camera was hunting for focus. I took a photo while the camera was still hunting, and really liked the way the bright lights were turned into these 'bokeh balls' of light.

Bokeh Balls of Light. Olympus OM-D E-M5 MkII and 12-50mm EZ lens set to Macro. F5.6 @ 1/8th sec, ISO 800
I set the camera to manual focus so that I could control the degree of out-of-focus effect (I wanted very distinct looking circles of light), and also found that the best results were achieved with the lens set to macro mode. Then it was just a matter of moving around the room finding light patterns that looked interesting.

Abstraction in Blue. OM-D E-M5 MkII
Some photos worked well when the image was still vaguely tree shaped, while others worked as pure abstractions. I shot in this fashion for over an hour and thoroughly enjoyed making these abstract images. It was only when I got home and looked at them on the computer that I realised I could have taken this in so many other directions.

They would probably also work really well as zoom bursts - by zooming the lens in and out while taking the photo. This would add an extra level of dynamism in the image - if that's what you're after?

Or I could also have experimented with multiple exposures, overlaying different colours and sizes of lights to get some interesting effects?

Don't get me wrong, I'm not disappointed with the shots that I got on the night. But often we are so 'focused' (excuse the pun) on what we are doing that we don't stop to consider if there are other ways of exploring the subject we are photographing.  Some of the other ideas might not have worked, and I may have ended up liking the images I initially took anyway. But at least I would have stretched myself a bit more, and experimented with a few more techniques.

Christmas Bokeh. Olympus OM-D E-M5 MkII
I'm still very happy with the images that I did manage to create on the night - especially the more abstract ones. They work very nicely as backgrounds, as can be seen above.

So from me, to you, Merry Christmas and a Happy 2017. If you have been a regular (or even occasional) reader of this blog, then I thank you from the bottom of my heart. I hope you've found something interesting from the last year of blogging, especially if you are new to micro four thirds and the Olympus system.

On a personal note, Blogger has informed me that my last post was number 200! I guess that's not setting the blogging world on fire, but it's something of a milestone for me at least. If you have read any of those 200 posts, I'd love to hear from you. Please do drop me a line and say 'hi'. And let me know if there is anything Olympus, micro four thirds, or just photography related that you would like me to cover in 2017? It would be my pleasure.

Wednesday, 26 October 2016

Spring at the Botanic Gardens

In my blog post on Josh getting his Olympus E-M5, I mentioned that we spent a morning at the Christchurch Botanic Gardens shooting flowers and other spring-type subjects. I have only just looked through the photos I took on that morning, and thought I should post a few.

Spring Cherry Blossom. Olympus OM-D E-M5 MkII with Zuiko 40-150mm. f5.6 @ 1/1600th, ISO 200
As I mentioned in the earlier post, Josh was using my Zuiko 12-50mm EZ lens on his E-M5, especially the macro function, so I used my other 'kit' lens, the Zuiko 40-150mm f4.5/5.6. It's not a lens I would normally have used at the gardens, but it was a great exercise in forcing me to 'see' differently. Despite being a 'kit' lens, it's fantastically sharp, even wide open, and can still produce some decent bokeh, as can be seen in the Cherry Blossom image above.

Kayaking on the Avon. OM-D E-M5 MkII with 40-150mm. f5 @ 1/160th, ISO 200
The main issue I had with using the 40-150mm lens was not being able to go wide enough. There were some instances where I wanted to get 'more' in the frame, but couldn't move back. The above image of the family kayaking, for example, was taken standing on a bridge looking down on them as they paddled past. I was at the widest setting I could go (40mm), and while I like the image, ideally I would have given it a little more breathing space if the lens had allowed for it.

Monarch Butterfly. Olympus OM-D E-M5 MkII with 40-150mm. f5.6 @ 1/800th. ISO 200
Of course, the flip side of that is the ability to get very close to your subject at the 150mm (300mm film equivalent) end of the zoom range. The beautiful Monarch butterfly only stayed on this flower for a second or two - long enough to get three or four shots off, before it was gone again. Shooting at 150mm allowed me to maintain a good distance so I didn't scare the butterfly away, and still get a close up shot that shows all the incredible detail on the butterfly's wings.

Pied Shag. Olympus OM-D E-M5 MkII with 40-150mm. f5.6 @ 1/200th. ISO 200
Getting close to other wildlife was also possible with the 40-150mm lens. This Pied Shag was minding its own business by the side of the river, and since it's used to having lots of people around, wasn't too concerned when I got down low on the ground to photograph him. I didn't have to get too close though, and the combination of the long zoom and separation from the background has meant that the bird stands out sharply against the water.

Red Tulip. OM-D E-M5 MkII with 40-150mm. f5.6 @ 1/640th. ISO 200
I also got down low and used the far end of the zoom to isolate some of the flowers. This works really well with the long stemmed flowers like tulips. Even though the flowers were growing closely together, shooting from a distance, at 150mm, and picking out just one flower, has created a decent amount of background blur (bokeh). Even from a lens that stays at f5.6 wide open at the long end. Yes, I'm sure an f2.8 lens would have given even more subject to background separation, but I don't have an f2.8 lens - and this has worked out fine. In fact I'm very happy with the final result.

I had a great time shooting at the Botanic Gardens with the Zuiko 40-150mm f4.5/5.6. It's made me realise that we don't always have to reach for the standard lens we always go for when we find ourselves in a familiar environment. We can (and should) shake things up a bit by using a lens that we wouldn't ordinarily choose. Next time you find yourself reaching for the same lens, stop and consider shooting with something else. It will force you to think slightly differently about the images you can take - and that's never a bad thing.   


Thursday, 6 October 2016

Two EM-5s in the family

My son Josh is 15 and, much to my surprise, has developed a keen interest in photography over the last few months. Now I say "much to my surprise" not because I don't think he has the talent for it - he most certainly does. It's just that he's never expressed much interest in photography before, despite there always being a camera available for him to use on family outings.

It's a matter of timing I guess - and I'm certainly not complaining. It's fantastic that he's getting excited about photography, and not just because it happens to be my passion as well. I think it's very important for everyone to have some form of creative outlet. And in this digital age, photography is an important skill to have.

His older sister is also very creative - taking Visual Art and Photography at Level 2 (6th Form) at High School this year. I've seen some of her photos from earlier in the year and they're fantastic abstract studies. But Em (Emily) is a bit wary of showing Dad too much, and she's always been quite private about her art.

Master and Apprentice? Photo: Joanna Lorimer
Josh, on the other hand, is just like his old man - very interested in the gear/technology side of digital photography; almost as much as the creative side. So he's been keen to chat with me about cameras and techniques. He's been using his mother's Nikon D70 SLR for the last few months, but has also had his eye on my Olympus OM-D EM-5 MkII mirrorless. So we've often talked about the different systems and what he might go with for his own camera.

Both kids have also had part-time jobs for the last year and have managed to save some money. Josh got to the stage where he had enough to start thinking seriously about getting a second-hand camera of his own - and last week (October 2016) we spent a few days in Christchurch while the girls had a trip to Wellington.

Christchurch just happens to have one of the best camera stores in New Zealand (shout out to Matt at Photo and Video in Merivale), and they just happened to have a second-hand Olympus OM-D EM-5 body for sale for a pretty good price. Josh and I went to have a look on our first morning in Christchurch (I said he was keen), and discovered that as well as the Em-5 body, they also had the HLD-6 grip to go with it!

Seagulls. Photo by Joshua Lorimer. OM-D EM-5 MkII with 40-150mm f4-5.6. F5.6 @ 1/250th ISO 200
If not for the price of the body and grip combined, I think Josh would have walked out with them both right there and then. But together they were going to take up a large chunk of his savings, so we left the store to 'think about it' for a day.

Two Dogs. Photo by Joshua Lorimer. OM-D EM-5 MkII with 12-50mm f3.5-6.3. F4.5 @ 1/4000th ISO 400
Josh had never really used my Olympus for very long, so I gave him the opportunity to spend an afternoon shooting with the EM-5 MkII, knowing that it would be similar (yet different) to the EM-5. He used it with and without the extra grip for the whole afternoon and, to cut a long story short, loved using it in both configurations. We went back the next day and purchased the EM-5 body with the HLD-6 Grip. So now there are two EM-5 mirrorless shooters in the family!

 On our third and final day in Christchurch, we went to the Botanic Gardens (it's late Spring and the flowers are still in bloom). Since Josh's EM-5 was sold 'body-only', he didn't have a lens. So I loaned him my 12-50mm EZ kit lens for the day, while I used the 40-150mm f4-5.6. I've never seen a teenage boy more fascinated with flowers - especially after I showed him how to use the macro function on the 12-50mm lens. I had to practically tear him away from the gardens after three hours. Needless to say, he had a great time and is loving his EM-5!

Old Piano. Photo by Joshua Lorimer. OM-D EM-5 MkII with 12-50mm lens. F4 @ 1/500th ISO 200
So yes, I am thrilled that Josh has been bitten by the photography bug. I think it's a fantastic hobby for anyone - but will be even more rewarding for us as something that father and son can do together. And if I'm really lucky, we may even convince big sister to come out shooting with us on the odd occasion too?

Thursday, 14 July 2016

Get a Grip! Review of the Olympus HLD-8

I’m a battery grip kinda guy. I love using them, and they are almost the first accessory I get when I have a camera (apart from the obligatory spare battery). Yes they add weight, and yes they add bulk – and that’s one of the reasons I like them. Up until switching to a mirrorless micro four thirds system I was of the ‘bigger and heavier is better” persuasion. It’s something I still sort of believe – to a point.

There are other reasons why I always opt for the grip. I like the portrait-orientation shutter button, the extra purchase it gives your hand, and the ability to add a second battery for extended shooting times. All things that, as a wedding photographer, I found very useful.

But I’m not a wedding photographer anymore. And I have ‘lightened’ my load by moving to the Olympus OM-D EM-5 Mk2. So why add a battery grip to the EM-5?

The HLD-8 comes in two sections. Genius!
For me, the addition of the HLD-8 grip for the EM-5 Mk2 makes sense for all the reasons mentioned above. It adds a portrait orientation shutter button. It adds an extra battery slot. It gives my hand more to grip onto when holding the camera, and it also adds a headphone jack for listening to audio when capturing video. The really clever design of the HLD-8 also means that you can have you cake and eat it too! Only want the extra grip portion for 90% of your shooting? Fine – just add the grip attachment (HLD-8G) section. Need more battery power (and an audio in for filming), then attach the additional battery section. Or leave the grip at home and just shoot with the camera. Lots of options. Ok, that last one you had anyway without paying for the grip – but you get what I mean.

Yet as much as I love battery grips, and always get one for whatever camera I own, it’s been almost a year with my EM-5 Mk2 and I’ve only just got the grip for it now. Why the long wait?

Mostly it was because I had convinced myself I shouldn’t get a grip for the EM-5 Mk2. With some camera decisions I make – especially if it’s a fairly costly one – I can occasionally suffer from analysis paralysis. The internet is a wonderful tool for learning and making ‘informed’ decisions about all sorts of gear – I contribute to this knowledge base myself with my blogs. But it can also subject us to information overload.

I read countless reviews on mirrorless systems, and on the Olympus EM-5 specifically, before deciding to buy one myself. And most of those reviews centred on going as light as possible and using just the body with two or three prime lenses. So that’s the way I was tempted go. Only a month or so after buying the body with 12-50mm EZ lens, I travelled to my nearest city to purchase the grip, but just couldn’t do it. I bought a 45mm f1.8 prime instead, and thought I’d done the right thing. Just me, my EM-5 Mk2, and some prime lenses against the world. Who cares about a big old grip – that’s just for DSLR users!

Trouble is, I’ve come to realise that I’m not a prime lens kinda guy. I’m a zoom lens guy. I LOVE the 12-50mm EZ lens, even if it is f6.3 at the long end. I LOVE the 40-150mm f4/5.6 as well – it’s so sharp and light (and cheap). Of course it would be great if they were faster. I would love to replace them one day with the PRO versions at a constant f2.8. But the 45mm f1.8 prime lens… not so much. I bought it, I used it once and I sold it. Same with the 17mm f2.8. I had grand delusions of being a hipster street shooter with a small camera and 17mm prime, but it’s just not me. Don’t get me wrong, they are amazing lenses. I’m just not a prime lens kinda guy. The next lens I have my eye on is the Olympus ultra-wide 9-18mm f4/5.6 lens, followed by the 75-300mm f4.8/6.7. There are rumours of a 30mm f2.8 macro coming soon – which is a prime lens that would interest me. But I’d be happy if my kit consisted entirely of zooms (with the exception of the 9mm fisheye bodycap lens).

Once I’d had this epiphany (it only took me 30 years), it freed me up to accept that the handling of my EM-5 Mk2 would be greatly improved, for me, if I added the extra grip. What tipped me over the edge was using the Olympus EM-1 recently (see my earlier post). The handling of that camera, with its large grip, was superb. With the extra grip attached, the EM-5 Mk2 looked like it would feel and handle similarly to the EM-1. So from that moment on I was sold.

So now that I have one, am I happy with it? Has it made a difference? You bet your sweet Nelly it has! My camera might be bigger and heavier now, but I don’t care. In fact, I like it better that way. It’s still nowhere near the size and weight of a 1D Mk3, or even a Canon 50D with battery grip and equivalent 24-100mm zoom lens attached. Not even close. But it has made a significant difference to the ergonomics and the handling of the EM-5 Mk2. It’s now much more comfortable (and secure) walking around carrying it one-handed (as is my want to do). The shutter button is now in a much more comfortable location – not to mention the second button for vertical shooting – and the added heft gives the camera a more stable and solid feeling when held up to the eye. Overall I’m a happy camper.

Also, with the grip attached, the cameras strap eyelet now has more room around it so my hand doesn’t rest up against it as much. This makes it far more comfortable for my hand than without the grip. Nice.

It’s not all roses though. With the grip attached, I now find accessing the function buttons on top of the camera to be a bit more awkward. Because the grip naturally moves your hand placement forward of the camera, accessing the function buttons means letting go of the grip altogether to reach them. So now it’s become very much a two-handed operation, whereas without the grip attached your shutter finger is within easy reach of these programmable buttons. A shame – but not a deal breaker. Maybe it’s something I need to get more used to?

Also, the grip completely covers the battery door at the bottom of the camera. So to change batteries in the camera you need to completely remove the grip. This isn’t hard to do of course, but just takes a little more time. To counteract this, Olympus have included an option in the menu (section K under battery options) that lets you choose which battery to use first – the one in the camera or the one in the grip. If you choose to use the one in the grip first, then once that is exhausted and it switches to the in-camera battery, just pop a fresh battery in the grip and it will start using that again. Simple.
Prime-only shooters will probably pass on the HLD-8 because of the extra weight it adds to the EM-5 Mk2. I totally get that. Maybe some should consider getting the HLD-8’G’ – just the grip portion of the unit (sans battery section)? But even that might be an unnecessary addition. If however, like me, you are more of a zoom shooter and feel that the handling of the EM-5 Mk2 could be improved if it were just a tad bigger, then the HLD-8 isn’t really an option, it’s a necessity. A beautifully made, cleverly designed and highly customisable necessity. 

Finally – just a word on what for me was the ‘elephant in the room’ so to speak – the price. At just a tad over $400NZ it certainly isn’t a cheap accessory. You can buy a 45mm f1.8 prime for that kind of money (and I did). Of course I wish it was half the price.  But after finally sucking it up and actually getting one, I’m very, very, very happy that I did.

And on that note – just a quick shout out to Hayden Himberg at Southern Cameras in Dunedin, here in New Zealand. Hayden stocks a great range of Olympus (and other) products and always seems to be able to get me what I want quickly and competitively priced. If you are looking for any kind of camera gear and live in New Zealand, give Hayden a call and see what he can do for you. Tell him I sent you :-)

Saturday, 5 March 2016

Olympus OMD EM5 MkII Abstract Landscapes

A photographer friend of mine (Hi Stew) and I went out shooting last evening to grab a sunset along the Coast Road.

Unfortunately, it didn't really eventuate - even though the night before (and the one after) were fantastic! Murphey's Law in practise once again :-(

17 Mile Beach Sunset. Olympus OMD EM5 MkII with Zuiko 12-50mm f3.5/6.3. F4.5 @ 80th sec. ISO 500
It never got better than the image above, with fairly flat lighting, but still some elements of colour. Whenever I'm presented with these conditions I think of two things; black & white and ICM (Intentional Camera Movement).

Olympus OMD EM5 MkII with 9mm Fisheye bodycap lens. F8 125th sec at ISO 1600
So I tried the black and white first, although there isn't a lot of contrast in the scene to really make black and white work. It's OK, but not great.

The light, what there was of it, was fading fast - perfect conditions for the long shutter speeds required for ICM photographs. But if you want to 'intentionally' blur your images with an Olympus mirrorless, then you need to turn the Image Stabilisation OFF first - it really is that good.

Olympus OMD EM5 MkII with 12-50mm EZ lens. F16 @  0.8secs, ISO 200
I aslo turned Auto ISO to OFF, setting the camera at its lowest ISO of 200 (for longer exposures). I then began to move the camera around as I exposed - effectivley 'painting with light' with the camera as the paintbrush. There are an infinite number of ways of moving the camera, so the results are practicaly limitless - and a whole lot of fun.

Olympus OMD EM5 MkII with 12-50mm EZ lens. F16 @ 2.5secs, ISO 200
With some colour still in the sky, the exposures weren't too long - only about 2 to 3 seconds. This is long enough to get some movement, but short enough to still retain a lot of the detail in the image. The result is a mysterious lansdcape that is obviously blurred, but still very readable as a landscape picture.

Olympus OMD Em5 MkII with 12-500mm EZ lens. F11 @ 3.5secs, ISO 200
The longer the exposure, the less landscapy the images are - and the more abstract they become. I'm a huge art  lover, and one of my favourite artists is Turner. His abstract expressionist paintings have always inspired me, and I strive for that look and feel in my ICM images.

Olympus OMD EM5 MkII with 12-50mm EZ. F16 @ 5secs. ISO 200.
ICM is a lot of fun and can really create some strikingly beautiful images. Granted, they may be more like paintings than traditional photographs - but therein lies the joy of experimentation.

Olympus OM-D EM-5 MkII with Zuiko 12-50mm EZ. F11 @ 8secs, ISO 200
Next time you're faced with a landscape that isn't quite doing it for you in terms of light and drama, think about slowing down your camera and trying some ICM (Intentional Camera Movement). It can be very counter-intuative at first - especially if you're used to shooting landscapes on a tripod. But once you start seeing the results on the lcd screen, and realise how liberating it can be to intentionally shoot for blur, then I think you'll be hooked on the technique. Enjoy!

Tuesday, 19 January 2016

The Making of an Image

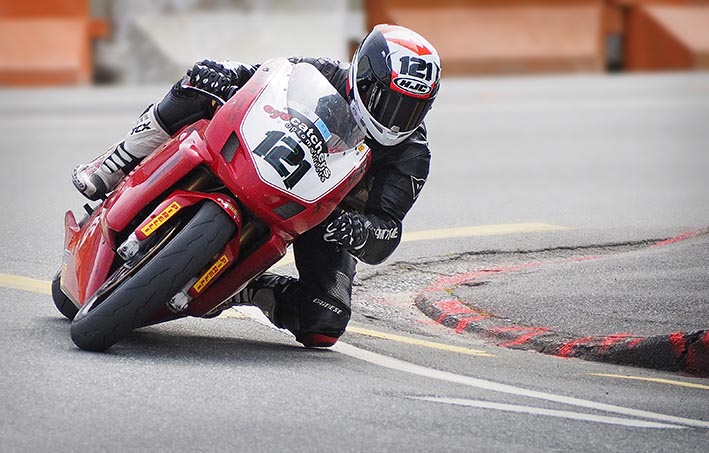
One of my favourite outings from last year would have to be the Greymouth Street Races. It was the shoot that convinced me that I had made the right decision moving to mirrorless. Up until then, I had been nervous about using the Olympus OM-D E-M5 MkII to photograph fast-moving subjects. But rather than being disappointed, I was blown away with the images that I got that day. It’s been a few months since then, and I have lived with the images for a while before deciding how to process them (there were over 2000 images!).

In the Lead. OM-D E-M5 MkII with 40-150mm f4/5.6 lens. 1/4000th sec @ f5.6, ISO 1600
As I said, I was thrilled with the quality of the images I captured – especially with the ‘cheap’ Olympus 40-150mm f4/5.6 consumer zoom. Cheap and plasticky it may be, but boy-oh-boy is it one sharp lens for the price. Even wide open, it’s as sharp, if not even sharper, than the Canon 400mm f5.6 and 70-200mm f2.8 pro zooms. And that’s not just anecdotal. That’s from actually comparing images taken with these lenses from previous years capturing the same event.

Cutting it Close. Olympus E-M5 MkII with 40-150mm f4/5.6 lens. 1/2000th sec @ f5.4, ISO 800
Yet as sharp as it may be, the one slightly limiting factor for the lens, and to a certain extent mirrorless itself, is the larger depth-of-field exhibited due to the smaller sensor size. F5.6 on the EM-5 MkII is equivalent to F11 on a full frame sensor (and probably around f8 on an APS-C sized DLSR). This is great for landscapes when you want everything in focus. Not so great for sports where you want a decent separation from the action and the background.

So, with the editing of the images, I set out to give more background blur, for a greater 3D quality and subject ‘pop’. I also wanted to simplify the backgrounds as much as possible, to really focus attention on the bikes themselves. I had tried to achieve this on the day by positioning myself somewhere on the track with fairly clean backgrounds. But even then, I wanted to make it cleaner still by cloning out a few problem areas.

Catch Me If You Can. E-M5 MkII with 40-150mm f4/5.6 lens. 1/2000th @ f5.6. ISO 640
What follows is my post-processing steps to create the final images included in this post. I will cover what and why I did what I did at each stage of the process, without going in to too great a detail about the actual how-to’s of the individual processes themselves. I’m very happy with the results, although that doesn’t mean I wouldn't do it slightly differently six months or a year from now. That’s the great thing about post-processing an image. You can take it in many different directions – as long as you keep the original!

First step is cropping. I don’t crop all that often, preferring to ‘crop’ in-camera as I shoot. But sometimes the action is fast and frenetic and you don’t have time to crop perfectly. So in this instance, and again, to help simplify the composition and distractions, I cropped afterwards.

Complete Concentration. E-M5 MkII with 40-150mm f4/5.6. 1/2000th @ f5.6. ISO 1000
Second step was actually sharpening. Yes, the images were already sharp, but I wanted to give them even more crispy sharpness. I achieved this with ‘high pass’ sharpening (my favourite way to sharpen), and then added a layer mask to mask out the areas I didn’t want sharp (like the asphalt on the road and the background).
 
Third step, cloning out the unwanted distractions. Cropping got rid of some of them, but many of the plastic barriers had dark holes and branding on them that were very distracting – even out of focus. So I cloned them out using a combination of 'content aware' fill and the clone brush.

Next was some dodging & burning and levels adjustments to get the exposure looking exactly how I wanted it. This usually meant some light dodging on the faces, and some opening up of the shadows with the highlight/shadow setting on +10 for the shadows. Then a simple levels ‘S’ curve finished things off.

Layers Palete in Photoshop for Blur
Having achieved all that, I was then ready to create the background separation. I wanted the final images to look like they were shot with an f2.8 aperture rather than the f5.6 (f11) they were actually taken with. To do this, I cut around the bike and rider using the pen tool (make sure you use a good graphics tablet if you’re going to be doing a lot of pen tool work) and selected this with a 0.5 feather on the selection. I pasted this on a new layer (Ctrl + J), and then went back to the original layer and duplicated this as well (Ctrl + J again). I re-selected the selection (found in the Path palate), this time with no feather, and hit Delete (Backspace) on the keyboard to cut it out of the layer. To this layer I applied a 15% Gaussian Blur, then added a layer mask. Using the gradient tool I masked out the lower third of the image, graduating towards the top where I wanted the most blur. And hey-presto, an f2.8 background!

This is the most time-consuming element to the image, but still only took me about 10 minutes to achieve. And I’m more than happy with the results. I wanted the bikes to really ‘pop’ out from the background, without making it look too unnatural. Hopefully I’ve achieved that?

All the changes made in post process to get the images looking how I wanted.
To finish it all off, I flatten the layers into one final image, and then darkened the top and bottom a little, before adding a 10% black feathered vignette to the image. Subtle, but just something to again help draw the eye to the action in the image.

It sounds like a lot, bit it really isn't when you sit down and get into the flow of processing. Each image probably took about 15 minutes, and it certainly helps if you have a good graphics tablet (Wacom Intuos).

And the finished image after all that processing.
Admittedly, I could have saved myself a few hours of post processing work by just shooting with an f2.8 lens in the first place. Agreed. Except, I don't have an f2.8 150mm lens on me, and am probably never likely to. So you make do with what you have, and just know you're up for some computer work afterwards. I don't think that 10 to 15 minutes is overly excessive in terms of post production anyway. I certainly wouldn't want to spend that time working on every shot I take - and I don't. My average is probably only a minute or two. But for images that I want to take the time to elevate to a higher standard, then 10 minutes is totally worth it (IMHO).

Out in Front. E-M5 MkII with 40-150mm f4/5.6 lens. 1/4000th sec @ f5.6. ISO 2000
There may be some photographers out there who still believe any use of Photoshop in an image is a crutch. Hard to believe maybe, but I'm old enough to remember back to Photoshop version 1 and the hot debates held by 'purist' photographers and those crazy early digital adopters. For a long time, Photoshop was a dirty word in camera club circles and while that may have changed, I know that many photographers still believe that you shouldn't spend longer than 1 minute 'working' on a photo on the computer.

I can sympathise. But sometimes, I also think that you've gotta do what you gotta do to help create your vision. You can't use Photoshop to make a silk purse out of a sow's ear, but you can (and should) use Photoshop to help you achieve the end result you envisaged when you took the photo. And that's exactly what I've done with the images in this post. Hope you like them?