Showing posts with label Fujifilm X-E2. Show all posts

Tuesday, 14 July 2020

Using Fujifilm's PC AutoSave function

There's not a lot I don't like about my Fujifilm X-E2. The size, weight, form factor, ergonomics and IQ are all fantastic, and I adore the range-finderesque style of shooting (which is a complete surprise to me).

There are, however, a couple of features (or lack of in one case) that I am not all that crazy about. First, which I wrote about last post, is the X-E2's inability to set individual white balance shifts for each custom film setting. To be fair, this isn't just an X-E2 issue, and was only recently fixed with the X-Pro 3 and X100V. Still, I wish the X-E2 had this ability.

Second, due to its X-Trans II sensor, the X-E2 doesn't have the Acros film simulation, and nor does it have any Grain setting for the film recipes. If I am going to stick to shooting in Jpeg-only going forwards (which remains to be seen), these are two settings I would dearly love to have. As much as I adore the X-E2 in most other respects, these omissions have me seriously considering upgrading to the X-E3.

And third, I'm not a huge fan of the positioning of the SD card underneath the camera right next to the battery. For a couple of reasons. Primarily, it's fiddly to get the card out with the battery in place, and even worse if the extra grip is attached. Fuji's own accessory grip for the X-E2 covers the battery compartment completely and so needs to be removed every time you need to change battery or SD card. I also have a third party grip which is better, in that it does have a cut-out so the door can be opened without complete removal of the grip. However, it makes the hole quite a bit deeper and therefore even more difficult to get you fingers in to eject the card. Sigh...

While not much can be done to fix my first two gripes (other than an upgrade to the X-E3 or X-Pro 3... yes please), my final issue does actually have a work-around - especially if you're shooting jpeg-only. It's a brilliant solution called PC AutoSave, and basically uses your home wi-fi connection to transfer all the images from the card to your computer wirelessly.


I recall a couple of years ago investigating whether this could be done on my Olympus OM-D EM5 MkII. I think that I had seen on some promotional material at the time that this feature was available on the Fuji's - so I presumed that since the E-M5 MkII had wi-fi connectivity, that it could do it as well. But alas, it couldn't. I actually wrote about my frustration with this at the time here.

In the ensuing couple of years, I'd obviously forgotten about this feature on the Fuji system (I'm getting old), and haven't been utilising it at all. Something (don't ask me what) jogged my memory the other day when I had returned from a quick shoot with the X-E2 at the Cobden Lagoon (see last post). As I was preparing to fight yet again with the camera to give up its SD card I suddenly thought "Hang on a minute. Can't you download these images over wi-fi?" And the answer is 'yes', you can.

It's pretty strtaight-forward as well (thanks Fujifilm). Just download the Fujifilm PC AutoSave App on your PC or laptop, open the software on the computer, and follow the prompts. You will first have to set your camera up to 'Save to PC' in its wi-fi settings, and then connect the camera to your home wi-fi network. But once you've achieved these simple tasks (the software walks you through the process) the rest is plain sailing. Point the software to the folder you want to use as the 'download' folder, hit enter when the camera asks you if you want to transfer the files to your PC, and bingo - away it goes. Brilliant!

Honestly, this is the answer to all my prayers (in-so-far as the SD card issues are concerned). With wireless transfer of images to my computer, I need never take the 64GB SD card out of the camera ever again! And you only have to go through the (relatively painless) rigmarole of setting it up once. Next time you come back from shooting, set the camera to 'Image Preview' mode, press the wi-fi button, and the camera should pair up to the computer automatically.

It's a great system for someone shooting Jpeg-only, with 'relatively' small file sizes. I'd imagine that if you were shooting RAW + Jpeg and came back from a wedding with a full 64GB card (or two), then it might take quite some time to transfer them all over wi-fi. In that scnario, perhaps the old-fashion card reader might still be the better option? But for one or two hundred Jpegs transferred over wi-fi, the wait time isn't too horrendous.

Fortunately, after file transfer is complete, the camera disables the wi-fi connection automatically. You should, however, make sure that you have a reasonably full battery in the camera during image downloading, since the camera - not surprisingly - needs to be 'on' during the process.

This all may be old-hat to many of you who have been using Fuji cameras fro a while. But for me, it's been almost revolutionary! I've never been able to do this with any other camera that I've owned - although I wanted to with the Olympus's and couldn't understand why they didn't.

If, like me, you've been fiddling about getting the SD cards out of the slot next to the battery chamber, then fiddle no more! Download Fujifilm's PC AutoSave app and enjoy the liberating experience of wireless image transfer! What a relief.

Thursday, 9 July 2020

Jpeg-only week one with Velvia Film simulation

It's my first week of shooting in Jpeg-only with custom film simulations on my Fujifilm X-E2, and I've already completely rearranged my recipes!

Cobden Lagoon, early evening. X-E2 with 16-50mm XC. f/8 @ 1/20th, ISO 3200. Velvia recipe

In my last post I explained how I've set up the seven custom slots to allow for white balance adjustments for each film recipe. This relies on heavy use of similar film stocks that use the same WB channel adjustments. Mostly, this meant using Kodak film recipes. But when I took a series of test images (again, see last post), I came away feeling that there wasn't enough variance in the final results. All the images looked a bit too similar. 

So, I decided to start from scratch, and have now programmed in a whole new set of recipes that are hopefully going to give me a bit more variance between 'looks'. I've kept the first two film simulations from my previous set (Kodak Ektachrome 100SW and Fuji Acros), and have added Agfa Optima 200, Agfa Scala, Fuji Velvia, Ilford HP5 and Kodak Gold 200. I feel a lot better about this set of recipes - it feels a bit more 'democratic'. Two Kodak, two Fuji, two Agfa and one Ilford. Sounds pretty good to me.

Cabbage tree and tussock. f/8 @ 1/30th, ISO 3200
I've been itching to get out and start shooting (always a good sign), and got my wish this week after work. We've been having some lovely sunsets here recently (it's mid winter), and driving home from work I could see that the sky was starting to colour up nicely.

However, the sun also sets pretty quickly this time of year, so you need to be at the right place at the right time or you'll miss the light. 

There is a lagoon walk not far from where we live, so my wife and I headed off from home towards the lagoon, hoping that the light would last - and colour up enough to get some decent images. 

I took my Fujifilm X-E2 with Fujinon 16-50mm XC lens, the 50-230mm XC and a spare battery. I don't carry a tripod when we go out walking in the evening. My wife is happy for me to wander around with the camera, but if I started setting the tripod up every 5 minutes I think that her good nature would be sorely tested. So I grab anything I can hand-held, and don't mind cranking the ISO up if I have to.

In fact, all of my film recipes use 'Auto' ISO - with the colour stocks topping out at 3200, while the B&W simulations get cranked up to 6400 if necessary. If it's a toss-up between camera shake at low ISO's, or getting the shot with some 'noise' (grain) at high ISO's, I'll get the shot with noise every time.

Most of the photos I took while on the walk were captured at ISO 3200. And while there certainly is some 'noise' if you zoom into the image, I certainly don't find it objectionable. I understand that noise is a subjective thing. Some want as clean an image as possible at ISO 250,000 - whereas others (like me) don't mind a bit of noise in an image.

Cobden Lagoon blush. X-E2 with 16-50mm XC. f/8 @ 1/20th, ISO 3200. Velvia recipe

If I was blowing the images up super-large for printing then it might be a different case. In that scenario I would use a tripod and lower my ISO as much as possible. But these are just 'test' images to start to get a feel for the particular film recipes, so they were only going to be for the web or social media anyway.

With the sky starting to 'pink-up', I knew I wanted to shoot with a recipe that gave me the richest possible colour. So I set my custom slot to C5 - Fuji Velvia. Colours don't get more punchy than on Fuji's Velvia slide film, and as can be seen from the images accompanying this post, it was certainly the right choice!

Purple Haze. f/8 @ 1/60th, ISO 1600. Fuji Velvia film simulation
 
Initially I thought that I had lost the light and had left it too late. But when I held the camera up to my eye, the evf exploded with colour! The above image certainly didn't look like this to my naked eye. But with the Velvia recipe, the light was intense, and incredible. I snapped some images, showed my wife the back of the screen, and she couldn't believe the colour I was getting.

Full disclosure - all of the recipes I'm using are taken off of the internet - and more specifically, from Richie Roech's excellent Fuji X Weekly blog. I have, however, had to modify them slightly, since most of his custom film recipes are designed for the X-Trans III sensor (and the X-E2 uses the earlier X-Trans II sensor).

Cobden Lagoon Sunset colours. f/8 @ 1/60th, ISO 1600

Now, the keen observers among you (of which I'm sure there are many) will no doubt be saying - "Hang on a minute. Don't Fujifilm cameras come with a pre-exisitng Velvia film stock already programmed in"? What do you need a 'Velvia' custom recipe for"? Excellent question, and point well taken.

All Fujifilm digital cameras do indeed come with the Velvia film stock included (as well as Astia, Provia, Monochrome etc). And while the Velvia film recipe I'm using starts with the Velvia stock as a base (obviously), it 'tweaks' it to produce even more Velvia film-like goodness!

My Fuji Velvia recipe for the X-Trans II sensor looks like this:

Fuji Velvia
Film base: Velvia
DR:200
Colour: +2
Sharpness: +1
Highlight Tone: -1
Shadow Tone: 0
Noise Reduction: -2
White Balance: 'Auto' (+1R, -1B)
ISO: Auto up to 3200

Cobden Lagoon Sunset. Fuji X-E2 with 16-50mm. f/8 @ 1/60th, ISO 1600. Velvia recipe

Am I pleased with the results? You betcha! The vibrancy it produced from the small amount of colour that could be seen by the naked eye is incredible. And yet, the first few images I took on the walk (seen above) are 'fairly' realistic to what I saw at the time. So yes, it's punchy and colourful - but not so over-the-top so as to look fake and unuseable. Not great for portraits, but amazing for landscapes - exactly like the actual Velvia film stock. 

Of course I will need to try it out at other locations, under other lighting conditions. But if this night at the lagoon was anything to go by, I think I may have found my go-to landscape film recipe!?

Sunday, 5 July 2020

WB settings for film simulations in my Fujifilm X-E2

In my last post I discussed 'going 100% Jpeg'. This may sound scary to some photographers for who shooting Raw is almost a religion (and yes, that was me too). It's really only been made possible - for me at least - by shooting with the Fuji custom film simulations (or recipes).

Fujifilm expects you to play around with film simulations and create your own - that's what their X-Raw Studio software is all about. Unfortunately, my X-E2 is not compatible with X-Raw Studio (I presume it only works for X-Trans III sensors and above?). Fortunately, others have done the hard work for me already, and there are a plethora of film simulations on-line to choose from (check out the amazing Fuji X Weekly blog).

All sorts of parameters can be tweaked to create a 'look' you're after; from highlight and shadow tone, to sharpness and colour - and even grain and clarity on the latest Fuji camera models (alas, again, not my X-E2!) To get the very best out of these film simulations, you also need to tweak the white balance R & B (red and blue) channels to truly dial-in the colour shifts that some 'films' give. It's well known among film shooters that Kodak has warmer tones than Fuji, whose films are generally slightly cooler (bluer). To achieve these colour variables, the R and B channels can be changed to mimic these tonal variances. So far so good.

Unfortunately, on most of the Fuji cameras, these changes to white balance in the R & B channels are a 'global' change. So, for example, if you have Auto WB set, with a +3R and -2B colour shift, all film recipes that use Auto WB will have the same shift applied. Annoyingly! This has, fortunately, been fixed with the X-Pro 3 (and X100F I think?) - but I don't have an X-Pro 3, do I...😞

Fear not, fellow Fuji user - for there is a work-around for this... kind of. Since the white balance shift is global, what you need to do is set different white balances for each film simulation, applying the correct red and blue channel shift to each white balance. You can also, of course, choose film simulations that use the same r&b channel colour shifts. I've set my X-E2 up with a combination of the two. Let me explain...

The seven film recipes I have currently programmed into my Fujifilm X-E2

Currently, in the seven allowable custom setting slots on the X-E2, I have Ektachrome 100SW, Acros mono, Kodachrome II, Kodak Tri-X, Fujichrome Sensia 100, Kodak Ektar 100 and Kodak Portra 400 film 'simulations' programmed in. Of those, five use the same Auto white balance shift (Auto +3R, -4B) while two have different WB settings applied with their own R&B channel shifts.

Remember how I said earlier that Kodak is known for being a 'warmer' toned film. Look at the list above. Five of them happen to be Kodak film recipes - four of which (Ektachrome, Kodachrome, Ektar and Portra) use the same Auto WB as mentioned above. The fifth is actually the black and white Fuji 'Acros' simulation. Since mono is less crucial with colour shifts (obviously), having my Acros film simulation share the Kodak films WB setting isn't an issue.


Having said that, of the two film recipes that have other WB settings applied, one of those just happens to be a Kodak mono film - Kodak Tri-X. This recipe actually uses a Daylight WB, with +9R and -9B. The final, odd one out is, not surprisingly, the Fujichrome Sensia recipe. The slightly 'blue' cast associated with many Fuji films is actually achieved by using the Fluorescent 2 WB with a -1R and -3B channel shift. As can be seen in the thumbnails above, it certainly gives it a blue tone over the other Kodak film recipes. 

It's early days using these film recipes, and the above images were taken on a very overcast and gloomy day - not my normal shooting conditions. Initial indications, however, are good, with the film simulations rendering the Jpegs as expected. Ektachrome and Ektar are exhibiting the punchier colours, while Kodachrome has a more vintage look. Sensia, as mentioned, has the cooler Fujifilm tones, whereas Portra colours are more subtle and muted (ideal for portraits). The Acros and Tri-X mono recipes are fairly similar in overcast conditions. I expect more variance will become apparent in brighter light?

I won't go into each individual recipe in this post - it's far too long already 😆 Look for future blog posts where I will discuss each individual recipe I'm using in greater detail. If anything I've written in this post doesn't quite make sense, or you want further clarification, don't hesitate to comment down below and ask me questions. I'm just feeling my way through using channel shifts as well, so maybe we can work all this out together?

I do encourage you, if you're not already, to set some film 'recipes' up in your custom settings on your camera and start using them. They are a lot of fun, especially if you're an ex-film shooter who had some favourite film stocks back-in-the-day. Yes, I know it's still digital. But you can at least pretend you're shooting film - can't you?

Shooting Jpeg Only for 6 months!

Yeah, I know - the Jpeg vs Raw debate is about as old as Canon vs Nikon - and about as interesting (not). Any photographer worth their salt will tell you that you should only ever shoot in Raw, and if you absolutely HAVE to have a Jpeg (for some bizarre reason), then shoot in Raw + Jpeg (and then throw the Jpeg away).

I'm one of those photographers, to be honest. I've pretty much only ever shot in Raw since picking up my Nikon D70 sixteen years ago, and have never really understood the Raw + Jpeg argument. If you've shot Raw, what on earth would you need the (inferior) Jpeg for? Ok - maybe sports photographers had a case for shooting jpeg once upon a time (when cards were measured in Megabytes and not Gigs). But for 99.99% of the rest of us, just shoot Raw. Job done.

But... (isn't there always a but)... more recently - and I mean only in the last few years - the allure of shooting Jpeg-only has been brewing. More and more 'serious' photographers have been extolling the virtues of using Jpegs SOOC (Straight Out Of Camera) because the manufacturer's Jpeg processing engines inside their cameras are just so good! The rise of mirrorless cameras, where you can actually see your exposure (and tweak the highlight and shadow areas) before taking the shot, has helped hugely to light a fire under the 'shoot Jpeg only' brigade. Expose carefully, use a creative filter, and have the camera process it for you. Job done.

Shipwreck, Cobden Beach. Fuji X-E2 Jpeg (edited)

About a year ago, I moved over to using the Fujifilm system - namely the X-E1 and X-E2. I've absolutely fallen in love with the ergonomics, handling, and IQ from these range-finder style APS-C cameras. But if I'm honest, the main reason I wanted to try out the Fuji system - and the main reason I'll probably stay in the Fuji ecosystem for a very long time - are their film simulations.

I grew up using film, and still shoot with film cameras from time to time (see my recent posts on choosing a 35mm film system). So moving to a digital camera, from Fujifilm, that shoots with film simulations like Velvia, Provia and Astia, was almost a no-brainer! In fact, I'm not quite sure what's taken me so long to be honest?

But... (there's that but again)... the film simulations are only applied to Jpegs. Not surprisingly, the Raw files are left untouched. No problem - I hear you say. Just shoot Raw + Jpeg and have the best of both worlds. A Jpeg with the film simulations applied, and a Raw file that you can tweak and torture to your hearts content in Lightroom or Photoshop. And yes - thank you - that's exactly what I've been doing. Job done.

Or is it? Because a very large part of me isn't really very happy with this solution. I've always thought, as mentioned earlier, that shooting Raw + Jpeg was rather redundant. And I still do think that. I hate coming back from a shoot with 100 photos - only that's now 200 because I shot in two file formats, one of which I know I'm probably never going to use! In the past, that 'redundant' file was the jpeg. Now that I'm shooting with the Fujifilm, and utilising film simulations, the redundant file is - well - the Raw file!

Proud grandparents. Fujifilm X-E2 Mono (no editing)
I've toyed (briefly) in the past with shooting Jpeg-only when I was using Olympus gear. The Olympus Jpegs are known for being excellent SOOC, so I tried to go Jpeg-only with them for a while. Didn't last long through, since I wasn't really excited about their existing creative filters.

With Fujifilm, however, their film simulations are 'next-level'. On their own they are fantastic. But there's more! You can actually build your own 'custom' film recipes and programme them into seven slots to recall and use them instantly. There are many custom recipes on-line - most famously on Fuji X Weekly, a blog run by film recipe expert Ritchie Roesch. This means that you can pre-programme film 'simulations' like Kodachrome 64, Kodak Tri-X and Agfa Optima into you camera and switch between these 'looks' as the mood (or scene) dictates. For a die-hard film shooter like me, this is absolute photography heaven!

For example, at the moment in my X-E2 I have; Ektachrome 100SW, Fuji Acros, Kodachrome II, Kodak Tri-X, Fujichrome Sensia 100, Kodak Ektar 100 and Kodak Portra 400 all programmed into my custom film simulation settings. I can flick between them almost instantly, get seven different 'film' looks SOOC, and have minimal editing to do once I get the image home.

So I've decided to 'bite the bullet' and shoot Jpeg-only for the next 6 months at least. Seriously. No cheating. No Raw + jpeg 'just in case'. It will be film simulation Jpegs only for the next six months. Sounds a bit scary. And for a die-hard Raw shooter, it is a bit scary. But modern Jpegs - well exposed modern Jpegs - are surprisingly editable. And If I'm happy with the film simulations, there shouldn't be much - if any - editing required anyway?

As someone who is more than happy shooting film - I think I'll handle Jpeg-only digital capture for six months. Who knows, I may even go longer?

Monday, 30 March 2020

Golden Bay Holiday - Farewell Spit Dunes and Sunset

The Golden Bay Region at the top of New Zealand's South Island is a photographer's paradise! There is so much to see and photograph; from rugged coastline and sandy beaches, to old abandoned buildings and various wildlife. 

On just our second day at Puponga, blessed with beautiful weather (not a breath of wind), we decided to walk along the Spit at low tide, to photograph the sand dunes. We hoped for some nice evening light and some interesting formations to photograph. What we got was out of this world spectacular!


It's about an hours walk to the dunes from the car park. But if you are going to go you need to make sure that the tide is well out. Fortunately for us, we had timed it perfectly and low-tide coincided with sunset. I didn't really know what to expect from the dunes, and after about three quarters of an hour of trudging over broken shells carrying a tripod and camera gear, I was beginning to wonder whether it was all going to be worth it? But boy oh boy, was it worth it!

Farewell Spit Sand Dunes. Fuji X-E2 with Fujinon 16-50mm XF lens. f9 @ 1/45th sec, ISO 200
We were greeted with a landscape unlike any other I have ever experienced. I've never been to the desert before, and am possibly never likely to? So for me, this was the next best thing. A sandscape that reminded me of the sand planet Tattoine in the Star Wars movies, bathed in beautiful evening light. My photography brain almost exploded from sensory overload! It was almost too much to take in and process. It was so alien and foreign - I'm used to a lot of lush green on the West Coast - that I almost didn't know how to approach photographing it? And yet, at the same time, incredible images seemed to materialise no matter where I pointed my camera!

Visions of Tattoine. Fuji X-E2 with Fujinon 16-50mm XF lens. f9 @ 1/56th sec, ISO 200
Faced with such an overwhelming visual experience, I knew that I ran the risk of just 'spraying and praying'. Taking hundreds of images of stuff that was 'new' without really considering the 'why' of the image. So luckily I decided to slow down and give myself 10 minutes just to soak it all in and not take a single photo. I also decided to switch the camera to black and white in the viewfinder (shooting RAW + Jpeg so I would have the option of both colour and b&w later). These two decisions saved my bacon (so to speak), as they forced me to slow down and actually 'look' at what I was seeing.

What was I drawn to most strongly? What was I responding to most emotionally? When I took the time to ask myself these questions, and when I looked through the viewfinder of the X-E2 at the black and white image, I realised that it was the textures and the forms in the sand that excited me the most. And especially how these textures and forms were responding to the light. So that's what I concentrated on for my images.

Golden light. Fuji X-E2 with Fujinon 16-50mm XF lens. f9 @ 1/25th sec, ISO 200
If that had been the photography done and dusted for the evening then I would have gone away very happy and considered it a successful evenings shoot. But mother nature wasn't finished with us yet.

The light was slowly fading as we left the sand dunes to head back to the car park. We had another hours journey ahead of us, and wanted to make it back before dark. But we were also hopeful that the sky might colour up for a decent sunset. We'd had an amazing time with wonderful light at the sand dunes. Did we dare hope for a great sunset as well?

Colouring up. Fuji X-E2 with Fujinon 16-50mm XF lens. f11 @ 1/40th, ISO 200.
As we made our way back, we couldn't believe our eyes (and luck)! The light was gorgeous, and just kept getting better and better! At low tide, on such a still and calm evening, the reflections in the remaining water were perfect. Glassy smooth and pristine. Nicki and I were two very happy and excited photographers, with perfect conditions, in what turned out to be one of the best evenings of my life - period!

Very happy Photographers! Photo: Joanna Lorimer
On a more technical note: I continue to be impressed and more than satisfied with the 16MP x-trans sensor in the Fuji X-E2. The x-trans colours are beautiful, the files are clean, and the cameras themselves are a joy to handle and use. I still love the programmable 'film simulations' of the Fuji's, and switching quickly between them is a breeze. Having shot b&w using my 'C2 - Acros' film simulation at the sand dunes, a quick press of the 'Q' button and flick of the control wheel and I switched to my 'C1 - Classic Chrome' film simulation for punchy sunset colours. The jpegs that these film simulations produce are astoundingly good. But so too, surprisingly, are the RAW files from the x-trans sensor. Most manufacturers RAW files are somewhat duller (even lack luster) when compared to the out-of-camera jpegs - but not so with the Fuji RAW's from the X-E2. Even the RAW files are punchy and colourful, with very little needing to be done to them in the way of added contrast or saturation. When I flick between a Nikon jpeg and RAW capture in Lightroom, the difference between the two files is obvious. Not so much with the Fuji's. Which I like.

Sunset over Abel Tasman. Fuji X-E2 with Fujinon 16-50mm XF lens. f16 @ 2 secs. ISO 200
We had gone on holiday to Golden Bay knowing that there would be plenty of photo opportunities. I had prepared my gear as best I could, but you always need the weather to come to the party. So there is always going to be an element of luck involved with any photographic endevour. On only our second night at Golden Bay, we got extremely, extremely 'lucky'. We were in the right place, at the right time, to capture some truly magnificent light on the landscape.

On nights like this, in those moments when everything aligns and comes together (which - lets be honest - are extremely rare), I feel amazingly honoured, and incredibly humbled, to be a photographer. It's a hobby/profession that I've been passionate about for over 30 years of my life.

You may or may not be a person with a religious faith. I happen to be. And on a night like the one we experience that evening, I feel closer to my creator than at any other time. That's the gift that photography gives me.

Friday, 11 October 2019

Quick shoot with the Fuji XF 27mm f2.8 pancake

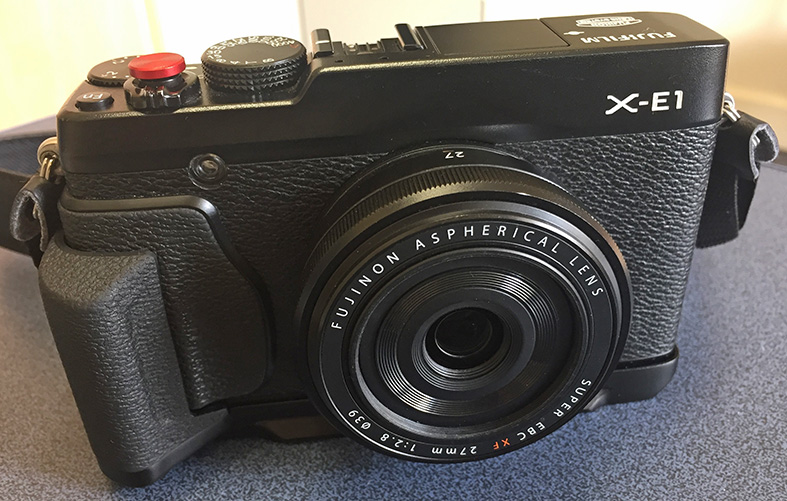
My pimped X-E1 with 27mm pancake... Nice!
As mentioned in my last post, I am using the Fuji X-E2 as my main camera, but have also purchased an X-E1 and Fujinon XF 27mm f2.8 pancake lens as a 'backup'.

Just a couple of  months ago, I put my toe in the water of the Fujifilm system with an X-E1. I was hooked from the moment I took my first image with the compact, range-finder style body, and the beautiful Fuji x-trans sensor.

The X-E1 very quickly made way for the X-E2, although it was far from being a straight forward decision. I was still running a Nikon DSLR kit as well, and couldn't justify keeping both X-E's. So reluctantly the X-E1 had to go.

But, so enamored have I become with Fujifilm, that I soon after decided that it was the one system for me - so I sold my Nikon gear and got an X-T1. Great decision - right? Well, for some maybe. But not for me. Turns out I'm a compact, range-finder style guy. Who knew!? (Certainly not me). So I've sold the X-T1 and got, instead, the X-E1 (yay!). So now I'm back where I started - rockin' two X-E's - and lovin' it.

Hokitika Beach sculptures. Fuji X-E1 with Fujinon XF 27mm f2.8 pancake. f/4 @ 1/950th, ISO 200. C2: Acros recipe
I have been a working photographer in the past (shooting weddings) and have the 'back-up your gear' mindset drummed into me. These cameras are very well built, and it's unlikely that there will be a problem 99.9% of the time. But they are also full of electronics - and electronics do fail. So I like to have that 0.1% covered. Just in case. And then, of course, there's always human error. I have dropped, and destroyed, camera gear on at least two occasions. So yes, redundancy is a thing...

Which also meant that I needed a backup lens to go with my XC 16-50mm zoom. I could have gone for another one, but I decided to see what else I could get for a similar price - to experience a bit more of the Fuji system, since Fuji is all still new to me.

I've said in the past that I'm not a prime kinda guy. And while this is true, there is one prime lens that I've owned regularly, and used a lot. The 50mm f1.8 - in both Canon and Nikon flavours. I've often advised students to go for a fast, standard prime, as their first lens purchase outside the kit lens, so I figured I may as well take my own advice for once!

I was tossing up between either the Fujinon 23mm f2 or the 35mm f2, which would give a 35mm or 50mm equivalent focal length (respectively) in traditional film terms. I honestly couldn't decide which I should go for - and then I saw a review on the 27mm f2.8 pancake (40mm fov).

Fujinon XF 27mm f2.8 lens elements
All the reviews I read or watched were super positive about this tiny little pancake prime lens. Sharp, reasonably fast focusing, well made, small and light - what's not to like? Especially when paired with the X-E's. The 40mm (40.5mm to be exact) field of view in traditional full frame terms seems like the ideal compromise between the 35mm's wide and the 50mm's normal. In fact, apparently 43mm is 'normal' (hence Pentax's 43mm prime). So the Fujinon XF 27mm f2.8 (multiplied by x1.5 for the sensor's 'crop' factor) should give me a great 'standard' walk around field of view. Not to mention a super lightweight and super small profile.

How lightweight and how small, you ask?  It weighs just 78 grams, is only 23mm deep, and uses a 39mm filter thread. Yet it also manages to house 7 elements in 5 groups - with one aspherical element (see diagram above). I've owned the Olympus 17mm f2.8 pancake lens when I was using micro four thirds, and while the Olympus is even lighter still (at 71 grams), and just a touch thinner (22mm deep), it's also designed for a smaller sensor. I'd give the build quality to the Fujinon, as well as focus speed and optical quality.

Beach Sculpture, Hokitika. Fuji X-E1 with Fujinon XF 27mm f2.8. f/4 @ 1/400th, ISO 200. C2: Acros recipe
So far so good in theory. But what about in practice? What's the Fujinon XF 27mm f2.8 pancake lens actually like to shoot with? And what kind of images can it produce?

As its diminutive size and weight would suggest, when popped onto a camera body it really doesn't make much of an impression. Even on the small X-E1. There's just enough lens to rest in your hand when holding the camera up to the eye. But you will be cradling the fly-by-wire focusing ring. Not a big deal, and certainly ok if you are planning to focus manually (I'm probably not). On a bigger camera (like the XT-1) it would probably get lost pretty quickly and maybe even look a little ridiculous? I guess the 23mm f2 or 35mm f2 lenses would be better choices for the X-T range of bodies?

Driftwood Sculpture, Hokitika Beach. Fuji X-E1 with 27mm f2.8 XF pancake. f/4 @ 1/640th, ISO 200
As you can see from the first image on this post, I have attached the extra grip to the X-E1 body. In hindsight, this is probably not really necessary with such a small lens attached, so I think I will actually swap it over to the X-E2. I guess the reason I didn't do so in the first place was because the X-E2 has the leather case attached, which won't fit with the added grip. I'll swap them over and use the grip on the X-E2 with zoom lens, and the leather case on the X-E1 with 27mm pancake. Makes a bit more sense that way around.

I've only had the lens for a few days, so it's far too early to give a full user-review. But so far so good in terms of handling, auto focus response and image quality. From the few images I've taken with it so far, it seems plenty sharp enough. I haven't pixel-peeped edge-to-edge, but nor have I really used it at my optimal landscape apertures yet (f8 to f11). I guess it's not really going to be my 'landscape' lens anyway. It is what it is - a back-up/walk around lens.

Sunset Point, Hokitika Beach. Fuji X-E1 with Fujinon XF 27mm f2.8. f/4 @ 1/850th, ISO 200. C2: Acros recipe
All the images here are jpegs, shot with my C2: Acros film simulation recipe, and lightly edited in Lightroom. Just my standard clarity and dehaze with a slight vignette and some grain added. I'm very please with these initial images, and happy to be using the X-E1 again. It may be 'old' (Really? Is six years really that old?) but damn does that first generation x-trans sensor take some great images!

The weather is clearing (briefly), so I plan to take this combo out again soon and continue to put it through its paces. I'll probably mix it up next time and shoot some colour film simulations as well as black and white. At 40mm (equivalent fov) and an f2.8 aperture, it may even be worth shooting a few portraits with the lens? I haven't done many portraits since moving to Fuji, so if I can find some willing subjects, that might be the next test?

Tuesday, 8 October 2019

Film Simulation Recipe C4: Kodak Tri-X

If you've been following along recently (thanks if you have - shame on you if you haven't), you will have been introduced to the first two of my custom film recipes for my Fujifilm X-E1. If you want to catch up on these posts, go here for my version of Classic Chrome, and here for my version of Acros.

Hansen Park, Christchurch. Fuji X-E2 with Fujinon 16-50mm. f/16 @ 1/100th, ISO 400
C4 film simulation recipe - Kodak Tri-X jpeg
To mix things up a bit (and to keep those who are following along on their toes), I'm going to jump from C2 to C4, missing out C3 - my Kodak Portra 400 simulation - for another time. Couple of reasons for this. First, I haven't used the C3 Portra 400 simulation yet, since I haven't been taking many portraits (which is mainly what I would use this film simulation recipe for). But mainly it's because I recently had the opportunity to shoot in a park early in the morning and decided to use the more 'grittier' C4 film simulation. So I actually have some images to show that use this film simulation.

C4: Kodak Tr-X Film Recipe
ISO 400 (will increase if appropriate)
Dynamic Range: 200
White Balance: Auto
Noise Reduction: 0
Image Size: Large 3:2
Image Quality: RAW + Jpeg fine
Film simulation base: Monochrome + R
Highlight Tone: +1
Shadow Tone: +2
Sharpness: +1

As you can see, my Kodak film simulation is based on the Monochrome + Red filter, for a bit more contrast in the black and white tones. This is further enhanced by boosting both the highlights and shadows much more than with my 'standard' Acros simulation. Base ISO begins at ISO 400 to mimic the classic Kodak Tri-X rating, with +1 sharpness to emulate Tri-X's outstanding edge-to-edge sharpness.

Casting Shadows. Fuji X-E2 with Fujinon 16-50mm XC. f/5.6 @ 1/750th, ISO 400. C4 film simulation: Kodak Tri-X
Of my film simulation recipes for the X-E2 (and X-E1), four are black and white and three are colour. When shooting with actual film, I tend to be more of a black and white user, so it's not surprising that me preferences for 'film stock' in the X-E2 is going to be slightly skewed towards B&W.

Of course all my 'titles' for these film recipes are completely arbitrary. The C4 simulation is simply my attempt at replicating a more grittier, high contrast black and white look. The kind of look I associate more with Kodak Tri-X. And calling it Kodak Tri-X is just more cooler (and more descriptive) than always referring to it as 'C4'.

Creeping shadows. Fuji X-E2. f/5.6 @ 1/320th, ISO 400. C4: Kodak Tri-X
I think I mentioned this in my previous post about the Acros recipe, but it's worth mentioning again. The reason I love shooting in the black and white film simulations, is that it offers me the best of both worlds. Setting the camera to shoot in RAW + Jpeg, I get to 'see' in black and white through the evf and subsequent image on the lcd screen, but I also capture a colour RAW file if I change my mind and want the image in colour.

Actually 'seeing' in monochrome is by far the biggest benefit. Eliminating the colour reduces the image to purely shapes, lines and tones. This was a huge help when visualizing an image like the one above - Creeping shadows. Yes, I could see that the shadows were making interesting shapes on the grass when I was there taking the photo. But by setting the camera to my C4 film recipe I was able to  remove all the distracting elements and nail the image in-camera. I could have shot in colour only, knowing that I was going to convert it to monochrome later on and boost the contrast in Lightroom. But if I knew that already, why not just do it at the time? Fuji's outstanding film simulation recipes allow me to do this.

A shadow of my former self. Fuji X-E2 with Fujinon 16-50mm XC. f/5.6 @ 1/550th, ISO 400
I have visited Hansen Park in Christchurch every month for the last six months, and photographed there at the same time each visit. My wife and I have been going over to a medical centre near there, and I have been taking the opportunity to go for a walk in the park and take photos while my wife has her appointment. It's been the winter months mostly, with very cold mornings. But now it's spring, and at 9.30 in the morning the sun was casting very strong side light through the park. The shadows looked fantastic in b&w through the evf, so this is what I decided to concentrate on capturing this morning.

Treescape. Fuji X-E2 with Fujinon 16-50mm XC. f/8 @ 1/240th, ISO 400. C4: Kodak Tri-X jpeg
The X-E2 with lensmate thumb grip and leather case makes for a surprisingly comfortable grip for such a small compact camera. As I talked about in my last post, this is also helped by using the ultra-light Fujinon 16-50mm XC lens. My 'new' secondhand silver mark II version arrived before the weekend, just in time to take it away with me. It's just as sharp and impressive as my last black, mark I, version of the lens - and looks great in silver on the silver/black X-E2 body.

Handling, ergonomics and shooting experience with the Fujifilm X-E2 is sheer joy. I haven't had this much pleasure using a camera in a very long time. Sure, I 'enjoy' using cameras - full stop. The Nikon D300 was/is a 'great' camera, as are the Canons. But there's just something else about the Fujifilm X-E2 (and X-E1) that captivates me and makes me want to shoot. Something almost undefinable. It's all getting a bit 'zen' (sorry), but the connection I feel to the Fuji's is quite special.

Dappled light. Fujifilm X-E2 & Fujinon 16-50mm XC. f/8 @ 1/450th, ISO 400. C4: Kodak Tri-X - jpeg 
Anyone who has followed my posts on this blog for any length of time will understand that I've been searching for my 'ideal' camera system for years. I've oohed and aahed over many systems through the years - from big pro DLSR's like the Canon EOS 1D, to small micro four thirds Olympus E-M1's. And as I said earlier, I've 'enjoyed' them all. But none have given me the almost 'spiritual' connection (here he goes again) that I feel with the Fujifilm X-E's. Am I reading too much into enjoying using a new (for me) camera system? Maybe. But I've also written about how I wasn't that enamored with the X-T1. So I do feel I have at least some perspective still in tact!?

I'm loving the images, I'm loving the cameras and I'm loving the whole user experience. I can't really say much more than that. I've recently sold off all my other gear and moved entirely to the Fujifilm X-E2. But such is the lure of the original X-E1, I've purchased another (back up) body, having just sold my first X-E1 recently. I had presumed the X-T1 / X-E2 would be my camera combination, but once I'd decided to sell the X-T1, I started looking for another X-E1. I found one almost straight away - a black body in mint condition. So now I have an X-E2 / X-E1 combination. And although I'm not a prime lens kinda guy, I've also snapped up a Fujinon 27mm f2.8 pancake lens, which I will pair with the black X-E1 for a super small, super light combo. Looking forward to trying this out and comparing the IQ with the 16-50mm XC. I will post about this soon.

Thursday, 19 September 2019

Landscape photos with the Fujifilm X-E2

I've fallen in love with the Fujifilm X cameras! Having recently purchased a used X-E1 to get a 'taste' of the system (to replace my Pen E-P3 as my mirrorless travel camera), I'm now gorging myself on all the x-trans Fujifilm goodness I can handle!

Motukeikei Beach, West Coast. Fujifilm X-E2 with Fujinon 16-50mm. f8 @ 1/140th, ISO 800.
(RAF file processed in Lightroom)
I'm definitely in the 'honeymoon' phase, willing to overlook any faults that the system may have (surely not), to focus instead on all the amazing positives. Of which, I believe, there are many.

As I said earlier, and wrote about recently here, the Fujifilm X-E1 is my 'toe in the water'. I've used it on a couple of landscape outings so far, and have been so amazed and impressed by the images it produces, that I've gone and got an X-E2! They are so cheap (relatively speaking) body-only, that I just couldn't say no - and to be honest, I was also curious to see how the E2 improved on the E1.

Motukeikei Beach low tide. Fuji X-E2 with Fujinon 16-50mm. f5.6 @ 1/20th, ISO 800
So is the X-E2 an improvement on the X-E1? Yes - and No. What's that supposed to mean? Let me try to explain...

In terms of technology upgrades, the X-E2 is an improvement over the X-E1 - as to be expected. It has a bigger, clearer (higher resolution) rear lcd screen, much faster write-times (much faster), a 'better' autofocus system, more exposure compensation latitude (+/-3 compared to the X-E1's +/-2), a less laggy evf, wifi capability, and a few more customisable function dials than the X-E1. So all-in-all, it feels like a newer, more responsive, camera. And as I've said already, so it should.

Motukeikei Beach Sunset. X-E2 with 16-50mm. f/11 @ 1/2sec, ISO 200
BUT - (here it comes), in terms of IQ (image quality), the two cameras are as close to identical as to make the differences irrelevant. Yes, the X-E2 is 14bit RAW where the X-E1 is 12bit. But the difference in real-world terms is negligible. The sensor is exactly the same in terms of megapixels (16MP), although as mentioned, processing speed has been greatly improved with the x-trans II sensor on the X-E2. It would have been nice to get a resolution bump from the 1 to the 2, but it was not to be. Not that I'm complaining about the 16MP x-trans sensor in either camera - far from it. Both are outstanding.

I have read that the x-trans II sensor has an 'issue' with waxy looking skin tones shooting at high ISO's (1600+), whereas the original x-trans sensor doesn't. But I could count the times on one hand where I've shot portraits above ISO 1600, so I don't see it as being an issue for me.

Motukeikei Sunset 2. Fujifilm X-E2 with 16-50mm. f/11 @ 2 secs, ISO 200
One thing that does bug me about the X-E2, is the movement of the 'Q' button away from the thumb area and up to the middle-back of the camera. Aaarrgghhh!!! The X-E1 placement makes way better sense to me, and obviously to others as well - since Fuji reverted back to the original position of the 'Q' button on the X-E3! It's not a deal breaker, and something that I'm sure I'll get used to. But it's annoying nonetheless. All the other buttons are identical - if not a little smaller to accommodate the larger lcd screen - and as mentioned previously, more programmable. The only function button I've actually changed on the X-E2, again so that it's more in-line with the X-E1, is the wifi button. I've programmed this to be the ISO selector instead. If I want to engage wifi, I'm quite happy to go into the menu system to do it.

Motukeikei Beach tow tide 2. Fujifilm X-E2 with Fujinon 16-50mm. f/11 @ 1/8th sec, ISO 800.
So apart from a few software upgrades and an annoying button switch, the X-E2 is alarmingly similar to the X-E1. It's a year older, faster and more 'refined' maybe, but the image output from the two cameras is so similar as to be basically identical. I can't justifying keeping both (I don't think), so which one will go?

Surprisingly, it's not been an easy decision. My heart says keep the X-E1 and embrace its beautiful first gen x-trans sensor - while my head says keep the newer X-E2 to enjoy its hardware and software refinements. IQ is, as I've said, a non-issue for me.

I 'think' I've decided to keep the X-E2. For a couple of reasons. First - for its wifi capability. It might not be a feature I'll use a lot, but it is handy to have, and I can see it being useful in certain scenarios. It sucks battery juice like there's no tomorrow, but I have a heap of spare batteries, so should be fine.

Second - for its intervalometer capabilities - which is really only a software upgrade, but something they haven't added to the X-E1. Time lapse photography wasn't on my radar until relatively recently, but I've been doing a few of late and really enjoying it. So having a camera with a built in intervalometer is a bonus for me.

And that's ultimately what it boils down to. Some software/processing upgrades that makes the X-E2 a 'newer' feeling camera - surprise, surprise. I will be sad to see the X-E1 go, but I really don't need two X-E bodies.

My sexy X-E2 pimped out with thumb grip and leather case
As you can see from the photos above, image quality with the X-E2 isn't an issue (certainly not for landscapes). Its 16MP x-trans II sensor produces gorgeous files, with plenty of dynamic range, and a lot of flexibility in post from the RAF (Fuji's RAW) file. And surprisingly (for me at least), even though it's a smallish camera, the ergonomics are actually pretty good. With the Fujinon XC 16-50mm 'kit' lens attached (more on that in a future post), a Lensmate thumb grip attached, and leather case adding a little bulk, the XE-2 is very comfortable in the hand. And hey, let's not deny it, it looks damn sexy!

I said right at the start of this post that I've fallen in love with the Fuji X system - and I have. So much so, that what began as a 'trial' to find an occasional use travel camera, has turned into a serious contender for becoming the only camera that I own!

I have also very recently invested in the Nikon system again (a D300), but I am already trying to sell this on. When I do, the Fuji X-E2, and a Fuji XT-1 that is also a recent purchase (more on that soon as well), will be my only digital cameras. And whereas having something small like the Olympus Pen E-P3 as my only camera would have freaked me out, contemplating an X-E2 being my only digital camera for everything has me actually very excited! Bring it on!