Showing posts with label Adobe. Show all posts

Thursday, 19 October 2023

Is there life after Adobe?

John Lennon once sang that 'the best things in life are free' (yes, I know it's an old Motown song, but I grew up with the Beatles version). He then, however, went on to say that he'd rather have money. And I'm sure that this is a sentiment shared by most in the west today.

Don't get me wrong, I need money just as much as the next person. But with the price of living sky-rocketing, I also need to be careful how I spend it. Which is a long(ish) way of saying that I've decided to end a couple of my software subscriptions.

One of these just happens to be Adobe's photography subscription which gives you Lightroom and Photoshop. It's actually pretty good value to be fair. But it's still a monthly subscription, and I still can't afford it. 

So of course, that means that I start looking around for alternatives. FREE alternatives. Yeah - right! But hang on a minute. There actually are some very good, open-source, free alternatives to Lightroom and Photoshop. And it turns out they are actually very - very good. 

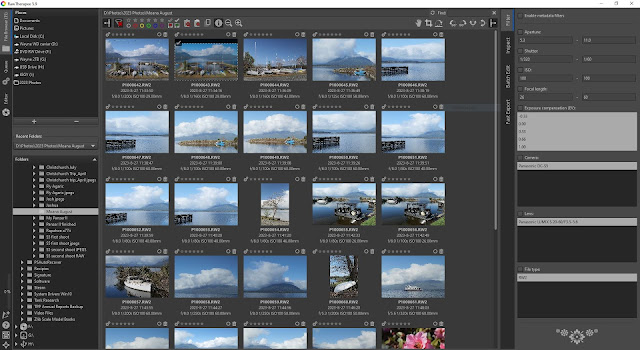
Raw Therapee 5.9 Catalogue interface.

The first one I downloaded was Raw Therapee - an Adobe Lightroom alternative with a very similar look and feel to Lightroom. The one (major) advantage that Raw Therapee has over Lightroom is that it doesn't require you to set up a catalogue. Instead it simply accesses the images from your hard drive and uses the file structure you already have.

You can key-word, tag, compare and stack images, just like in Lightroom, and the thumbnails can display a good amount of shooting information (or none). Speed is very good, since there's not a catalogue to slow things down, and if you've used Lightroom, you should feel right at home with Raw Therapee.

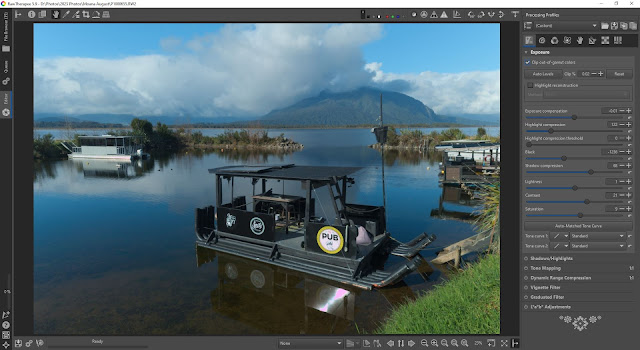
Raw Therapee 5.9 Editor interface.

Double-clicking a thumbnail in the File Browser loads the Raw file into Raw Therapee's Image Editor. And BTW, it reads the Raw files from my Lumix S5 with absolutely no issues.

Again, anyone with even a limited knowledge of Lightroom will feel at home in Raw Therapee. All the slider controls are on the right side of the screen, and are all arranged in a mostly obvious order. Which is a good thing. Because there are a LOT of controls. Which is also a good thing. Although it may mean a bit of a learning curve - especially for newbie photographers. But stick at it if you are considering trying a free Raw processing programme, because Raw Therapee is incredibly powerful and you will be richly rewarded with first-class results. Amazing for FREE software!

A quick tip for anyone who is new to Raw image processing and is thinking about giving Raw Therapee a go - use the 'Auto levels' button in the Exposure tab. There's no shame in it, and it will get you in the right ball-park immediately (very much like the same button in Lightroom will).

Buoyed by my overall positive impressions of Raw Therapee, I decided to download another free, open-source image conversion software that I'd heard a lot about - Darktable.

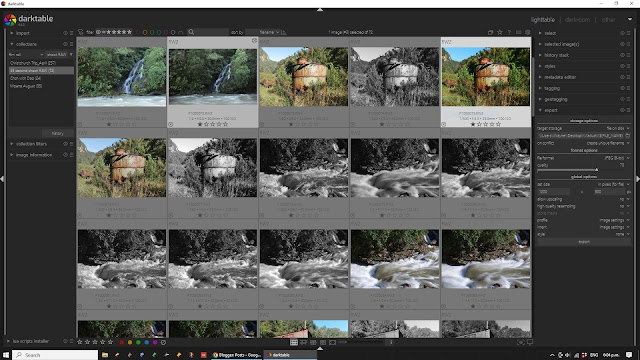
Darktable 4.4.2 Image Browser (Lighttable)

If Raw Therapee reminded me of Lightroom from a few versions ago (and it did), Darktable upped the ante even more - reminding me of a somewhat more up-to-date Lightroom. Again, navigation is easy and logical, with a plethora of options when it comes to key-wording and image tagging.

Moving into the editing (Darkroom) section is as straight forward as double-clicking on a thumbnail - and again, as with Raw Therapee, speed is decent because it works off of your already created computer file system. Whenever you make changes to the Raw file, it simply adds a sidecar .xmp file to note the changes. So just like Lightroom, it is 100% non-destructive (as is Raw Therapee).

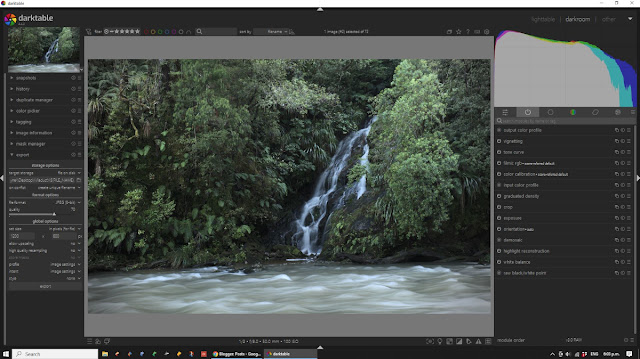
Darktable 4.4.2 'Darkroom' module. Look familiar at all?

Of the two (Darktable vs Raw Therapee), Darktable seems the more feature-packed - but also comes with a slightly steeper learning curve? I've watched a few Darktable tutorials on the interwebs, and the features and explanations can get pretty complex. But I also find Darktable to be the programme I gravitate towards - maybe because I am a fairly experienced Adobe user, and Darktable is the more modern Lightroom-like of the two. 

Having said that, both programme are absolutely amazing. And well worth the money.

Yes, that's a joke. Because remember folks, both of these programmes are absolutely FREE! Gratis. Nada. Zilch. Mind officially blown!

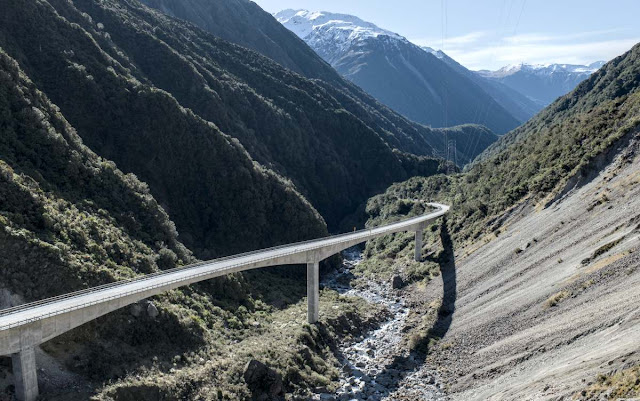
Arthur's Pass Viaduct, Developed in Darktable. Lumix S5 with 20-60mm. f/10 @ 1/100th, ISO 100

I've been an Adobe Lightroom user since version one. And was an Apple Aperture user before that. I love the Adobe Lightroom interface - but I don't love the monthly bill. With the price of living ever-increasing, it's hard to justify yet another monthly subscription charge. Something has to give. And as someone who doesn't make a living from his photography, a monthly subscription to Lightroom (especially when I haven't been shooting all that much over the last year), was an obvious choice to let-go.

I may be struggling financially, but I'm also not crazy! I do need a Raw conversion programme of some description. But to be honest, I hadn't really taken the open-source (free) programmes very seriously. I mean they are Free after all, so how good could they be - right?

Fortunately for me (and you), it turns out they can be good. Very, very good. Maybe even (dare I say it) as good as (if not in some areas maybe even better than) Adobe Lightroom.

Is there a bit of wishful thinking and self-delusion involved in all of this because I want them to be as good as Lightroom? Maybe. But I don't really think so. Having downloaded and 'played' around with both open-source programmes, I have been super impressed.

I still have a lot to learn, and am riding the learning curve at the moment. But even that gives me hope. Because neither Raw Therapee or Darktable are 'simplistic' versions of Lightroom, dumbed-down for the masses. Oh contraire. They are both fully-fledged Raw conversion programmes that are serious contenders for the best software out there - money aside. 

So do yourself a favour. Download both and give them a go. You might just find that the Beatles were right. The best things in life might really be free!?

Saturday, 4 March 2017

Post-production post Photoshop: ACDSee Ultimate 9

I've finally done it! I've cut the digital umbilical cord (so to speak) and no longer have Adobe Photoshop on my home computer. Or any other Adobe CC product for that matter. No more InDesign, no more Illustrator, no Premier Pro.... nothing. I'm almost breaking out in a sweat just thinking about it!

This is a pretty big deal for someone who has used Photoshop since the very early days. I have been a graphic designer for most of my working life (the last 32 years), and have invested most of that time to learning, using, and even teaching the suite of Adobe software products. They are, after all, the industry standard.

When I started my own graphic design business 10 years ago, my first major outlay (after the computer), was the Adobe Creative Suite. I wouldn't have even considered running a design business without it. And to be honest, I still wouldn't. But I don't run a design business anymore. As a 'home' user, or hobbyist, I now have to justify to myself (and my wife), what I use for software and, more importantly, how much it costs.

Maybe I'm showing my age, but I hate - and I mean HATE, the subscription model of software ownership. I know I'm swimming against the tide (don't worry, I'm used to that), but I just like to know that when I spend the money, I 'own' the software. It might make sense for businesses to 'lease' or subscribe monthly, but as a home user I just want to buy a product outright. But that's just me.

I was fortunate for the last year to be classified as a 'student' since I was enrolled in an on-line course through work. As part of the course, I qualified for the entire Adobe CC (Creative Cloud) Suite at a ridiculously cheap monthly fee. I signed up, knowing it was only going to last for the year, and knowing that after that year I was going to have to cut the cord and look for something else. I just can't afford the monthly fee that Adobe is charging for the whole Suite.

Well, the year is up. And today (as I write this) I ended my Adobe subscription and deleted the whole suite from my computer. And I should be freaked out. I should be worried. I'm a photographer for crying out loud. What's a photographer going to do without Photoshop?

First of all relax.... take a deep breath. There is life without Photoshop, and it comes from ACD Systems. I would recommend any photographer, with or without Photoshop, take a very serious look at ACDSee's Windows based (sorry Mac users) Ultimate software. I have Ultimate 9, but everything I am about to say also applies to their latest version - Ultimate 10 (which, not surprisingly, adds some newer features).

ACDSee Ultimate is very aptly named software. It's an incredibly powerful image viewer, organizer, RAW processor, and image editor - all in one! It incorporates individual programs like Adobe's Bridge, Lightroom and Photoshop into a single, seamless package. And it does so at blinding speed, all within an excellently designed UI. The designers and engineers at ACDSee should be incredibly proud of what they have accomplished with Ultimate 9. It is a truly outstanding piece of software!

As someone who has lived and worked within the Adobe eco-system for so long, I don't say that lightly. I really wasn't looking forward to ending my subscription to Adobe CC. But finding ACDSee Ultimate 9 has been an absolute revelation for me. In many ways, I find it better, faster, and stronger than anything Adobe could offer for my photography.

First, of course, is the fact that you can purchase the software outright - at a very reasonable price. You can also choose the subscription based model if you wish - or not. The choice, thankfully, is yours (and please, ACDSee, keep it that way).

Manage Mode - ACDSee Ultimate 9
Second, I prefer the way ACDSee uses your own computer hard-drive to manage, view and arrange the files. No database-driven library a-la Lightroom. I dislike the way Adobe's Lightroom creates its own library. I just never fully trusted it. Yes, the photos were there, until they weren't for some reason, and then heaven help you trying to get the library to sync properly again! I just love the simple, straight forward, logical, and yet effective way that ACDSee handles your images. It just makes sense.

Photo Mode - ACDSee Ultimate 9
If you really want to take image cataloging to the next level, try out the 'Photos' view, which gives you thumbnail images of all the photos in your folders. These can be arranged by day, month or year - and hovering over a thumbnail will give you a slightly larger view of the image. A single click will take you into the chosen images folder, while double-clicking will send the image directly into 'View' mode.

View Mode - ACDSee Ultimate 9
Navigating all makes perfect sense, and doesn't take long to get used to. View mode is nice and clean, with a film strip for the selected folder, and large view for the selected image. Simple metadata for the image is always displayed (I like this feature a lot), and moving through images is lightning fast. ACDSee made their name initially in Digital Asset Management (DAM) software, and it really shows in Ultimate 9, offering a wealth of different organizational tools and structures.

Develop Mode - ACDSee Ultimate 9
But where ACDSee really shines for me, as a photographer looking for a Photoshop replacement, is in the Develop and Edit Modes. Develop Mode is Ultimate 9's RAW processing engine. And what a fantastic engine it is! I have compared ACDSee Ultimate 9's RAW output against several of the top RAW processing programmes, and ACDSee was a clear winner in my book. It easily beats Lightroom for colour reproduction, especially in the warmer reds, oranges and yellows. Develop Mode has a rich and satisfying feature set, with all the controls you would expect from a RAW processing engine. Lighting, colour and lens controls are all there, as well as curves, split toning, healing, cloning, sharpening and noise reduction. It is, of course, all non-destructive - attaching a script to the RAW file that moves with it if ever the file changes location on your computer. RAW processing software simply doesn't get better than this.

Edit Mode - ACDSee Ultimate 9
Finally, Ultimate 9's one-two knock-out punch is its inclusion of Edit Mode. What Develop is to Lightroom, Edit is to Photoshop. Layers, adjustment layers, masks, blend modes, crop, rotate, resize, repair, dodge and burn, skin retouching, sharpening, clarity, brushes - it all there, and more! It even has a few tricks up its sleeve; like Pixel mapping that masks particular areas through color and tone - as well as smart brushes (in Ultimate 10) that make selections magically, also through color and tone.

Adobe is such a formidable giant in the image editing industry, it seems almost unthinkable that a 'serious' photographer would use (or choose) anything else. Yet there are many good reasons why a 'serious' photographer, or someone looking to take their photography to the next level, should look elsewhere for an image editing program. As someone who has taught Photoshop to beginning photographers for years, I know how intimidating Photoshop (and Lightroom) can be. It has grown over the years to be something of a Frankenstein's monster of a program, with maybe 20% of content that photographers actually need, and 80% that simply confuses people.

This is where ACDSee Ultimate 9 really shines. It's got everything you need, and practically nothing you don't. All in a slick, unified, logical and useful package. It's a seriously impressive combination of well designed, cleverly organized and satisfyingly intuitive software programs for the modern photographer. If you don't have Photoshop, and are looking for a DAM, RAW development and photo editing package, then you have to try ACDSee Ultimate 9 (now 10). And if you do have Lightroom and/or Photoshop, but are struggling to learn how to use it, then boy do I have the solution for you! Do yourself (and your images) a favor and download the trial of ACDSee Ultimate 10. I think you'll like what you find. I know I do.
Friday, 22 July 2016

Olympus Viewer 3 vs Lightroom CC Part 2

Since my last post on the comparison between Olympus Viewer 3 and Lightroom CC, I've done a little more research into OV3 (Olympus Viewer 3).

It appears that Olympus are applying a decent amount of sharpening and noise reduction to the file once it's output - even if the software settings are all set to '0' or Off. Olympus's jpegs are praised by many as being some of the best out-of-camera jpegs in the industry. Sharp, contrasty, and with great colour. It would appear that the software developers for OV3 want to make sure you get these same results when outputting from an .orf  RAW file, even at the '0' or Off settings.

So I decided to repeat the comparison, but this time I dialed in -2 Sharpness, -2 Contrast, -2 Saturation, and set the Noise Reduction to 'OFF' (from 'As Shot' - even though NR in the camera is, in fact, set to 'OFF').

Lightroom CC on right, Olympus Viewer 3 on the left.
So what's the verdict now? Well, on the sharpness front, things have definitely evened out by setting OV3 to -2 Sharpness. In fact, I'd say that now the Lightroom Tiff is maybe just a 'hair' sharper - maybe. Contrast and Saturation are also now about the same. But I have to say that I still prefer the Olympus colour rendition. Once again, it looks slightly 'truer' to my eyes.

The other difference that still remains between the two is the noise - or at least the lack of it in the Olympus Viewer 3 generated Tiff. Noise is still cleaner compared to Lightroom CC's conversion, so either Olympus are ramping up Noise Reduction regardless of what you set as the user - or they really do have the secret to their own 'special sauce' contained within the .orf file. I like to think that it's the later of the two?

Lightroom CC on right, Olympus Viewer 3 on left.
But at the end of the day, it's still the colour rendition from OV3 that stands out the most. And it's the above sunset shot comparison that is still the most telling (for me at least). With most settings dialed down to their lowest (-2) in Olympus Viewer 3, Lightroom CC and OV3 Tiffs are very close - except for their colour rendition. I happen to prefer the way OV3 renders the colour from the RAW file. I think it's a truer representation of what I was actually seeing when I took the photograph.

So given that a simple 'flattening' of the OV3 Tiff file is all it takes to bring it in-line with Lightroom CC - but that I find the colours more pleasing from Olympus Viewer 3 - then I still think it's a win for Olympus.

Besides - this all assumes that I want my Tiffs to start out looking like Lightroom's slightly flatter conversion. What's wrong with starting with sharpened, noise-reduced, colourful, contrasty Tiffs from your RAW processor? I know I can always dial down all these settings if I need to. But 99% of the time it's what I want my photos to end up looking like anyway.

I've always been the kind of photographer who tries as much as possible to get it 'right' in camera. I rarely spend more than 5 minutes editing any image, and that includes cropping. I crop 'in-camera'. A sharpened, colourful, noise free Tiff suits me just fine. I only ever do very basic edits to my RAW files before saving it out to a Tiff or jpeg, so the controls available from OV3 also suit my needs perfectly. Once I have the Tiff, I'm going to do final edits in something else anyway. So the OV3/Tiff/Photoshop workflow makes a lot of sense to me personally. Your mileage may, of course, vary.

I would also finish this off by reiterating the whole purpose of this comparison. I wanted to see if Viewer 3  - the FREE software supplied with my camera - was a worthy consideration when placed up against the industry standard Adobe Lightroom. The fact that there really is hardly anything in it - and that I actually prefer the files that are coming out of OV3 - speaks volumes for the manufacturer's software. When it comes for free and the results can be this good, what's not to like?

Thursday, 21 July 2016

Olympus Viewer 3 vs Lightroom CC

I used to be an Aperture 3 user on the Mac. I preferred the Aperture user experience over Adobe's Lightroom, but alas, as we all know, Aperture is no more. So I've switched to Lightroom - right?

Well no, actually. I have played around a bit in Lightroom, and I 'own' it as part of my Adobe Creative Cloud subscription. But I don't actually have it installed on my computer at home - although it is installed on my machine at work.

Having been an Aperture user, I'm obviously not adverse to taking the less popular option when it comes to software. My workflow consists of Adobe Bridge and Camera Raw, with the final edits in Photoshop - all through my CC subscription. At the moment, I'm lucky enough to have the entire CC collection for a student rate. But that will end next year. And then I have some serious decisions to make. Because there's no way I'm going to pay Adobe around $50NZ a month to rent their software! No way.

I could go down to the 'Photography' package of just Photoshop and Lightroom for about the same as I'm paying monthly at the moment for the whole suite - but I really want to have InDesign, Illustrator and Premier as well - which bumps me back up into that $50 a month bracket. Damn.

So what's a man to do? Well if he's me, he starts looking around for alternatives. Cheaper (in the long run) alternatives. And they're out there. Adobe isn't the only kid on the block anymore.

When you're looking for 'cheaper' alternatives for a RAW converter, the first place you should really look is the manufacturers own software. After all, it comes with your camera. You don't get much cheaper than free folks!

Hang on though. Surely that means that it can't be very good? It'll be slow, and clunky, and produce fairly average images? If, like me, you thought that would be the case, then you'd be right - about two of those three assumptions. Yes, Olympus Viewer 3 is slow. Sometimes painfully slow. And yes, it's clunky. No UI design awards here. BUT - the images it produces... well that's where it gets very interesting.

When I was a Canon shooter I would occasionally come across a post from a photographer extolling the virtues of using Canon's own proprietary RAW processing software. But then you'd have responses from others saying things like 'slow' and 'clunky' and I'd quickly move on. I was using Aperture, was very happy with it, and saw no reason to change. But that was then....

Since I'm now in the market for a RAW processing programme, I though it might be time to look at Olympus's offering and compare it with the megalithic giant that is Adobe Lightroom. The results are very interesting.

Lightroom CC Tiff on the left, Olympus Viewer 3 Tiff on the right.
Obviously in any RAW software you can tweak and alter an image to your hearts desire. So all I did to compare "apples with apples" was to take the RAW .orf (Olympus Raw Format) file and 'process' it as a 16bit uncompressed Tiff file completely unaltered. Nothing was touched, nothing was changed, no slider was moved. I simply opened the RAW file in the respective programmes and saved them out immediately. I should also mention that I shoot my RAW images with everything in-camera set to neutral.

It may be hard to see from the internet resolution, so I'll tell you what I see on my computer monitor in the comparison above. First, the Tiff file from Olympus Viewer is much sharper that the one from Lightroom. Much sharper. Which is odd, and somewhat surprising, since I read somewhere recently that Lightroom adds about 25% sharpening by default to all its RAW conversions (since RAW images are 'softer' out of camera). So I was expecting that the Lightroom Tiffs would be sharper than Olympus's. But it just ain't the case.

Second, the colours of the Olympus rendered Tiff look more 'accurate' to me. And not just more accurate, but also more vibrant. Blues are bluer and whites are whiter, whereas the Lightroom Tiffs introduce a slight colour shift.

And third, and again surprisingly (to me at least), the Olympus images have a lot less noise apparent in the image. And I mean a lot. Noise in the blue of the water in the above magnified crop is practically non-existent in the Olympus Tiff (shot at ISO 200). Whereas the Lightroom Tiff had obvious noise.

Lightroom Tiff on left, Olympus Tiff on right.
Again, the above comparison shows the Olympus Viewer 3 Tiff to be sharper, punchier, and yet truer in colour rendition. And this was a trend that continued shot after shot.

Lightroom on left, Olympus Viewer 3 on right.
Sometimes the differences are subtle, but they are still definitely there. Olympus Viewer 3 just produces better conversions every time. And although initially this surprised me, when you stop and think about it, it makes perfect sense. RAW files are unique for each manufacturer. They encode them with their own 'special sauce' (so to speak) to differentiate them from others. So who best to 'unlock' that code than the manufacturer themselves. Adobe (and other third party software developers) have to reverse-engineer the RAW codes each and every time a new camera is released, which is why it sometimes takes a while for new cameras to be added to the Lightroom catalogue. They get their own conversion algorithms close - but not perfect. Olympus, of course, gets it perfect.

Lightroom on left, Olympus Viewer 3 on right.
Of all the examples, the one above perhaps illustrates best the benefits of using Olympus Viewer 3 over Lightroom. Again, these are straight, unaltered conversions of the same .orf RAW file. The colours are almost night and day different, and the results speak for themselves. I know which one I'd rather be using as a starting point for any further editing.

Of course you could tweak the Lightroom file to look like the Olympus file - you can almost do anything you like with a RAW file - that's the point of shooting RAW. But the Olympus software saves you that initial hassle by getting it right out of the box.

Final image, processed with Olympus Viewer 3 and edited in Photoshop CC
The final image is exactly what I wanted to portray with this shot. Yes, I could have got there by using Adobe Lightroom, but it would have taken a lot longer to fix up the colour and noise issues inherent in the Lightroom file, that simply didn't exist in the Olympus rendered file. It makes me wonder what software camera reviewers use when they give an opinion about the noise of certain cameras/sensors? Looking at the Lightroom Tiffs I would have said that the OM-D E-M5 Mk2 had a fairly noisy sensor - even at ISO 200. But look at the Olympus Viewer 3 Tiffs and it disappears.

So I may have become a convert to using Olympus Viewer 3 for my RAW conversions from now on? Yes, it is slower, and yes, it is clunkier. But at the same time it is also fairly intuitive and usable. And at the end of the day, the time you save not having to tweak the images further in Lightroom probably cancels out the slowness of the software.

I have also downloaded Corel's AfterShot Pro 3 RAW conversion software, which I will try against Olympus Viewer 3 next. But I have a feeling it's going to need to be mighty impressive to knock Viewer 3 off the top of the RAW Software perch. Very interesting indeed.