Tuesday, 19 January 2016

The Making of an Image

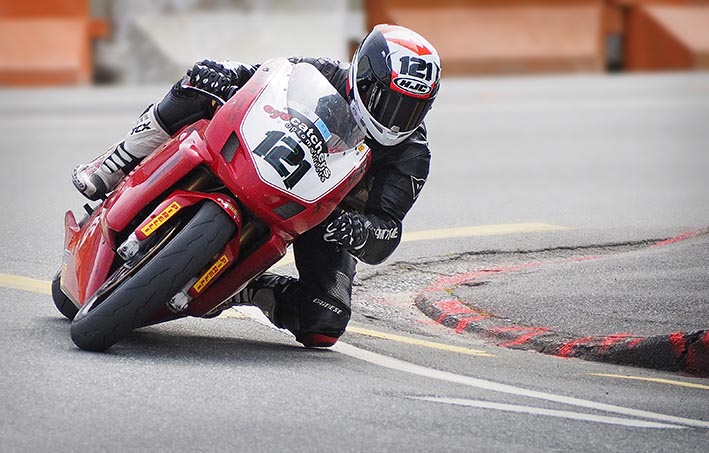
One of my favourite outings from last year would have to be the Greymouth Street Races. It was the shoot that convinced me that I had made the right decision moving to mirrorless. Up until then, I had been nervous about using the Olympus OM-D E-M5 MkII to photograph fast-moving subjects. But rather than being disappointed, I was blown away with the images that I got that day. It’s been a few months since then, and I have lived with the images for a while before deciding how to process them (there were over 2000 images!).

In the Lead. OM-D E-M5 MkII with 40-150mm f4/5.6 lens. 1/4000th sec @ f5.6, ISO 1600
As I said, I was thrilled with the quality of the images I captured – especially with the ‘cheap’ Olympus 40-150mm f4/5.6 consumer zoom. Cheap and plasticky it may be, but boy-oh-boy is it one sharp lens for the price. Even wide open, it’s as sharp, if not even sharper, than the Canon 400mm f5.6 and 70-200mm f2.8 pro zooms. And that’s not just anecdotal. That’s from actually comparing images taken with these lenses from previous years capturing the same event.
Cutting it Close. Olympus E-M5 MkII with 40-150mm f4/5.6 lens. 1/2000th sec @ f5.4, ISO 800
Yet as sharp as it may be, the one slightly limiting factor for the lens, and to a certain extent mirrorless itself, is the larger depth-of-field exhibited due to the smaller sensor size. F5.6 on the EM-5 MkII is equivalent to F11 on a full frame sensor (and probably around f8 on an APS-C sized DLSR). This is great for landscapes when you want everything in focus. Not so great for sports where you want a decent separation from the action and the background.

So, with the editing of the images, I set out to give more background blur, for a greater 3D quality and subject ‘pop’. I also wanted to simplify the backgrounds as much as possible, to really focus attention on the bikes themselves. I had tried to achieve this on the day by positioning myself somewhere on the track with fairly clean backgrounds. But even then, I wanted to make it cleaner still by cloning out a few problem areas.

Catch Me If You Can. E-M5 MkII with 40-150mm f4/5.6 lens. 1/2000th @ f5.6. ISO 640
What follows is my post-processing steps to create the final images included in this post. I will cover what and why I did what I did at each stage of the process, without going in to too great a detail about the actual how-to’s of the individual processes themselves. I’m very happy with the results, although that doesn’t mean I wouldn't do it slightly differently six months or a year from now. That’s the great thing about post-processing an image. You can take it in many different directions – as long as you keep the original!

First step is cropping. I don’t crop all that often, preferring to ‘crop’ in-camera as I shoot. But sometimes the action is fast and frenetic and you don’t have time to crop perfectly. So in this instance, and again, to help simplify the composition and distractions, I cropped afterwards.

Complete Concentration. E-M5 MkII with 40-150mm f4/5.6. 1/2000th @ f5.6. ISO 1000
Second step was actually sharpening. Yes, the images were already sharp, but I wanted to give them even more crispy sharpness. I achieved this with ‘high pass’ sharpening (my favourite way to sharpen), and then added a layer mask to mask out the areas I didn’t want sharp (like the asphalt on the road and the background).
 
Third step, cloning out the unwanted distractions. Cropping got rid of some of them, but many of the plastic barriers had dark holes and branding on them that were very distracting – even out of focus. So I cloned them out using a combination of 'content aware' fill and the clone brush.

Next was some dodging & burning and levels adjustments to get the exposure looking exactly how I wanted it. This usually meant some light dodging on the faces, and some opening up of the shadows with the highlight/shadow setting on +10 for the shadows. Then a simple levels ‘S’ curve finished things off.

Layers Palete in Photoshop for Blur
Having achieved all that, I was then ready to create the background separation. I wanted the final images to look like they were shot with an f2.8 aperture rather than the f5.6 (f11) they were actually taken with. To do this, I cut around the bike and rider using the pen tool (make sure you use a good graphics tablet if you’re going to be doing a lot of pen tool work) and selected this with a 0.5 feather on the selection. I pasted this on a new layer (Ctrl + J), and then went back to the original layer and duplicated this as well (Ctrl + J again). I re-selected the selection (found in the Path palate), this time with no feather, and hit Delete (Backspace) on the keyboard to cut it out of the layer. To this layer I applied a 15% Gaussian Blur, then added a layer mask. Using the gradient tool I masked out the lower third of the image, graduating towards the top where I wanted the most blur. And hey-presto, an f2.8 background!

This is the most time-consuming element to the image, but still only took me about 10 minutes to achieve. And I’m more than happy with the results. I wanted the bikes to really ‘pop’ out from the background, without making it look too unnatural. Hopefully I’ve achieved that?

All the changes made in post process to get the images looking how I wanted.
To finish it all off, I flatten the layers into one final image, and then darkened the top and bottom a little, before adding a 10% black feathered vignette to the image. Subtle, but just something to again help draw the eye to the action in the image.

It sounds like a lot, bit it really isn't when you sit down and get into the flow of processing. Each image probably took about 15 minutes, and it certainly helps if you have a good graphics tablet (Wacom Intuos).

And the finished image after all that processing.
Admittedly, I could have saved myself a few hours of post processing work by just shooting with an f2.8 lens in the first place. Agreed. Except, I don't have an f2.8 150mm lens on me, and am probably never likely to. So you make do with what you have, and just know you're up for some computer work afterwards. I don't think that 10 to 15 minutes is overly excessive in terms of post production anyway. I certainly wouldn't want to spend that time working on every shot I take - and I don't. My average is probably only a minute or two. But for images that I want to take the time to elevate to a higher standard, then 10 minutes is totally worth it (IMHO).

Out in Front. E-M5 MkII with 40-150mm f4/5.6 lens. 1/4000th sec @ f5.6. ISO 2000
There may be some photographers out there who still believe any use of Photoshop in an image is a crutch. Hard to believe maybe, but I'm old enough to remember back to Photoshop version 1 and the hot debates held by 'purist' photographers and those crazy early digital adopters. For a long time, Photoshop was a dirty word in camera club circles and while that may have changed, I know that many photographers still believe that you shouldn't spend longer than 1 minute 'working' on a photo on the computer.

I can sympathise. But sometimes, I also think that you've gotta do what you gotta do to help create your vision. You can't use Photoshop to make a silk purse out of a sow's ear, but you can (and should) use Photoshop to help you achieve the end result you envisaged when you took the photo. And that's exactly what I've done with the images in this post. Hope you like them?

Wednesday, 13 January 2016

What I did in my Summer Holidays

Back at work now after 3 weeks of summer vacation over Christmas :-(

At the start of the break three weeks sounded like a long time. It wasn't. Fortunately though, we had great weather and I took the opportunity to get around our home and do some weeding.

The back yard before weeding.
I'm not a naturally enthusiastic gardener - there's lots more I'd rather be doing (like taking photos for instance). But once I get underway and start seeing some results, then I tend to get a bit more inspired.

This year, we even decided to grow some of our own veggies, and plant flowers to fill in some spaces that normally run wild with weeds. Hopefully this will help to cut down on time spent weeding in the future, as well as give us some fresh produce!

Just so happens that eating is something I can get enthusiastic about :-)


And the back yard after 6 hours of weeding and planting!
In the spirit of my New Year's resolution of taking more photos, I decided to document a 'before and after'. First shot was taken about 7.00am, hence the long shadows (that I've lightened considerably in Lightroom). The second image was taken about 6.00pm, after all the work was completed. Doesn't look like a full days work, but it took hours just to clear away some of the grass that was growing over top of the concrete behind the shed.

There's still a month or so of summer left, so now the attention turns to the front section of the house. We need to clear out a large area of stones and shrubs (and weeds) at the front, get rid of all the weed mat (what is weed mat all about?), and then let the soil lay fallow over the winter, ready to plant a 'cottage flower garden' there next summer. That's the grand plan anyway.

Cobden Beach Sunset. Olympus OM-D EM-5 MkII with Zuiko 12-50mm f3.5/6.3 EZ
While on holiday, I also tried to make the most of the warm evenings and beautiful light to get out and take some 'serious' photos. Cobden Beach is literally five minutes away from my house - on foot. There had been a few amazing sunsets in a row that I had missed getting out to, so I was determined to get out the next night and capture a sunset.

Murphy's Law dictates that it wasn't going to be as spectacular an evening as the ones I had missed (and it wasn't), but it did also give me the opportunity to get a shot that I had been visualizing for quite a while...

Miners Memorial - Greymouth Floodwall. Olympus OM-D E-M5 MkII with 12-50mm @ 12mm, 125th sec, ISO 1250
Last year a memorial statue was erected in town for all the miners who have lost their lives over the years on the west coast. It sits prominently on the Greymouth floodwall, and I have always wanted to capture a silhouette of the statue against the evening sky.

Miners Memorial, Greymouth. 2016
It was about 9.30pm when I took these images - and there was still plenty of light to be able to hand-hold the E-M5 MkII and get sharp shots (at ISO 1250).

I knew I wanted a fairly 'wide' angle of the monument with Greymouth township in the background, so chose the 12-50mm kit lens so I could use the 12mm (24mm equivalent) end to go wide. Apart form the 9mm fisheye bodycap, the 12-50mm is currently the widest lens I have in my bag, so I find myself using it a lot for landscapes.

I did also take a few images with the 9mm fisheye bodycap lens, and while I liked them, the 12-50mm at its widest end was the closest to what I had pre-visualized for the shot.

I'm glad I took these images, and I'm sure I'll go back again and take some more. I've driven past the statue so many times and thought "I must photograph that at night" - and now I have. Wasn't quite so lucky with another shot I've been meaning to take for years now though. There's an abandoned house just outside of Westport that I mean to stop and photograph every time we go there, but never have. We went to Westport after Christmas and guess what - it's gone. Been demolished. Darn.

New Years resolution - stop and take more photos.

Sunday, 3 January 2016

Happy 2016 and reflections on 2015

I began writing this post on New Years day, 2016. Happy New Year to you all.

At the risk of jinxing it already, my 'new years resolution' is to take more photos :-) Probably not a stretch for a photographer. But for someone like me, who spends so much time agonising over camera purchases, it's worth making that commitment. I have finally, after many years of searching, found the camera and system 'for me'. Now I want to get out and start using it.

Josh on Christmas Day 2015. Olympus OM-D E-M5 MkII with 9mm Fisheye bodycap lens.
2015 will always stand out for me as the year I went 'mirrorless'. I owned some pretty amazing cameras in 2015 (Canon 1D MkIII stands out), but none more-so than the Olympus OM-D E-M5 MkII.

For a very long time I held on to my DSLR's, and had convinced myself that mirrorless was not for me. Oh how wrong can you be? I now truly believe that I will never own another DSLR. Even if Olympus folded (and they are having their problems), I would look at either Fuji or Panasonic mirrorless as replacements. Wouldn't even consider another DSLR.

NZ Robin. E-M5 MkII with Zuiko 40-150mm
2016 is going to be about the images, and not about the gear (so much). To this end, I took my kit with me on New Years Day and the family went for a walk to Coal Creek. On the way, we were stopped by this inquisitive and very friendly Robin. He showed no fear of us whatsoever, and posed just a few feet away from me as I snapped away with the 40-150mm f4/5.6.

The light level was very low, so the camera chose an ISO of 3200 (I have it set to Auto ISO ranging from 200 to 3200), which allowed my to get sharp images at around 125th sec.

As well as taking my camera with me and getting out with the family as much as I can, this year I also hope to be far more active in my local camera club.

The monthly meetings begin in February and I am going to try to make it to all the meetings, and submit at least one image every month for judging. I might post them on this blog each month, along with the judges comments. Might be interesting to look back and see how I went over the year? First up in February is 'Waves' as the set subject, although you can also enter 'nature' or the 'open' section as well.

Coal Creek Falls HDR. Olympus OM-D E-M5 MkII and Zuiko 12-50mm f3.5/6.3 EZ. Processed using Photomatix
There are a lot of opportunities to go out and take photos coming up in the next few months. I'm going to try and take as many of those opportunities as I can.

Wednesday, 23 December 2015

Olympus 9mm Fisheye Bodycap lens - initial review

A few days ago I was lucky enough to receive the Olympus 9mm Fisheye bodycap lens from my wife for my birthday (thanks honey).

Olympus 9mm f8 Fisheye Bodycap lens
I wanted this lens for a couple of reasons. First, it's a 'fisheye' lens, for a very reasonable price (NZ$169). I enjoy using a fisheye on the odd occasion, even pulling them out to use at a wedding every now and then. But they tend to be very specialized (and therefore very expensive) lenses, so I've only ever owned one in my career (a Tokina that was a 'fisheye' zoom).

Second, it's considered a 'fun' lens to have. Something that takes up no room, you have with you all the time, and you use on the odd occasion just for a different effect. The fisheye look can quickly become overdone, although the 9mm (18mm equivalent) Olympus bodycap fisheye has a slightly narrower 140 degree field of view (as opposed to the traditional 180 degree angle of view of a traditional fisheye lens).

As you can see from the specs, the bodycap is only 12.8mm thick, 56mm in diameter, weighs just 30 grams, but manages to fit in 5 glass lenses, 2 of which are aspherical elements for image correction (although the lens is still prone to chromatic aberration in high contrast areas).

Olympus have previously released a 15mm bodycap lens, but the image quality was not up to much, and it didn't really make sense to me since I already own the tiny 17mm f2.8 pancake. But a 9mm fisheye! That's another story. And with the inclusion of 2 aspherical lens elements, Olympus is obviously taking the IQ of the lens fairly seriously. Although having said that, the 9mm bodycap lens is not given the 'Zuiko' brand name. It's considered more of an 'accessory' rather than an actual lens. So given all that, how does it perform in real life?

Home Office. 9mm bodycap fisheye
Surprisingly well, actually. Especially for a very cheap bodycap lens. It's a fixed f8 lens, with no electronic contacts whatsoever. Mount it on the E-M5 MkII and the camera reverts to manual focus, which is controlled by a very simple lever on the front of the lens itself. The first position is lens closed (by a thin shutter), the second position is infinity focus, the third position is for general photography that will cover 90% of shooting scenarios (hyperfocal distance), while the final position is for 'close focusing' of around 20cm.

The extreme edges are a bit soft and blurry, but the rest of the image is acceptably sharp, to very sharp in the central portion. Images from the 9mm bodycap would print up to A3, and maybe even bigger with some localized sharpening applied.

The extreme edges do have some purple fringing, especially in high contrast areas, but this is easily fixed in software like Lightroom.

Coal Creek Falls. Olympus E-M5 MkII with 9mm bodycap Fisheye. F8 @ 500th sec, ISO 200
As can be seen above, the 'fisheye' look doesn't have to be extreme. The figure taking a photo at the extreme left of the image still looks fairly natural, since she wasn't too close to the camera when I took the picture. If you get up close and personal, then things will start to bend and look 'fishy', but give your landscape some breathing space, and everything looks pretty natural. This is partly due to the slightly narrower 140 degree angle of view that the 9mm captures. Colours look good, contrast is ok, and most things are pretty sharp. Overall, very impressive for an accessory :-)

Forest Interior. Olympus E-M5 MkII with 9mm bodycap fisheye. F8 @125th sec, ISO 800
Here we can start to see a little more of the fisheye effect, especially in the trees on the edges of the frame. Surprisingly though, the ferns in the foreground still look relatively natural. Sharpness is still pretty good - depending on your definition and tolerance. Pixel peepers may be disappointed, but we mere mortals should have no problems using this lens on a regular basis. I'll say it again - IQ is very good for a bodycap lens sold very cheaply as an accessory.

Flare is also well controlled.
Some reviewers have complained that the lens doesn't capture the vibrant Olympus colours that the Zuiko lenses are capable of. This may be true, but it's nothing that Lightroom or Photoshop won't fix. And without wanting to sound like a broken record - this isn't a Zuiko lens. It's a cheap, plastic, fully manual, bodycap lens.

Since it's a bodycap, there isn't any thread to attach a lens hood or filters. And with such a wide field of view, it's almost impossible not to include a portion of the sun in some of your images when shooting landscapes. Fortunately then, the 9mm fisheye bodycap controls flare extremely well, although I'd still want to avoid shooting into the sun whenever possible.

I might also try placing a square cokin filter in front of the lens while shooting, just to see if I can use filters without getting my fingers in the shot!?

The photo above shows a small amount of flare in the top of the image, but it hasn't affected the contrast too badly, and the rest of the image is perfectly exposed.

Dinosaur eggs or Fungi? Olympus E-M5 MkII and 9mm bodycap fisheye.
This last image was a bit of an experiment. I came across this patch of fungi that reminded me of dinosaur eggs from Jurassic Park. I wanted to get as close to them as possible, but I kept the lens set to the hyperfocal distance setting, and not the close focus setting. I didn't measure, but I'm pretty sure I was closer than 20cms to the fungi.

The result was exactly what I was after. The lens has kept the middle of the image nice and sharp, but getting up close has really exaggerated the fisheye effect around the edges of the frame. Pretty freaky, but also pretty cool. And a lot of fun. Which is exactly how I described this lens at the start of this post. Just plain FUN.

Maybe you shouldn't take the Olympus 9mm fisheye bodycap lens too serious? Maybe that misses the point of this accessory?

But, then again, maybe the IQ from this lens warrants a serious appraisal. It's a piece of kit that can be used to capture some seriously good images. If you're in the market for a fisheye lens that won't break the bank, you need to seriously consider the Olympus 9mm Fisheye bodycap lens.

Best birthday present ever! Thanks honey :-)

Tuesday, 22 December 2015

Starting to customize the OM-D E-M5 MkII

Many say that the Olympus Menu system is overly complicated and confusing. I disagree.

I've used a lot of menu systems in my time. In fact, I've used pretty much all of them. And I don't find the Olympus menu system to be inferior or purposefully confusing at all. I do agree that it's complex - but that's not the same as complicated.

Really, what it comes down to is the fact that Olympus cameras (and many of the other mirrorless systems) are just so incredibly customizable. You can change, tweak or alter almost anything to your own preference - or not.... They don't have to be confusing. And I don't believe that they are.

But, like any piece of serious technology nowadays, it does require some effort on the part of the user to get the most out of the system. Same is true with smartphones, smart tvs etc.

If you dig deep enough, take the time to get to know your gear, and shoot with it often, you will be rewarded with a very responsive - and dare I say it, even intuitive - picture taking experience.

To help us on our way, and indeed to give us the ability to set the camera up in not just one, but several different configurations, cameras include groups of programmable 'sets' where you can store different functions and recall them quickly.

This is nothing new. The higher end DSLR's from Canon and Nikon have given us this ability for many years. But I never really saw the point in them, and never used them. There were often only a few basic functions that could be changed on these cameras anyway, and it seemed to me to be fairly easy to change them on the fly.

Now, however, with the plethora of features, switches, dials and modes that can be customized on cameras, the use of different custom 'sets' has become much more helpful. Olympus call them 'Myset' and allow for up to four different configurations for quick recall. They are very easy to set up, and even easier to switch between - especially since you can programme one of the many buttons on the camera to take you straight to the Myset screen if you so desire.

I have three of these set up at the moment - Myset 1 are my 'standard' settings that I shoot with 90% of the time. Myset 2 is a Monochrome setting for shooting Black and White (with a green filter applied). While Myset 3 is a 'fun' setting that defaults to my three favorite art filters and shoots in bracketing mode. While these are fairly easy to remember, it would have been great if Olympus could have made it so that you could name the Myset options whatever you liked, just to help you remember what you've set for each one? Maybe an option in a future firmware upgrade?

If you haven't already, then set up some different shooting styles using the Myset menu. With three or four different camera configurations within quick access, maybe the complex menu system might just become less complicated to use?

Just a quick side note:

It was my Birthday a few days ago, and beforehand my wife asked me what I would like (within reason and budget). Without hesitation I said "The Olympus 9mm Fisheye bodycap lens."

So I am now the very excited owner of the 9mm fisheye, and I can't wait to get out and take some images with it over Christmas.

My next post will be about my initial thoughts/images using the lens. Bring on the holidays!